
A big part of making Word work better for you is molding the way it works to the way you work. Most users don’t know they’ve got options for how certain features perform. Some things you’ll want to get out of your way, some things you’ll want to make easier to access. Here are my suggestions for changing Word’s defaults to work better in a legal environment:
First Step: Going into Options
Most of the default behaviors in Word are set within the Options dialog box. To get there (a necessary prerequisite for all of the exercises below), go to the File tab and click Options.
Once you’re in Options, you’re ready to rock.
Set Justification to the WordPerfect Setting
Here’s a little secret (that’s not so much of a secret to WordPerfect users): Word’s full paragraph justification algorithm just isn’t as good as WordPerfect’s. In Word, you’ll occasionally see gaps within words that look like this:

Unless you turn off full justification for your paragraphs, that little gap is never going away. Infuriating!
Fortunately, there’s a way to force Word to use WordPerfect’s justification algorithm to calculate how much space to add within a line to make it perfectly justified. In the Options dialog box, go to Advanced, then scroll all the way down until you see Compatibility Options:
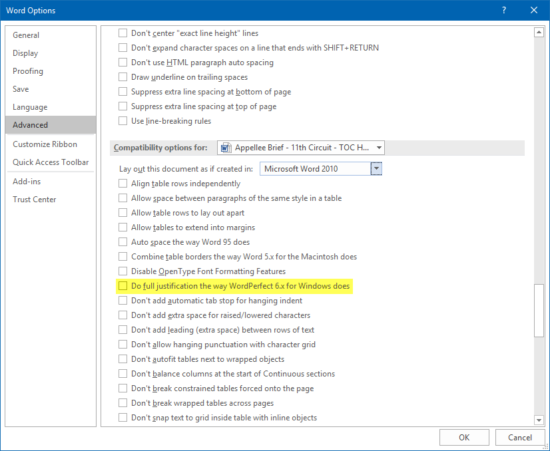
You should see the check box “Do full justification the way WordPerfect 6.x for Windows does” (highlighted in the illustration above). Check that box, and your document justification should behave much better.
(If you’re using Word 2016 and the document was created in that version, you may not have any Compatibility Options listed. Click here for some technical explanations about how that feature has changed in version 2016.)
Personal Templates and Other File Locations
If you’ve got a collection of custom templates you use to create documents, you’ll want to have the easiest access possible to all of them. “Easy access” means that, when you use the Create New Document command, you get a dialog box or screen that includes your custom templates.
The recent versions of Word differ somewhat in how those templates are presented, but the way you point Word to your template collection is the same in all the Ribbon-based versions. Within Options, go to Save:
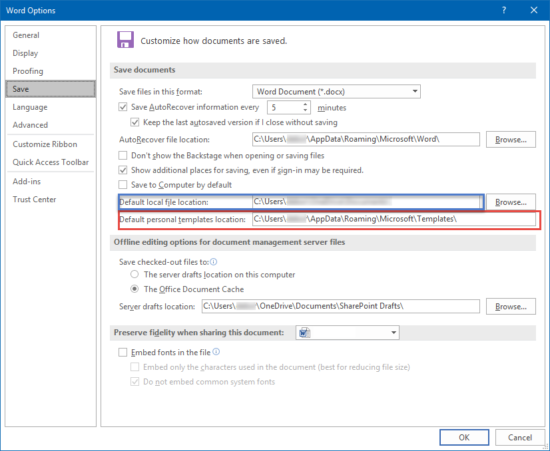
In the box enclosed in red above, you can specify where Word can find your custom templates; in the box enclosed in blue above, you can tell Word the default location you want save your documents to.
Automatic Backup
While we’re in this Save section, look up a bit. See the section that says “Save AutoRecover information”?
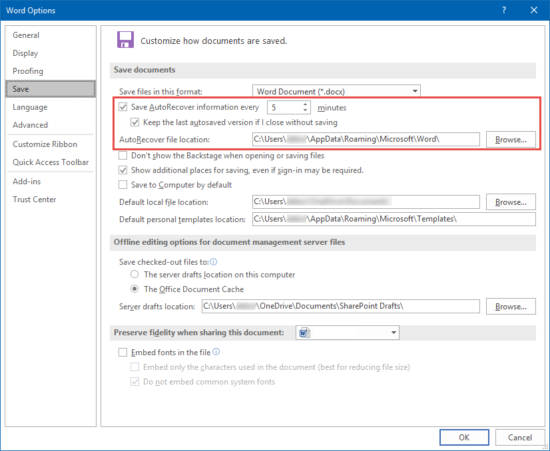
You’ll want to set that timing to five minutes or less. If Word stops unexpectedly (think power blackout or “blue screen of death”), Word will have saved a backup of your file within the last X minutes, minimizing the amount of re-work you have to do. The AutoRecover file location is just what it sounds like: this is where Word stores your AutoRecover files while you’re working.
Paste Options
If you’re like a lot of the Word users I encounter, you probably copy-and-paste a lot. And if you do, here’s where you can prevent most paste-induced formatting issues.
Under the Advanced area in Options, you’ll see Paste Options:
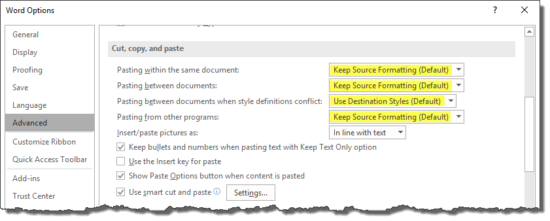
I’ll tell you straight up: Word’s paste defaults don’t cut it. In a law firm context, I believe my settings (illustrated above) work better. Here’s why.
In my experience, when legal professionals paste text from one document to another, they want to preserve some of the original formatting (e.g., italicized case names) but conform other formatting (like font types and indents) to the destination document. When moving text from one place to another in the same document, however, most people want to retain all of the original formatting.
Given those preferences, the settings illustrated above will set your default paste to what you’ll want most of the time. Of course, sometimes you’ll want to deviate from the default, but that’s the subject of a whole other post.
AutoCorrect and AutoFormat As You Type
AutoCorrect and AutoFormat As You Type are meant to be helpful features, and they are … most of the time. The problem comes in when either of them do something unexpected or just downright annoying.
For instance, AutoCorrect (the feature that corrects your spelling when you type “teh” but mean “the”) can often wreak havoc in legal documents. For instance, try typing (c). Once you press the spacebar, you’ll probably see a copyright symbol. Or type a series of dashes and hit the Enter key. Congratulations! Your last paragraph now has a border you’ll have a devil of a time getting rid of.
Disabling the more troublesome features of AutoCorrect and AutoFormat As You Type is easy. Again, within Options, go to Proofing and click the AutoCorrect Options button:
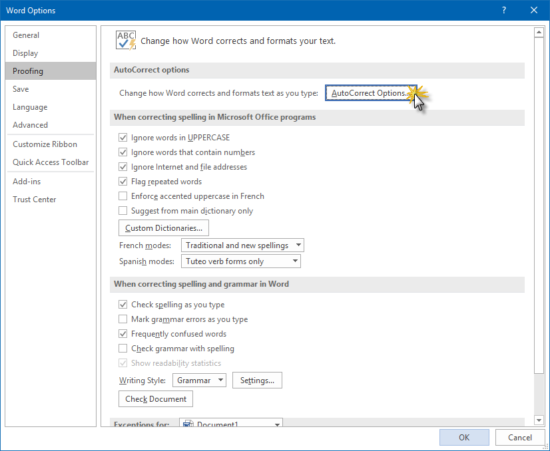
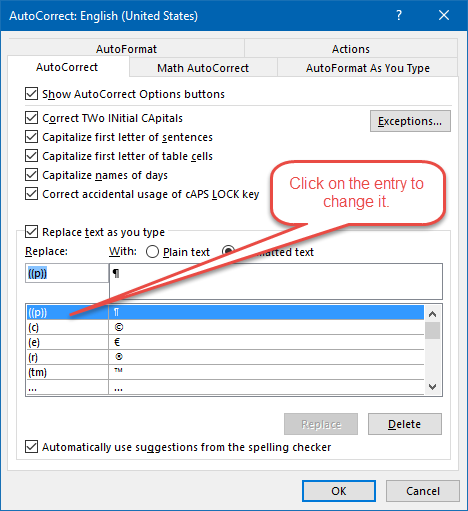
Both the AutoCorrect and Autoformat As You Type features are accessible within this dialog box. Within AutoCorrect, you can either delete troublesome entries altogether or modify them so they’re not in your way. See, for example, what I’ve done with the paragraph symbol entry:

Instead of the trigger being “(p)”, I simply added another pair of parentheses to it: “((p))”. That way, the paragraph symbol doesn’t pop up every time I create a list that gets all the way down to “p”.
With Autoformat As You Type, you just uncheck a few boxes. Here are my recommendations:
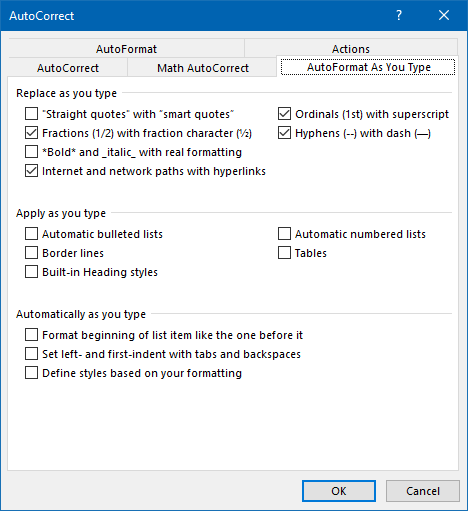
These settings keep stuff like this from happening:
- Type three dashes in a row, pressing Enter, and seeing a horizontal line appear that you can’t get rid of
- Type a “(1)” in front of a paragraph and see Word hijack it and turn it into an autonumbered list (complete with bad indentation)
- See Word decide that every subsequent line needs to be formatted just like the prior one
- Have your Styles get jacked up every time you make an exception to a Style’s formatting
About that very first checkbox: I personally don’t like “smart quotes” (mostly because of some negative experiences with the way they print when the text is pasted into text-only programs like timekeeping software), but that (and everything else above) is a personal preference. Experiment on your own and find what works for you.
So, are there any ways Word works by default that you’d love to change? Maybe there’s a setting for that. Hit me up in the comments below!
I love and look forward to your quick fixes. It has saved me many times at the law firm. I am like a child when I see and email with your address. I get so excited.
Thanks a million.!!!!!
Oh, thank you! That means a lot, truly.
This is probably obvious to most people, but how do you insert the paragraph symbol in the AutoCorrect dialog box to take advantage of the ((p))?
Not obvious at all! Although the paragraph symbol is already in the list by default (in other words, the only thing you’d have to correct in this scenario is the “(p)” to “((p))”), you can add it or any other symbol or pre-formatted text by using this technique: https://lawyerist.com/118550/use-words-autocorrect-text-expander/
Deborah, I don’t know how to otherwise comment on your article titled “Where did that line come from (and how do I get rid of it)?” that you just sent. So I just figured I’d answer here. (It actually fits here, tool) You suggest to (1) fix it and (2) to prevent it from happening that we go into the Options/Settings screens. I have found (for me, at least) that it is perfectly satisfactory to keep the defaults (sometimes actually I do want Word to automatically paint a solid line for me). If I don’t want that result, I just press Alt-Z. My three dashes are restored and I can type more if I need to. Alt-Z just a lot easier than (1) correcting in the way you describe and (2) figuring out how to insert a solid line when I actually want one.
Alt-Z is my favorite key because I can have my cake and eat it too. (It undoes just about every correction Word tries to make.)
Roy
I tend to suggest disabling that option because I can’t think of any good reason anyone would want an automatic paragraph border. But, hey, to each his own.
Hey Deborah, Herbert Ray here – I have a book almost finished, but it has a page in it with only two sentience’s in it. How can I either one, erase the page and renumber, or, back everything up without messing everything up! HELP!
Not sure I’m following your question. Are you trying to delete a hard page break after those two sentences? Clarify, please.
There’s another quick fix to those AutoCorrect actions you really didn’t want – as soon as the autocorrected thing appears (lilke the line across the page), Ctrl-Z will undo it and leave you with what you originally typed in. Easy as!
Well, there’s prevention, and there’s cure. Whichever works for you. About 90% of the time, there’s more than one way to accomplish a desired result in Word.
Dear Deborah, thank you for your article. You address many of the things that have aggravated me for years. One thing I have still not solved is how to get personal templates to travel with a document, so that when I have a document based on a personal template, the keyboard shortcuts, for example, and the style formatting, will go with it when someone else works on it. Thank you