
I had a good conversation with Sam Glover on the Lawyerist podcast in 2015 about stuff I wish lawyers knew about Microsoft Office. It was a chance to say some things about how well (read: badly) many law offices use Microsoft Office.
One of those items on my ideal law firm training agenda was Styles. Sam and I are pretty much in agreement on why Styles is an essential Word skill. It’s so baked in, you can’t possible NOT use Styles, but very few Word users in my experience really use that feature well.
That part of the conversation was going pretty well. Then, at around the 13:08 mark, Sam asked me, “What’s the number one reason that lawyers ought to use Styles?”
And I froze. Then I mumbled something about getting all your level-three headings to update all at once.
Disaster.
So, because I can do a do-over on my own blog, here are six reasons I think you really ought to up your Styles game sooner than later.
1. Modify one, update all
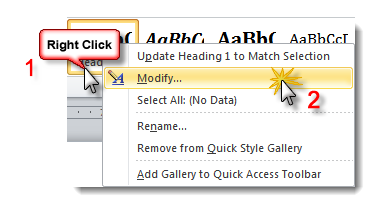
Okay, my point about updating all your level-three headings at once wasn’t a complete waste of time. What I meant was this: if you’ve used a Style to format a heading (or a paragraph or a numbering scheme or … whatever), rather than using direct formatting (where you painstakingly apply all the formatting to every bit of text individually), you can re-format whole swaths of text merely by updating the Style.
You want to change the font on everything, including the footnotes and headers and footers, all at once? Right-click on the Normal Style on the Home tab and hit “Modify”, then change the font in the drop-down on that dialog box. And it all updates across the document. Like magic!
2. Build a Table of Contents … painlessly
Do you want to put a table of contents in your documents? Start your document right by using Heading 1, Heading 2, Heading 3, etc., as subheads for your document.
Then, when you’re ready to insert a Table of Contents, go to the References tab, and hit Table of Contents on the far right. The two automatic tables are already set up to use the Heading Styles to define the TOC outline. But if you want to define your own, you can go all the way down to Insert Table of Contents, then click Options in the Table of Contents dialog box and pick whichever Styles you want to appear in it. Even Styles you added to Word’s list are available.
3. Make that Table of Contents clickable
Once you build that Table of Contents, hover your mouse over one of the entries. See that notice pop up? That tells you that, if you hold down your Control key and click, you’ll be taken directly to that heading.

What’s even cooler is (depending on what method/software you use) that feature carries across to pdfs you create based on that document. Convenient!
4. Navigate through long documents using the Navigation pane
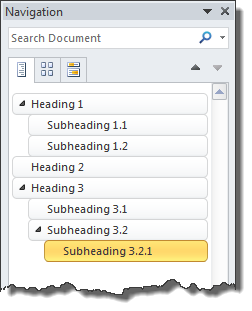
Another benefit of using the Heading Styles: If you pop up the Navigation pane on the left (available from the View tab), you can use those headings to navigate through the document, rather than endlessly scrolling up and down.
5. Drag-and-drop blocks of text within your document
Within that same Navigation pane, you can use that same Style-driven organization to drag entire sections around. If you decide want to move subsection 3.2.1 up a level, you don’t have to scroll down, select the text with your mouse, blah, blah, blah. Just take your mouse over to the Navigation pane and move that bad boy where it needs to be. How simple is that?
6. Make numbered headings both painless and self-updating
You can bake self-updating numbering into headings. You combine that with being able to use the Navigation Pane to move an entire section of your document somewhere else and having the Table of Contents update itself and … well, you become unstoppable.
So, here’s my plea: Make it your goal to at least start using the Heading Styles this year. Learn how to modify them to fit your document (Sam’s right, that blue crap Microsoft forces down everyone’s throat is awful). Start playing with the above possibilities. I think you’ll find your documents become more editable and useful and re-useable and just plain function better.
(I wish I could direct you to the recording of the podcast, but it’s since been deleted. Bummer.)
Hi – I am one of those Word users who doesn’t touch Styles. I appreciate your current post and I read them all. We are mostly a self-taught group in our law firm. How do I even begin? I was a WordPerfect user for a bazillion years and am about into Year 4 of Word. Word has been great, I just don’t understand Styles whatsoever, so I am one who formats “piece by piece”, as we did using WordPerfect. I would like to learn it, but have no clue where to begin.
Here’s a good place to start: https://lawyerist.com/31458/using-microsoft-word-styles/
Do I need to assemble a Styles class? Anybody else interested?
Yes, yes, yes! A Styles class, please! I have read all the posts, tried to do what is recommended, but nothing seems to “stick” and I am always piecing the document together at the last minute. Everything (meaning my so-called styles) are such a mess, I’m afraid I need to delete it all and just start from scratch. When I open a document, the list of styles in the document is longer than my arm!
Styles class – YES!
Dear Deborah
I agree with your 6 points. However, may I suggest that all of them are more powerful if you compose your document in Outline View, not in print or page view? In Outline View, you get all the automatic benefits that you list, in the docx as you work, without needing to use the navigation pane. Hardly anyone seems to know about Outline View.
Sincerely
John Prebble
John,
Unless I’m working in a very large doc with a lot of revisions that include moving text around in the doc, I prefer the Draft view to the Outline view. In the “old” days, all of us who were legal word processors were required to work in Draft (at that time called Normal) View.
And I agree with you, almost no one uses either of these more efficient alternates.
The best reason of all: Styles save time and time is money. 🙂
My tip is to use Customize the Ribbon to eliminate the awkward large Styles group — and use some of the freed-up space to add a button to the Styles dialog pane instead. It is far less tedious to use, and takes up almost no space: the dialog box can be docked or be displayed anywhere on the desktop as a resizable floating panel (especially useful for dual-monitor setups).
You can bring it up with a keyboard shortcut too: Shift-Ctrl-Alt-s.
Good tip!