
One firm I’ve been working with has been in “trial mode” for a couple of weeks now. Thankfully, I wasn’t directly involved (I’ve seen the looks on the faces of the people who are, and I don’t want that), but I did pitch in where necessary. And “where necessary” included helping a secretary with making file folders for 100+ trial exhibits. The one requirement the paralegal had was the trial exhibit numbers had to be large and easy to read.
Thankfully, the trial exhibit list that was e-filed with the court was done in the form of a table. So that made it easy to use Mail Merge to create the labels, because we had a ready-to-use data source.
Mail Merge tends to intimidate people. In the last few versions of Microsoft Word, Mail Merge has gone from a fairly straightforward process through what I consider a gosh-awful “wizard” that just seemed to make the process even more intimidating back to a somewhat simpler interface on the Mailings tab on the Ribbon. To understand Mail Merge, you have to get a few key concepts straight in your head.
The Elements of a Mail Merge
Every Mail Merge requires two parts:
- A main Word document (for example, a letter, envelope, or set of labels). This will contain the text that will remain the same for each merged copy.
- A data source that contains the variable data, such as a list of addresses or, in this case, the exhibit numbers and descriptions.
The Mail Merge process involves configuring your main Word document to pick up the various elements in the data source to create multiple copies with the different variables. In plain English, what this means is that you’ll get multiple copies of your document, each one with a different set of data. In the case of our exhibit labels, we’ll get one or more sheets of file folder labels, each label with a different exhibit number and description.
Setting Up the Data Source
Since the paralegal had already done the exhibit list in the form of a Word table, it was pretty easy to create a data source. All I had to do was copy the table with the exhibit numbers and descriptions into a new document and save it. (The reason I couldn’t simply use the pleading itself as a data source is that Mail Merge would’ve been confused by all the text outside of the table. What I needed was just the table with the exhibit numbers and descriptions.)
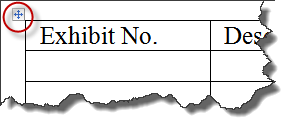
The easiest way to copy an entire table is to hover the mouse over the top left-hand corner until you see a + sign. Click that, and the entire table is selected. Then you can use CTRL-C to copy it and CTRL-V to paste it.
You can use other things as data sources too, like Excel spreadsheets, a delimited text file (if you know how to make a delimited text file, you probably don’t need me to teach you how to do Mail Merge), or even an Outlook contact list or Windows Mail address book. The common element is that these files organize data in columnar fashion (even if they don’t display it that way, like with an Outlook contact list) so that each piece of data has a data label, such as “exhibit number” or “description”. That’s what makes it possible for Mail Merge to repeat the correct pieces of data in the merged file. In the example above, the “data labels” are in the first row of the table where I have “Exhibit No.” and “Description”.
Setting Up the Document
Once you have your data source set up, it’s time to set up the actual document that will retrieve the data. In this case, we’re going to be doing labels, although you could just as easily use the same instructions to do envelopes, letters, or any other kind of document.
The Mailings tab in Microsoft Word is set up, from left to right, to take you through the Mail Merge process. In other words, you start with the leftmost buttons and work your way across to the right. You’ll notice that some of the buttons in the illustration below are greyed out. That’s done to force you to do the process in order; as you make choices on the left, buttons to the right will become active.

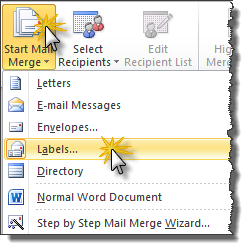
To start the process, I’m going to close my data source document (you’ll see why in a moment), start a new document (quickest way: do CTRL-N), then click Start Mail Merge in the Mailings tab and select labels:
Word’s going to need to know what kind of labels you want, so you’ll pick here:

In this case, I’m using the Avery full sheet filing labels. You can usually find the label number (in this example, 5166) somewhere on the front of the package. Click OK, and your new document is replaced with labels pre-populated with the Next Record field (more on that later).
Inserting the Data into the Document
It’s at this point that we start inserting the data elements into the document. When I say “data elements”, I’m talking about the exhibit numbers and descriptions. We’re going to use merge fields to do this. Since Mail Merge sort of assumes that were merging data to mail something (hence the name), we will click on Select Recipients next.
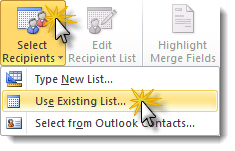
Since we already have the list of exhibits saved in a table in a Word document, we’ll just navigate to that document and choose it:
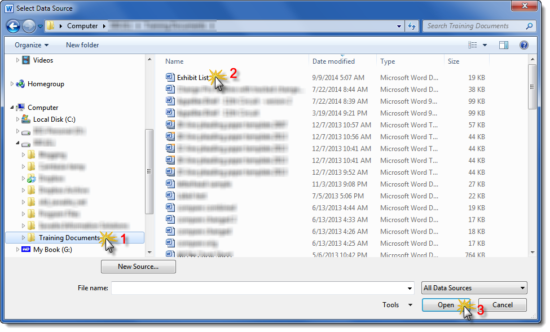
Once we do that, other options on the Mailings tab of the Ribbon start to be enabled, because now we can insert the data elements. First, place the cursor into the first cell of the table and click Insert Merge Field:
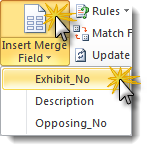
We’ll repeat that step for the other two fields (the Description and the Opposing_No, which is a cross-reference to the other party’s exhibit number if we have it), putting in any spaces, parentheses, tabs (to insert a tab within a table cell, use CTRL-TAB, since TAB alone will just move the cursor to the next cell), etc.
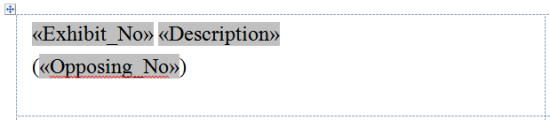
What we end up with is this:
Making the labels easy to read
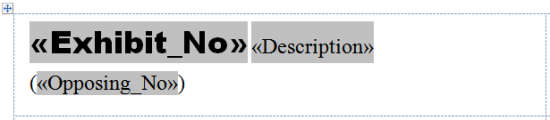
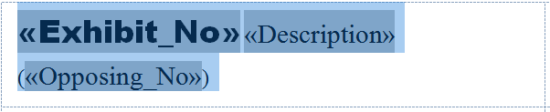
Right now, what we have is a label that’s formatted with our default text style. It’s just Times New Roman in 10 point size. That’s not “easy to read”.
What a lot of people don’t realize about these Mail Merge data elements is they can be individually formatted. So to make the Exhibit_No stand out, I select the entire field with my mouse and set the text to the Arial Black font at 14 point size using the Font drop-down on the Home tab. You can use whatever font you like and have available on your system. I just happen to like that one because it stands out so well from the rest of the text. I can also select the Description and Opposing_No fields the same way to bump the text size up to 12 points.
What I end up with is this:
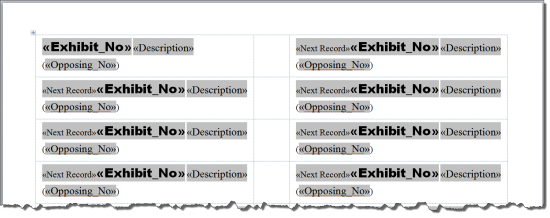
If that looks good to you, it’s time to duplicate that throughout the rest of your labels. Select all three fields with your mouse and copy it with CTRL-C:
… then place your cursor after the <<Next Record>> field in the following cell and hit CTRL-V to paste it. You want to paste that text after the Next Record field because the Next Record field tells Mail Merge to increment to the next record. In other words, the first label will print the data from the first exhibit, then the Next Record field will prompt Mail Merge to move to the second exhibit before printing the exhibit number, description, and opposing number on the second label.
So your second label will look something like this:

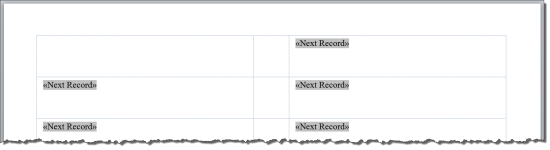
Repeat that same pasting action throughout all of the labels, so you end up with something like this:
Now’s the time to preview the results of the merge. This allows you to see the actual data in the table cells and make any formatting adjustments. To preview what the merged labels will look like, click the Preview Results button, which gives us this result:

Oops. I can see looking at this that the Opposing Number will drop-down a little too far if my Description extends beyond one line. So I go through my labels and delete the hard return between the Description and the open parenthesis just before the Opposing Number field so that it will just follow the Description on the same line. When I click the Preview Results button again, I get a better looking result:

Creating the Labels
Now we’re in the home stretch. At the far right end of the Mailings tab is the Finish & Merge button. Click it, and there are three choices:
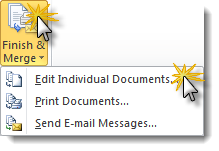
If you’re feeling inordinately confident, you could go straight to Print Documents, but I recommend you go to Edit Individual Documents, which will merge the data and the label document into a new Word document. That will allow you to tweak individual labels for formatting problems you didn’t catch in the Preview Results step.
Don’t Stop with Labels
Congratulations! You’ve been through an entire Mail Merge. All of the skills you picked up here can be used with other documents like letters. And remember, “data source” doesn’t have to be a Word table. If you ever run across an Excel spreadsheet that contained some data you need to merge into a Word document, the process is really no different.
So go forth and merge!