
To print an envelope in Microsoft Word:
- Go to the Mailings tab on the Ribbon
- In the Create command group on the left, click Envelopes
- On the Envelopes tab of the Envelopes and Labels dialog box, address and print your envelope.
One of the most basic functions in Microsoft Word is printing envelopes and labels. You’d think that such a basic function would be intuitive. It’s not. One of the most frequent questions I get from longtime WordPerfect users is, “Where on earth are the envelopes (or labels) in Word?”
Where to find envelopes in Word
In all the Ribbon-based versions of Microsoft Word, you can find the envelopes and labels feature on the Mailings tab.

Over on the far left in the Create command group are Envelopes and Labels. Click Envelopes to start:

You’ll notice immediately that the dialog box you get is for both Envelopes and Labels. Depending on whether you clicked on Envelopes or Labels on the Mailings tab, the correct tab on this dialog box will be selected by default. However, you can always click on the other tab if you’ve changed your mind.
At this point, you could simply type something in the Delivery address field, put your return address in the indicated field (if it’s not there already, which it would be if Word had already saved it there), and hit the Print button. And most of the time, that’ll work just fine.
Note: Word will insert the delivery address for you if you place your cursor right before the address:
Formatting your envelope with Options
Let’s explore this Envelopes tab a bit further so you’ll know how to tweak the settings on your own. Click the Options button.

Since I’m in the U.S., this is defaulting to a standard No. 10 envelope, but the drop-down provides a whole list of choices. Microsoft Word also has some embedded default settings for the placement of both the delivery and return addresses, but you can adjust those too, as well as the font used.
You can switch the size envelope by using the drop-down under Envelope size:

If you want to change the font of either the delivery or return address, click Font under either Delivery address or Return address and choose the font, font style, and size within that dialog box, then click OK:


Depending on the size envelope you chose, Word will automatically calculate an appropriate placement for the return and delivery addresses. If you want different settings, you can either use the spinners beside Delivery address or Return address to increment the settings (for U.S. users, these settings will be in inches), or you can type a custom horizontal (from left) and vertical (from top) setting into the From left and From top fields:

Let’s switch over to the Printing Options tab:

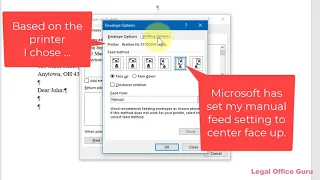
Again, Microsoft Word (based on your printer driver) will set a default feed method for your envelope. Most of the time, you can just leave this setting alone. However, if you find that your envelope needs to be fed into the manual feed or envelope tray in a different way or position, you can reset that here by clicking the picture that looks most like your printer’s feed method and choosing either Face up or Face down. You should consult your printer’s help files or manual to determine the best setting to use.
Tip: You can usually look at your printer’s manual feed tray to determine whether manually-fed documents like envelopes should be inserted face up or face down and even which end should be inserted first:

Printing your addressed envelope
Going back to the Envelopes and Labels dialog box, we see that we have two options for producing the envelope: Print and Add to Document. Clicking on Print, obviously, sends the envelope straight to the printer. If you are manually feeding your envelope from your printer’s manual feed tray, be sure you’ve already inserted it correctly per your printer’s instructions.
Clicking on Add to Document inserts a page at the top of your document formatted as an envelope:

One of the advantages of choosing Add to Document is that you can go back and change the envelope’s font or other formatting settings if you need to. A disadvantage, however, is that you must be careful how you print the document, particularly if the envelope must be manually fed and the remainder of the document does not. The easiest way to print just the envelope is to go to the File tab and select Custom Print and type “1” into the box beneath:

Or, you can click your cursor somewhere into the envelope, go to the File tab and choose Print Current Page:

Experiment and figure out which works best for you and your setup.
My favorite method: Save an envelope template
Speaking of “what works best for you,” this brings me, as an aside, to my own preferred method for creating envelopes. I have saved a blank template already formatted as an envelope, with the margins set up to place the delivery address 2.5 inches from the top and 4.0 inches from the left (standard for a no. 10 envelope).
To do this, I went to the Layout tab (Page Layout in earlier versions of Word) and performed several actions.
First, I set the Paper Size/Type to a No. 10 envelope:

Next, I set the page Orientation to Landscape:

Finally, I set the margins to 2.5 inches top, 4.0 inches left, and 0.5 inches bottom and right.


Setting up paper size, orientation and margins within the Page Setup dialog box
And yes, it’s possible to do all these steps within the Margins and Paper tabs of the Page Setup dialog box itself by clicking on that tiny grey launcher arrow in the lower right-hand corner of the Page Setup section of the Layout tab (or double-clicking on the horizontal or vertical rulers if those are in view):

Embedding your return address into your envelope template
If you want a pre-printed return address embedded into your envelope template, you can place that address into the header of your template. To do that, double-click into the header section of your envelope:

You’ll notice that, because you’ve set your left margin at 4.0” (or whatever measurement you chose) for your delivery address, your header starts at that measurement too. That’s clearly not what you want for your return address!
To fix that, right-click and choose Paragraph:

That will take you to the Paragraph dialog box. There, you can set a negative indentation to move your return address over to the left:

If you want to reposition your return address relative to the top of the page, adjust the Header from Top setting in the Position command group of the Header & Footer tab (visible whenever your cursor is positioned inside a header or footer).

Now you can type in your return address:

Click Close Header and Footer in the contextual tab shown above to finish.
Saving your formatted envelope as a template
To save your envelope as a template, go to the File tab and click Save As > Browse, and in the File Explorer window, be sure to choose a template format (in this case, .dotx):

Here’s a video with more information on saving templates (including setting up your Personal Template folder and saving templates to it):
The advantage of an envelope template: Always available!
Now that I have an envelope template already saved, I always have an envelope form I can start using immediately. This enables me to print multiple letterhead envelopes throughout the day. All I have to do is copy and paste addresses from letters in progress and print from the envelope form. Once I have the envelope(s) I need, I can simply delete the address(es) and reuse the form.
Word 365
Adding to the list of limitations of Word 365, Microsoft advises that, while the online version can open a document previously formatted as an envelope, you can’t create a new envelope or print one.
Is there a way to *insert* a label at a certain cell on a page of, say, 30 labels of addresses already filled in?
Also what are best practices for printing labels? Can you buy label printers to sit on desks? We re-use pages of 10-up labels for everyday one-off address labels, file labels, etc. and it just seems clunky, sometimes….figuring out which ones are still available for printing, getting the Word doc to line up with that, etc. Not sure if this makes sense and of course it’s not a Huge Deal. I can explain better if yr intersted….
I have added a button for “create envelope” on my quick access bar (customize toolbar/more commands/all commands/envelopes). When I am in my letter, I can just hit the button and most of the time it sees and grabs the address block properly and sends it to the envelope/labels window and then I hit enter and it is on its way to the envelope feeder on my printer. Another option is to highlight the address block and then click the button and the same thing – it opens the envelope/labels box and I just hit enter – and away goes the envelope (which are letterhead, No. 10 envelopes by default for me). If I need to change the envelope size, or create a label, same thing – just click the button on the quick access toolbar!
We use Avery 8164 shipping labels preprinted with our logo at the top. Since switching to Word 2007 (from 2003), we are unable to select that size label and create a label which will allow us to begin the address for enough down on the label to avoid printing over the logo. How do you customize this label size to print lower on the label?
I would adjust the internal margins of the label (I’m able to select 8164 in my copy of Word 2007, so if you cannot, you may need an update). On the Layout tab of the Table Tools ribbon, there is a section on the right called alignment. The left-most button is Cell Margins. Click that, then adjust the margins (probably just the top margin) to fit your print area to make room for the return address.
You may need to make a template for your preprinted labels so you don’t have to do this every single time you print labels – I don’t see anything in the label customization itself that would store an internal margin.
Maybe this will be covered in part 2, but I run a small biz and we’re trying to use avery 5264 labels for everyday mailings (sheets of 6). Ideally, I want to design the label to be custom, with our logo and return address, and print those out and have them ready when we want to use them individually. I can do that right now, no problem. What I can’t do is easily print an individual label using my now custom pre-printed labels, and line up the mailing address below my own logo and return address. Help! Have looked on the internet to no avail. Using Office/Word 2010.
Someone else asked that question not too long ago – see my answer above. Essentially, if you adjust the top interior margin of the labels using the Cell Margins feature in the Table Tools menu, the address can be placed far enough down to make room for your return address. You’ll probably want to set up a template for future use.
Hope that helps!
I get the info for how to print a single envelope, but I cannot find info on how to use a list of people/addresses and print a whole bunch of envelopes with that list (for instance, names & addresses on envelopes for my Christmas letter mailing). I use Word 2007 and got to the point of creating a list of recipients … I put in 30. But, I couldn’t find anywhere to save the list in preparation for printing out the envelopes and now can’t find the list. Is it gone? How and where on the computer do I save such a list???
I don’t know where you “put in 30” addresses, so I can’t really answer the question of where they’re now saved. The feature you’re likely referring to is Mail Merge, which is found on the Mailings tab.
If all you’re wanting to do is print a straightforward set of envelopes without filtering, etc., the easiest thing to do is use the single envelope method above and place a hard return (CTRL-ENTER) between each address so you have multiple envelopes, then save that document for future use/editing.
This is my first time using Word 2010 and I’m stunned at the hoops one has to jump through to print a simple envelope. In Word 2003, if you clicked on the first line in your address block and brought up the envelope window, the address was ready to print. It was that simple. It was a godsend. Now you have to go through all these machinations just to print an envelope. It has to be the single stupidest thing Microsoft has done to Word.
@Todd — Before you go plotting to assassinate Bill Gates, you should know that you can do the exact same thing in the Ribbon-based versions of Word. Just as you described, you put your cursor at the beginning of the address block, then go to the Mailings tab and click Envelope. The best explanation of the technique I’ve seen is at http://vmanning.posterous.com/snail-mail-a-lot-add-envelopes-and-labels-to .
It may not make you feel any better about Microsoft as a whole, but, hey, you can now print envelopes without “all these machinations.”
Yes, that’s the way it’s supposed to work. Unfortunately it doesn’t anymore. Now when you select your address block, all you get is the window with the Envelope Options and Printing Options tabs. It doesn’t give you the window with your selected address already on the screen.
Well, I might be wrong about this one — it seems to work in 2007, but I haven’t tested it in 2010 yet. I’ll keep you (all) posted.
Ed: See the yellow alert box and bonus video (31 seconds) above. Short answer: Yep, it still works in version 2010.
I have Word 2010 and I tried to print an address as was recommended and it worked. I also use my outlook address book by clicking on the icon above the delivery address area. Both seem to work OK.
My problem is that the standard address block is 4 lines and a specific width. If I go outside those dimensions, the printed address is truncated, no matter what the dialog box shows. How can I get around this limitation?
In the Envelopes and Labels dialog box, click Options and adjust the “From left” and “From top” measurements from Auto to whatever measurements will fit your address.
And this is why I recommend the method listed above under “The Guru’s Favorite Method,” because it’s a lot easier to accommodate longer addresses, etc.
I’ve tried all the basic stuff to get the additional lines and space – I used options to change the print location. Nothing has worked. It will print up to 5 lines (no more), but it still truncates the width.
Then you should try my second suggestion.
I have been trying to print addresses on envelopes and it limits the print area to much smaller than I want and the envelope can handle. I have figured out how to override the height, but cannot change the width. Any advice?
First of all, make sure your envelope definition is correct. In the U.S., it’ll generally default to #10 envelope. Otherwise, you’ll need to click on Options in the Envelopes and Labels dialog box and adjust the Delivery Address settings (I’m guessing you’d adjust the From Left setting to get more width).
How can I print multiple envelopes with the same address on them? Everytime I go through the letters/labels I only can print one label at a time.
If you need multiple envelopes with the same address on them, I would use the technique described above (see “The Guru’s Favorite Method”). The Envelopes/Labels dialog box does not allow you to print multiple copies.
I get pleasure from, cause I found exactly what I used to be having a look for.
You’ve ended my four day long hunt! God Bless you man. Have a nice day. Bye
When I print envelopes of any size the font is very tiny, and is printed on the left side of the envelope. The print preview of the envelope shows everything is in order,but face problem on printed envelopes. Please advise why this is so. Thank you.
Have you checked/adjusted the settings here (accessible from the Envelopes dialog via the Options button)?
It sounds like (a) your “printing to the left” problem is either due to your envelope size being wrong or the “from left” measurement needing adjusting and (b) your “print is too small” problem could by fixed by clicking the Font button.
Otherwise, you may need to tinker with the settings on your print driver re: how manual feed items are positioned.
Is there a way to change the fonts? This is my first time using “words” and I can’t believe it actually printed up and envelope…one thing that I did notice is that the address is dead center on the envelope. Is that the way it’s supposed to look?
Thank you so much, oh and by the way, since I just turned 70 October 8th I want you to know what intestinal fortitude it took for me to even try this”’LOL!
To change the font, click Options at the bottom of the Envelope dialog box, then the Font button on the Envelope Options dialog.
If your address is not placed correctly, you may have chosen the wrong envelope form (Size 10, etc.). Either choose the correct envelope or adjust the margins on the Envelope Options dialog.
Hi!
i want to know how I can add the FRONT portion of the envelope on word so I can add logo and print it as well. That’s actually the biggest problem I have now.
Thanks! Looking forward to hearing from you!
@April – You can actually add the address within the dialog box in the Return Address field (see illustration above). However, it won’t take a logo. For that, I’d recommend creating an envelope template with the logo, etc. (using the method outlined above, adding the extra step of saving the document for future use), and just type the delivery addresses in as you need them.
Thank you, thank you, thank you for giving me a reasonable way to do a series of envelopes!
I am trying to print on an envelope a US Postage Permit in upper right corner. I have a text box with information but do not know how to get in the proper location for a #10 envelope. thanks.
Generally, text boxes can be dragged to the appropriate location with the mouse by hovering the mouse cursor over the text box border until you see a cross-hatch style cursor, then holding down the left mouse button and dragging the box to the desired location. Be sure to confer with the U.S. Postal Service about the exact placement of your Postage Permit.
I do agree with all of the concepts you have introduced in your post.
They are very convincing and can certainly work. Still, the posts are very brief for
newbies. May just you please lengthen them a little from next time?
Thanks for the post.
I do envelopes all the time, and know how to do it, but when i bring the address in from my outlook contacts, it prints United States of America below the address….how do i make it stop doing this?
Courtesy of TechRepublic (because I’ve not seen this before):
1. Open Outlook.
2. Open Outlook’s Contacts folder.
3. Go to View | Arrange By | Current View | By Location.
4. Scroll down until you see the first record with United States of America in the Country/Region column.
5. Delete United States of America from the Country/Region cell of that record.
6. Select all remaining records with United States of America in the Country/Region column.
7. Click the Country/Region cell of one of the selected records and drag it to the empty Country/Region cell created in step 5.
I have always been able to print envelopes fine – until the past couple of weeks. The settings seem to be the same – #10 envelope, all the others on Auto – however now the return address prints so far to the left that only the last few letters of the return address prints – and the “to” address prints far to the left on the envelope. I have tried changing the settings, but that does not change how the envelope prints. Any suggestions are much appreciated.
Judging from your description (and assuming that the “settings” you’ve changed are the ones in Envelope Options), I wonder if there’s suddenly some “slippage” in the way your printer is feeding through the manual feed. Have you had a repair person look at it?
Try putting the return address in a text box and moving it manually away from the edge.
I have address lists I print every quarter. Sometimes (Windows 10), positioning your cursor at the beginning of each address block will succeed in having it print, but every once in a while I have the cursor at “John Smith” and “Sally Black’s” address will print. Once this happens, I have to highlight John’s entire address to have it print correctly. Help!
@carol – I can’t tell from your description whether you’re talking about envelopes or labels, and I’ve never heard about placing your cursor in front of an address to print it. Normally, you tell Word to print a specific page in the Print dialog box.
And what do you mean by “Windows 10”? The last version of the Windows operating system is 8.
My boss has been attempting to copy and paste the address to the envelope and it is causing the spacing to become double. However, when you go into paragraphs it shows single spacing. Is there a way to copy and paste the address from the letter to the envelope?
That’s probably not double-spacing your boss is seeing — that’s extra spacing before/after paragraphs. (Sounds like a semantic difference, I know.) Select the text you’ve just pasted and go to the Page Layout tab and look for a section called Paragraph over to the middle-left of the Ribbon. In that section, make sure that both the boxes under “Spacing” have “0 pt” in them (you can either type “0” straight in or use the down arrow to increment the number down). That should solve the problem.
Longer term, you may want to change the spacing setting on the Normal text style to make sure that doesn’t happen again (http://legalofficeguru.com/fixing-word-2007-2010-line-spacing/).
Why is your boss copying and pasting in the first place? Why not just use the Create Envelopes feature and print the envelope from within the document?
http://vmanning.posterous.com/snail-mail-a-lot-add-envelopes-and-labels-to
is no longer available to view
Yeah, she’s moved from now-defunct Posterous to Posthaven. That post is now at http://vmanning.posthaven.com/snail-mail-a-lot-add-envelopes-and-labels-to.
When I enter the delivery and return addresses and check Print/Preview, I see only the shape of a #10 envelope but no words, and the envelopes print blank. What am I doing wrong? I’m in Word 2011 for Mac, but the overall options are similar to those for Word 2010. Many thanks if you can help!
@Latrona:
Check on these settings:
It could be that the printer is feeding through in a position (left, right, or center) other than where Word is expecting it, so you’re printing on thin air while you’re feeding an envelope through.
I have no idea if these dialog boxes are similar to your Mac version, but I hope that helps.
You can do this right from any web browser using http://goenvelope.com. It’s a web site/app that creates a PDF of your addressed envelope in many popular envelope sizes. You can print the envelope from your browser to your printer using standard PDF controls.
Just so we have the proper transparency, the above comment was posted by an employee of goenvelope.com.
My coworker and I are both using Word 2010 for printing mailing addresses on envelopes. Mine defaults to “Auto” for both the “From Left” and “From Top” choices in the Envelope Options dialog box. This makes it print in the correct location. My coworker’s does not default to those settings for the two positions specific for delivery addresses. She has to manually change them to “Auto” each time she prints an envelope. I’ve tried to find a way to make hers use that as the default, but I’ve been unsuccessful in making her program keep those settings. Any suggestions?
My brother recommended I may like this web site.
He was totally right. This submit truly made my day. You can not imagine
just how so much time I had spent for this information!
Thanks!
You might want to explore the EnvelopeExtra AutoText entries which let you put graphics and more formatted return addresses on an envelope. See http://www.gmayor.com/Alternative_Return_Addresses.htm.
Interesting idea — thanks for the link!
i want to add 5 to 6 lines in the address but it takes only four lines..any suggestions
@Sarita — See that section above that says “The Guru’s Favorite Method”? You can add as many lines to your envelope that will fit using that method.
I would like to print addresses, including return address on small, thank you card size envelopes (5.13 x 3.63 in). Microsoft word says it won’t allow this size – minimum 6.4 x 2.13. Help!
Way at the bottom of the Paper Size dropdown is a selection called “Custom Size”. Use that.
We are printing promotional material, So I am trying to put the notice (Promotional Material) under the already printed return address, but I cannot get it to line up. It indents an inch. I assume its because I’m probably outside the return address field. It there a way to do this?
If you’re trying to insert a message to go to the left of the mailing address and underneath the return address, I’d suggest using a text box to do that. Look on the Insert tab. See http://wordribbon.tips.net/T007726_Inserting_a_Text_Box.html and http://wordribbon.tips.net/T009889_No-border_Text_Boxes_by_Default.html for two good tutorials on how to insert a borderless text box into your document.
I would sometimes like to switch printers for printing the address on an envelope. How can I do that? This would be especially handy printing 9×12″ envelopes. Using Win 7 and MS Office 2010.
I really appreciate your website. Thank you for doing it. Regarding your preferred envelope method, I can sure see why it would be useful to have that envelope form ready to go all day, but I wonder if creating a template could save that daily formatting chore?
That would be a good way to go. In fact, it would probably save you from having to have the form up on a window all day long.
I am trying to print 50 envelopes with the same address, but only one at a time will print, I have to reorder each envelope in the print screen even when I request multiple copies on the first print request?
Help! I need to find out how to print name and some times Codicil to the "Last Will and Testament of
(person's name) . . . Envelope using a Sharp MXM356N printer. Any suggestions?
I don’t know anything about that specific printer.