
(Note: to view this full-screen, click the double-arrow button near the lower-right-hand corner of the video player.)
You don’t need me to tell you what a paragraph is — it’s a block of text that ends with a “hard return” you insert by pressing the Enter key. In Microsoft Word, paragraph formatting covers such attributes as justification, indentation, line spacing, and what WordPerfect calls “block protect” (called something else by Word, but we’ll get to that later).
Our first lesson in paragraph formatting focuses on justification and line spacing. Some of these instructions will be familiar to anyone who’s worked with a Windows word processor before, but here’s how you can set each of these attributes in Microsoft Word:
Justification/Alignment
Justification (some prefer the term “alignment”) refers to how the paragraph is aligned horizontally.
- Is it flush against left margin with a ragged right edge? It’s left-justified.
- The opposite (aligned with the right margin with a ragged left edge)? It’s right-justified.
- Is each line centered between the left and right margins with ragged edges on the left and right? It’s centered.
- Are both the left and right edges of the paragraph flush against their respective margins? It’s full-justified.

And it’s super easy — here’s how you do left-justify, right-justify, center, and full-justify in Microsoft Word (either with your mouse or your keyboard).
Using the Ribbon
Paragraph formatting is controlled by the Paragraph section on the Home tab of the Ribbon:

You can control justification/alignment of a paragraph by clicking on the following buttons:

Left-Justify – leaves a ragged right edge to the paragraph (like a typewriter would)

Center – centers the text on each line

Right-Justify – aligns the text even with the right-hand margin
Full-Justify – gives paragraphs an even left and right margin by proportionally spacing the text
Using the Paragraph dialog box
More paragraph formatting commands (including those we’ll be talking about below) are contained in the Paragraph dialog box. To open the dialog box, click the launcher (the small arrow in the lower right-hand corner of the Paragraph section of the Home tab of the Ribbon):

That will bring up the Paragraph dialog box. The justification settings are near the top, in a drop-down box:

Justification shortcut keys
Your speed typists will want to know the following shortcut keys for paragraph justification (a.k.a. paragraph alignment):
|
Press this … |
… to do this: |
|---|---|
| CTRL-L | Left justify |
| CTRL-R | Right justify |
| CTRL-E | Center justify |
| CTRL-J | Full justify |
Line spacing
Setting line spacing is easy, too, and you’ve got the same options here: Ribbon and keyboard.
Setting line spacing on the Ribbon
There are two places on Microsoft Word’s Ribbon that you can adjust line spacing. You can either use the drop-down in the Paragraph command group of the Home tab:

… or you can click the dialog launcher arrow in the Paragraph command group of the Layout tab (called the Page Layout tab in Word 2010) to bring up the Paragraph dialog box:


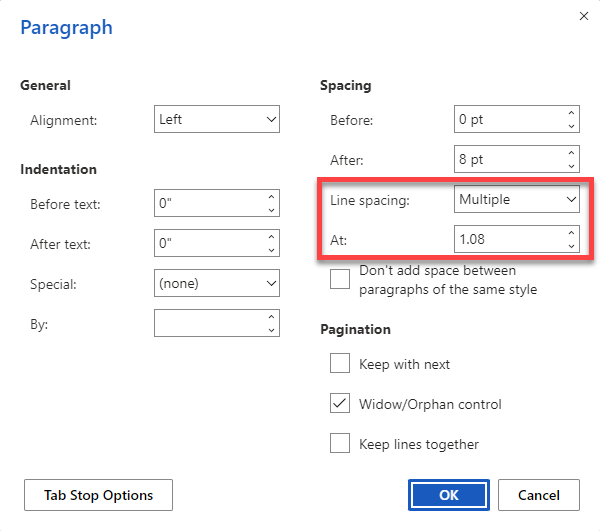
If you choose Multiple (see the area inside the red square above), you can use any positive number for the “at” value (the area inside the blue square above), and Word will adjust the spacing based on the number of lines (“3” would be triple-spacing, for example). If you need to be more precise, choose “Exactly” and use points, centimeters, or inches as your unit of measurement in the “at” box.
Setting line spacing with the keyboard
You speed typists out there can use the following shortcut keys for these standard line spacing options:
|
Press this … |
… to do this: |
|---|---|
| CTRL-1 | Single spacing |
| CTRL-2 | Double spacing |
| CTRL-5 | 1.5 line spacing |
Space Before/After Paragraphs
In addition to setting line spacing within a paragraph, you can add extra space between paragraphs. This option comes in especially handy in a couple of situations:
- In a letter, even though your text may be single-spaced, you can put extra space after each paragraph to avoid having to put two hard returns (pressing the Enter key twice) to start each new paragraph. For example, if your font is sized 12 points and your text is single-spaced, you could insert 12 points of space after each paragraph to leave one extra line’s worth of space between paragraphs.
- You can set space before and after headings to give each section of your document a bit more “breathing room” and create a more aesthetically pleasing layout.
This, by the way, is the feature that’s often behind this complaint: “I chose single spacing, but I still see extra spaces between my paragraphs!” If you run into this predicament, you’ll soon know how to check (and correct) this setting.
Again, you can access these settings via either the Ribbon or the keyboard. On the Ribbon, you can use the spinner (a field with up and down arrows on the side that enable you to change the value in the field up or down) in the Paragraph section of the Layout tab.

You can also adjust these values in the same Paragraph dialog box shown above.

That check box for “don’t add space between paragraphs of the same style” deserves a special mention. It’s handy when you’re working with headings (you want space before and after a two-line heading, but not space between the first and second lines separated by a hard return).

Where that check box becomes a bit of a pain in the neck is when it’s checked for regular text paragraphs. Don’t get frustrated if you reset before/after paragraph spacing and it doesn’t seem to “take”. Select all of the text that doesn’t seem to be behaving properly, then head into the Paragraph dialog box (click the launcher arrow in the lower right-hand corner of the Paragraph section of either the Home or Layout tabs) to make sure this box isn’t ticked.
Let’s Review
Here’s what we’ve covered in this tutorial:
- Justifying/aligning text in a paragraph — left, center, right and full justification — using either the Ribbon, the keyboard or the Paragraph dialog box
- Setting line spacing using the Ribbon or the keyboard
- Including extra space before and/or after paragraphs
- Checking the “don’t add space between paragraphs of the same style” box to troubleshoot line spacing.
This was kind of a long lesson! Thanks for hanging in there with me.
The next tutorial in this series will cover …
Paragraph indentation and tab settings. See you then!