
(Note: to view this full-screen, click the full-screen button near the lower-right-hand corner of the video player.)
In this lesson, we’re going to walk through both the Compare and Combine functions on the Review tab — what the difference is between the two, and in which scenario you should use each.
The trigger point: you’ve distributed a document and the edited copies are coming back — what did you get?
You’ve distributed your document for review, and now those reviews are coming back. But in what form? Once you open up however many review copies you received, you’ve got to figure out whether you need to flag what they’ve changed and how you’re going to do that. How do you do that?
The moment of decision: Compare or Combine?
You’ll notice there are two choices under the Compare dropdown on the Review tab:
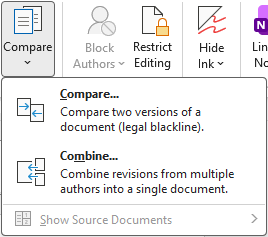
In some cases, the document you distributed comes back revised, but without any tracked changes. The reviewer simply made their edits without turning on Track Changes, so now it’s up to you to figure out what they’ve changed. For that scenario, use Compare on the Review tab.
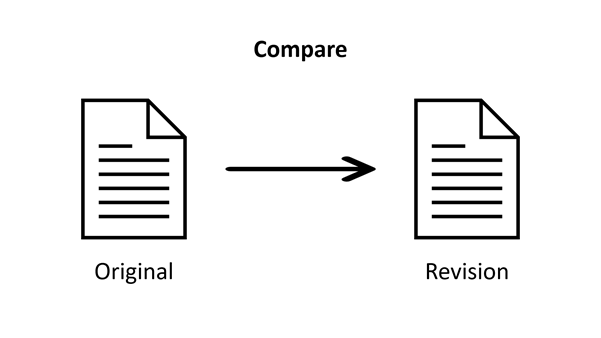
Compare lets you take two documents (usually one original and the other one an edited version of the same document) and produce a redline (a.k.a. “legal blackline”) showing what’s changed from the original to the edited version. Compare will assume that the revised version you’ve received from your reviewer does not have tracked changes. If you use Compare on a document with tracked changes, you will get an unreliable result. If you need to use Compare to verify their changes, accept all their changes in a separate review copy, then compare your original with their revised copy.
But sometimes you’ll get multiple review copies back, and they’ve used Track Changes to make their edits. So now your job is to reconcile all of those into a single reviewable draft. For that scenario, use Combine on the Review tab.
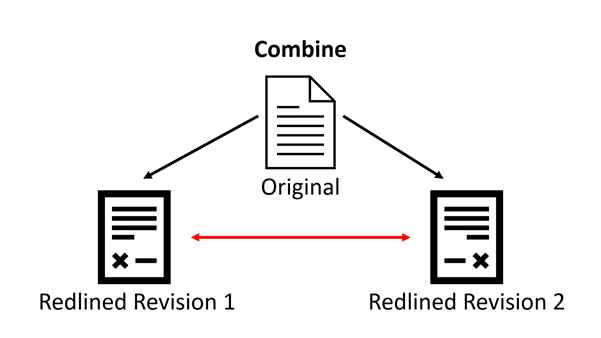
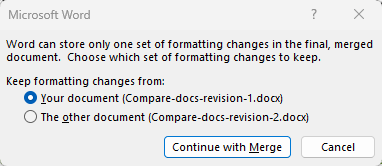
Combine takes two documents that have been edited from a common source document (in other words, they’re similar enough to make for a meaningful comparison) with revisions marked with Track Changes and combines the two sets of changes into a single document with everyone’s revisions marked. While the Combine feature can mark everyone’s text revisions, it can only preserve one set of formatting revisions. And if your two reviewers have made different revisions to the same bit of text (e.g., they’ve both edited the same sentence), both sets of text revisions are reflected in the resulting combined document.
So, to summarize: use Compare with two documents that don’t have revisions marked with Track Changes; use Combine with two documents that do have revisions marked with Track Changes.
Comparing two documents
For the first scenario, you’re taking an original document and comparing it with a revised version of that same document to produce a redline showing what changes have been made. To start, go to the Review tab and click the Compare drop-down and choose Compare:

You’ll get a dialog box that looks like this:


Typically, the drop-downs beneath “Original document” and “Revised document” will give you a list of recently-accessed documents. You can always click Browse at the top of the list if you don’t see your document listed. What I generally do is make sure I have both the original and revised documents open in Word before I start this process; that way, I know I’ll be able to find them in this list easily.


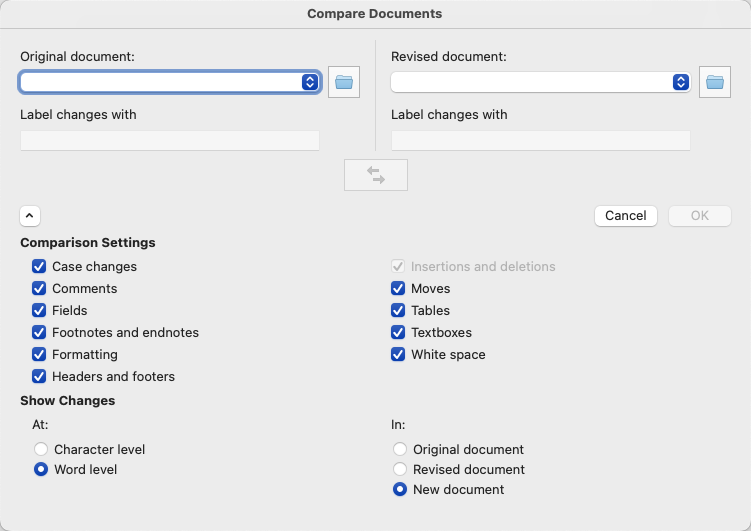
Once you click More in the lower left-hand corner, you get additional choices for how (and whether) Word will mark up various types of changes. My personal preference is to uncheck both the headers and footers and white space checkboxes (highlighted in yellow above) because marking those changes rarely tells me anything useful.
And the difference between showing changes at the character level vs. word level (highlighted in blue above) is this: If I take the word “View” and change the “v” to lower-case, character-level will show the change as “Vview”, whereas word-level will show it as “Viewview“. Make sense?
Click OK and you’ll get this in Word for Windows:

(In Word for Mac, you’ll get a regular redlined comparison result without the two extra panes on the right.)
Whoa, Nellie! That looks complicated, right? That’s about all the detail you could possibly stand. But this is actually pretty cool:
- My compared document is the one in the largest view in the middle. That’s got the redline all marked up showing the changes.
- Over on the left is a summary of my revisions. That’s the Reviewing Pane, and if you’ll look up at the top in the Tracking section, you’ll see that it’s dark grey. That indicates that the Reviewing Pane is active. Click on the drop-down, and you can switch it from vertical (its current setting) to horizontal (which would put it across the bottom), or you can switch that completely off.
- Over on the right are my original and revised documents, the ones that were used to create the compared document in the middle. And here’s what’s cool: When I scroll down the compared document, the original and revised documents scroll right along with it! If you don’t see your original and revised documents over on the side, click Compare on the Review tab, then choose Show Source Documents > Show Both. (You’ll notice you can also show either the original or the revised document alone, if you prefer.)

If that screen’s visually too busy for you, you can always shut down any one of those views (the Reviewing Pane on the side or bottom, the original document or the revised document) by clicking the little “x” in the upper right-hand corner of their views.
Want to save that redline for later reference (by you or someone else)? Just click on the File tab and choose Save As to save it as a new Word file.
Combining two redlines
But here’s a different scenario: Perhaps your reviewers were willing to use Track Changes, but they couldn’t use it in the same physical copy of the document. So you got back two different documents, each with that person’s tracked changes.
How do you reconcile those?
Here’s where Combine comes in handy, because it can take two redlines (at least, two at a time — if you’ve got more than two redlines to combine, stay tuned) and combine them into one. Be sure you don’t accept or reject any of their changes before combining. That redline markup is essential for Combine to do its job. Once that markup’s gone, so is any hope of attributing changes to their respective reviewers.
Now, I will warn you: in some cases, the results can be a bit messy. But if you’re trying to get one document to show you what everyone’s done so you can accept/reject revisions, this is how you’d do it.
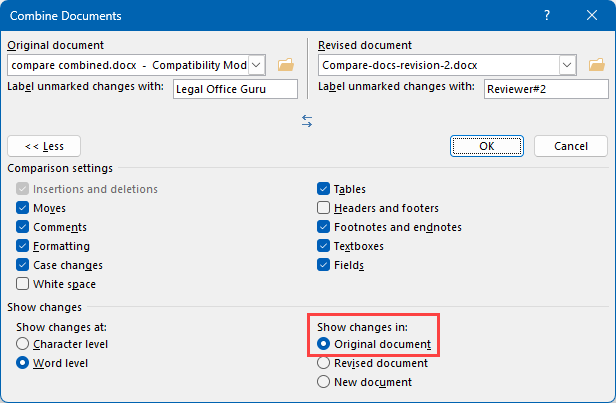
The process is very similar to the Compare feature:


As noted above, Combine will display everyone’s text changes but can only show one reviewer’s formatting changes. Word will ask you which reviewer’s formatting edits to retain before displaying the result.

Looks pretty familiar, right? Notice how the changes I made in the Label unmarked changes with field for each document (Author1 and Author2) now show up in the panes on the right (circled in red and green above).
(Again, on the Mac, you get a single redlined document without the comparison panes. The tracked changes, however, do attribute each change to the correct author.)
And, just like in the Compare example, scrolling one document scrolls all of them so you’ll see the same section of the document across all the viewports.
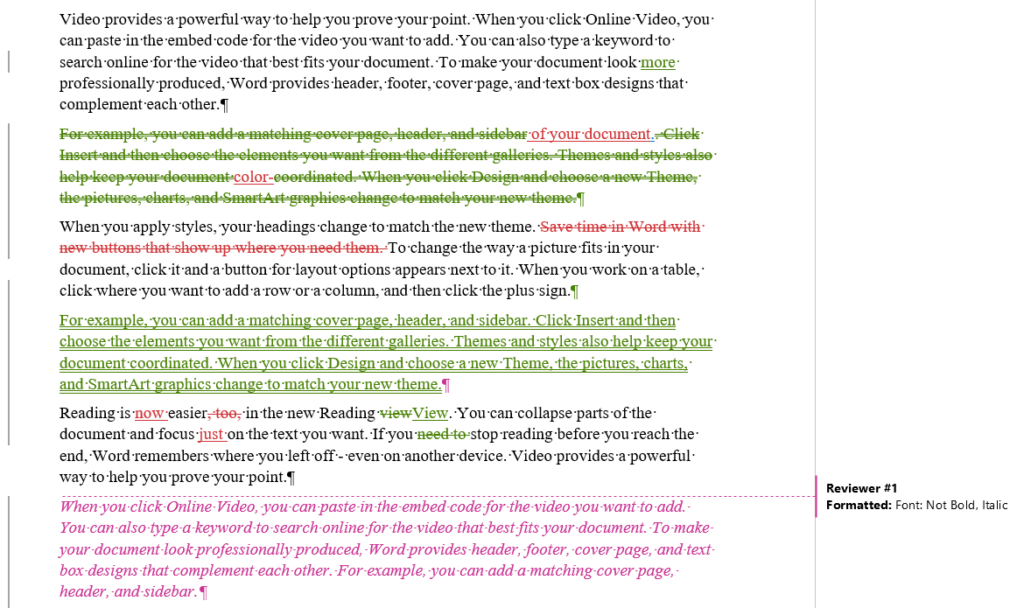
In this particular example, I have all of the changes of a particular type set to one color (rather than being specific to a particular author). That means that any deletion, regardless of who did it, is in red, and any insertion is in blue.
If you’d like for each author’s changes to be more visually obvious (different colors for each author), click here for the lesson demonstrating how to configure Track Changes Options.
When you’ve got more than two redlines
If you’ve got more than two redlines to compare, you’ll have to work iteratively (multiple repeated operations). Don’t accept or reject any changes in any of the redlines, because you need to preserve them for Combine to work effectively.
Combine the first two and save that combined document with a name that clearly defines it as combined redlines. Don’t accept or reject any changes in your combined document so all the tracked changes remain intact. That combined document from that first Combine operation now becomes your new “Original,” and the third reviewer’s redline becomes the new “Revised” version.
Rinse and repeat for any additional redlines, with one change: you’ll want Word to show your newest changes in the Original document rather than a New document as illustrated below, so your combined document will successively incorporate each new set of changes.
Be sure to re-save your “combined” document between each round of combining redlines. If you want to preserve a “rollback point,” save a new version of your combined document after each combine. It’s a good idea to keep careful notes of which reviewers you’ve processed in each round.
Once you saved your final “everybody in the pool” combined document, review it carefully, especially watching out for conflicts between reviewers. (See “An important note about conflicting changes” below)
One caution: While each reviewer’s name is carried across these multiple combine actions, their assigned color for their edits may change. One question I get a lot is “can we assign specific colors to specific reviewers?” The answer is “no.” If your Track Changes options are set to assign different colors to different reviewers, the color assigned to any specific user could change when the file is reopened or is opened on a different machine, but each reviewer will have their own revision color. In other words, if Bob’s insertions were blue and now they’re purple, you didn’t break anything. That’s just the way Track Changes works.
Reading the combined result
So you’ve combined two (or more) redlines. What do you get?
Let’s take a look at these sample documents:
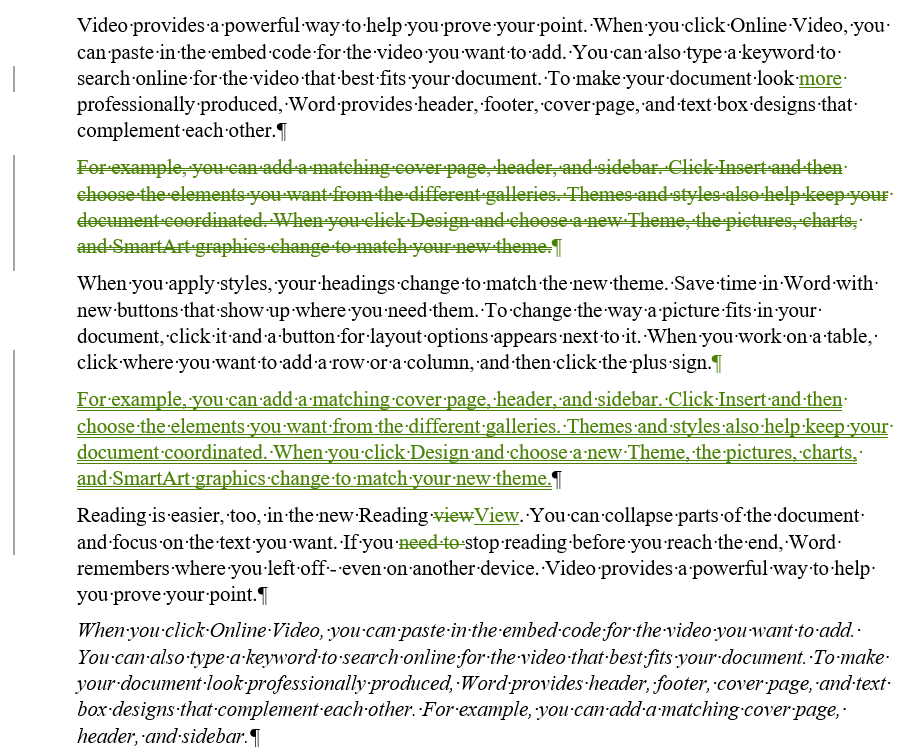
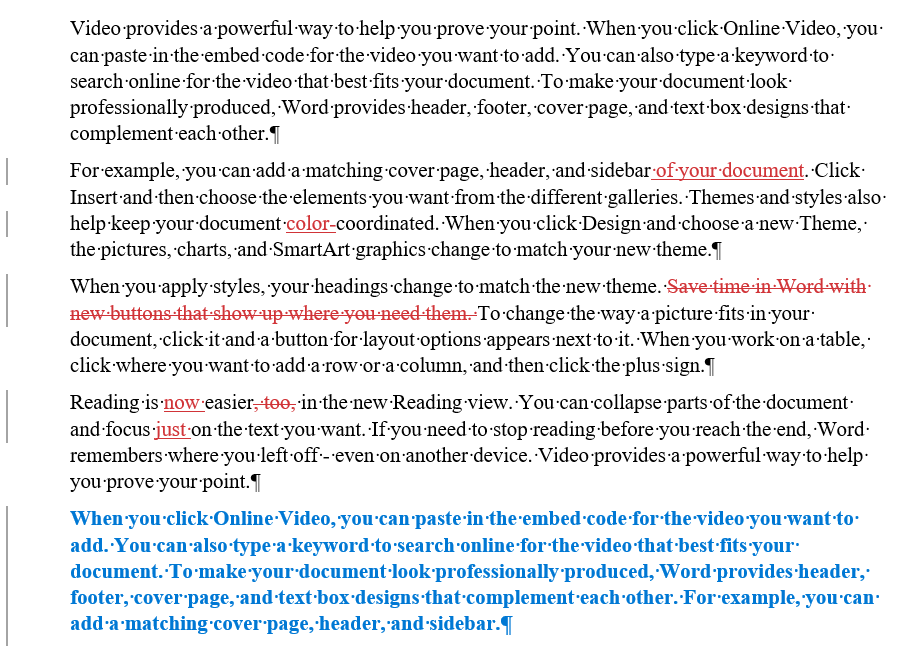
Depending on how much your reviewers’ changes overlap with each other, this could be confusing. For instance, Reviewer #1 moved that second paragraph (hence the double underline) after the paragraph that followed it in the original document, while Reviewer #2 added the phrase “of your document” and the word “color” but left the paragraph in place.
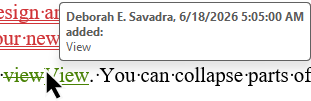
If your Track Changes Options (covered in a later lesson) are set up to show each reviewer’s changes in their own color, reviewing this onscreen or on paper becomes much easier. If each author doesn’t have their own color, this is something that’s going to be easier to review onscreen than in paper form. In either case, hover your mouse over each marked change, and Word will show you who made the change, and when.
An important note about conflicting changes
If two (or more) reviewers’ changes conflict, Word cannot (and really should not) “declare a winner,” so to speak. That’s your job. Be sure to review your combined document carefully to spot any such conflicts and only use Accept All where you are sure you understand its effect on your document. You may want to first save a copy of the combined document (because once you accept/reject all changes, all that attribution is gone), then review the changes one-by-one to ensure you’ve seen (and judged) everything.
Pop quiz
So, do you really understand which of these tools to use when? Let’s find out. Stop and think about these scenarios for a moment, then click the dropdown arrow on the right to find out if you’re right.
Let’s Review
Here’s what we’ve learned:
- The difference between Compare and Combine
- How to compare two documents to produce a redline
- How to combine two redlines to reconcile two sets of changes so the single resulting document clearly shows which changes belong to which reviewer
- How to iteratively combine multiple redlines when reviewing more than two sets of revisions, again with the single resulting document clearly showing which changes belong to which reviewer
- How to read and interpret the output from Compare or Combine operations
The next tutorial in this series will cover …
Scrubbing the metadata from your document (including tracked changes and comments).
Click Mark as Completed below to mark this lesson as “complete,” then click Next Lesson to go to the next lesson.
My compare document does not show the three documents, the compare document in the middle and the two original documents on the side (where I can scroll down the middle). I only see the (messy) compare document in the middle with all the changes noted in balloons on the right hand side.
What do you see (with your comparison document open) when you click on this menu?
Thanks for teaching the Combine function, Deborah. Now that I know what it does, I’ll try it out!