video thumbnail

(Note: to view this full-screen, click the double-arrow button near the lower-right-hand corner of the video player.)

If you don’t already have your Table of Authorities 10-Step Pre-Publish Checklist handy, check below this video for a link to download your copy. We’ll be walking through this guide, step-by-step, so pause the video now to grab your copy and print it out.

I’m going to be reviewing each of the 10 steps on the pre-publish checklist. So you’ll know when we’ll be covering which step, here’s the timeline.

STEP 1 (0:33)

Alright, let’s get started. As you can see from the checklist, the first step is to go to File Options Display to ensure that all the codes and other hidden text are NOT displayed. This can affect pagination, which in turn will introduce errors into your TOA. We’re going to do that by going to the File tab, choosing Options at the bottom left, then clicking Display on the left. On the right, there’s a section called Always show these formatting marks on the screen. Make sure all of those checkboxes are off, especially the one on the bottom that says Show all formatting marks.

Next, look under Printing Options and put a check in the box next to Update fields before printing. Click OK to finish.

STEP 2 (1:31)

Now, it’s time to ensure that everything in your document is up to date. The fastest way to do that is to select all the text and update everything all at once, and the fastest way to select all the text is CTRL-A. That selects all of the text in the main body of your document (which excludes the headers, footers and footnotes). Once you have everything selected, press the F9 key in the function key row across the top of your keyboard to refresh all.

STEP 3 (2:01)

Now that everything’s updated, check your citations against your brief. I tend to do it the old school way by printing the Table of Authorities pages, then scrolling through the brief and checking every citation against the TOA.

If you find a citation is missing, momentarily turn on Show/Hide on the Home tab (it’s the button that looks like a paragraph symbol) and check to see if there is in fact a TA code after that citation. If the citation is missing from the Table of Authorities, chances are that there’s either no TA code there at all, or there’s an orphaned short citation code that has no long citation code associated with in.

In the former instance, you may have simply forgotten to mark that citation. On the other hand, if there’s only a short citation, that’s not sufficient to prompt Word to list it in the Table of Authorities. Remember, you must have one (and only one) long citation TA code associated with each authority for that citation to show up in the Table of Authorities.

STEP 4 (3:09)

If, rather than a missing citation, you find a particular authority listed twice, you have more than one long citation TA code within your brief for that citation. Find the second long citation TA code and delete it, then re-mark all of the second and subsequent citations for that authority to be sure that all citations point to a single, correct long citation TA code. Remember, you can only have one long citation TA code, and it has to be the first instance in your brief of that particular authority, and all of your short citation TA codes must contain the same correct short citation text after the /s to properly connect them all to the original long citation code. If it’s too confusing to try to get all this reconciled, go through your brief and delete ALL of the citation codes for that particular authority, then re-mark them.

STEP 5 (4:16)

If you find that a particular citation is listed in the wrong category, turn on Show/Hide again, find the first instance of that particular authority, and check the number listed after the /c against this list. You can edit this number directly, turn Show/Hide back off, then refresh your Table of Authorities with CTRL-AF9 to have it re-appear in the correct section of the Table of Authorities.

STEP 6 (5:20)

If any of your citations have pin cites or other text errors within the TOA entry, find the first instance of that authority, turn on Show/Hide, and make the necessary correction within the quoted text after the /l part of the TA code. Once you’ve made that correction, turn Show/Hide back off, then refresh your Table of Authorities with CTRL-A, F9 to see your corrected entry within your Table of Authorities.

STEP 7 (6:14)

If the text of the entries in your Table of Authorities are wrapping too close to the right-hand margin, you can adjust the Style of the Table of Authorities entries to adjust their margins. Click inside your Table of Authorities, and on the References tab, click Insert Table of Authorities, then Modify. Choose the Style called Table of Authorities, click Modify, then Format Paragraph, and adjust the right indent setting in the Paragraph dialog box. This will adjust the indentation for all of the Table of Authorities entries.

STEP 8 (7:12)

If you find the spacing around the Table of Authorities categories not quite to your liking, or you’d like more or less vertical space between your individual entries, you can fix that easily by adjusting the Styles that control those elements. Click your cursor inside your Table of Authorities, go to the References tab, click Insert Table of Authorities, click Modify, then choose the Style you want to modify (either Table of Authorities for the individual citation entries or TOA Heading Style for the category headings). Once you’ve chosen the appropriate Style, click Modify Format, then either Font or Paragraph depending on what you’re changing, and make the necessary adjustment in that dialog box. Once you’re done, click OK until you’ve returned to your brief, turn Show/Hide back off, and refresh your Table of Authorities with CTRL-AF9 to see your changes.

STEP 9 (8:59)

If you’re not happy with the way Word has chosen to sort the entries in any particular category, I’m afraid I have some bad news for you: there’s no way to change the alphanumeric sorting scheme within Word. There are, however, a couple of workarounds.

In most versions of Word, you can select the entire text of the Table of Authorities and use CTRL-SHIFT-F9 to convert it to text, at which point you can manually re-order the entries as you like. Obviously, you’ll want to be sure your Table of Authorities is 100% complete and correct before doing this, and given that this command can yield some unpredictable results in some environments, you should hit the Save button or use CTRL-S first before performing this step.

If this is a frequent problem for you, or if your court requires a format like Points & Authorities not supported by native Microsoft Word, you should consider a third-party solution such as Best Authority. Whichever third-party solution you choose should feature a sophisticated sorting algorithm that can account for tricky things like numbered statutes.

STEP 10 (10:13)

Once you’re happy with the content and formatting of your Table of Authorities, repeat steps 1 and 2, and cross-check again. If it’s all good, you’re ready to publish!

Download your TOA Checklist below

Click here to download your Table of Authorities 10-Step Pre-Publish Checklist.

Obviously, since this is a document you’re going to be submitting to the court, you want everything to be absolutely right. But what if something’s amiss in spite of your best efforts?

Problem 1: Incorrect citations (video demo)

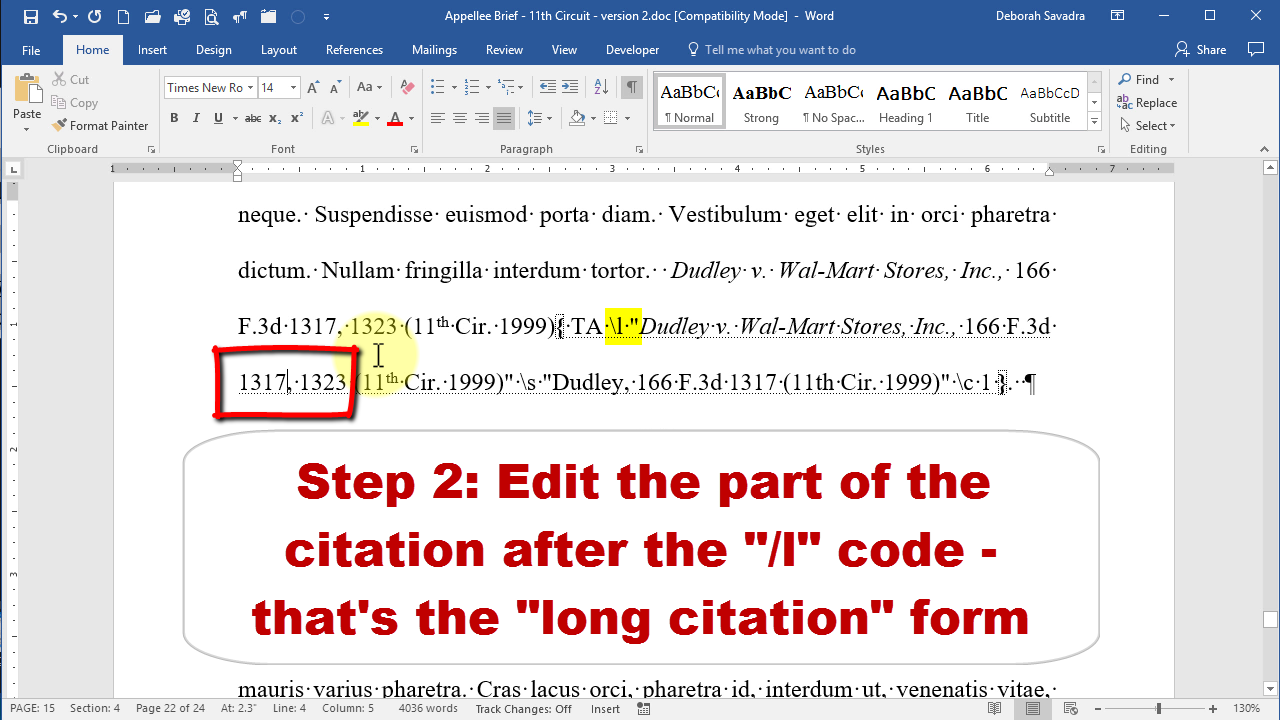
For instance, say you’ve spotted a pin cite within your Table of Authorities:

Don’t make the mistake many do by trying to edit this directly in the Table of Authorities, because every time you refresh your Table of Authorities, that pin cite will come back. Instead, find the first citation of that case in your brief and edit the TA code itself:

video thumbnail

Note: This video is intentionally silent (except for mouse clicks).

(Note: to view this full-screen, click the double-arrow button near the lower-right-hand corner of the video player.)

You can use that same technique of editing the TA code to fix other problems such as inconsistent short cites (your first clue: you’ll see the same case listed twice in your TOA) and authorities listed in the wrong TOA section (change the single-digit number after the /c in the TA code). Review “So, how does Word mark a citation?”  for details on how to read and correct a TA code.

Problem 2: Cases or other authorities missing from the TOA

If one of your cases or other authorities isn’t listed in the TOA, you’ve forgotten to mark it. If you don’t see something like this:

… or this:

… next to all of your citations, then either you don’t have Show/Hide turned on, or you’ve forgotten to mark them.

Problem 3: Cases in footnotes not listed in the TOA

In some versions of Word, there is a known bug that prevents the Table of Authorities from picking up TA codes from within footnotes. There is a fix available for it; see your IT person or Microsoft Support for details.

Problem 4: A single case or other authority listed twice

The first citation of any case or other authority should be the only one marked with a “long” citation (see the Gupta illustration just above for an example of that TA code); all subsequent citations to that authority must be marked with a “short” citation (like the Harris TA code shown just above). The long citation codes include all three parts: the “/l”, the “/s”, and the “/c”. The short citation codes only include the “/s”. If you have more than one long citation code for one particular authority, that will cause that authority to appear twice in your TOA. Remove the extra long citation and re-mark that as a short citation.

Problem 5: Case citations wrapping awkwardly

Sometimes, the way a particular citation wraps to the next line irks you. In some versions of Word prior to Office 365, it is possible to manually force a citation to wrap the line at a particular point. Just find the long citation (remember to turn on Show/Hide so you can see the “TA /l”), place your cursor at the desired wrapping point, and press SHIFT-ENTER. It’ll look awkward in the TA code, but that will enable it to wrap at just the right spot.

The most convenient and foolproof way, however, is to edit the underlying Style for TOA entries (the Table of Authorities Style). See the video at the top of this lesson (at the 6:14 mark) for a demonstration.

What about Points and Authorities?

First, the bad news: Microsoft Word, as it is of the time of this post, cannot produce a Table of Points and Authorities as required in some courts. (For those who don’t know, a Table of Points and Authorities is a sort of amalgam of the Table of Contents and Table of Authorities, so that the authorities cited are listed under each of the brief’s headings rather than divided by Cases, Statutes, etc.)If you’re practicing before a court that requires Points and Authorities in legal briefs, you have two choices:

  1. Once your document is 100% finished and you have saved it (CTRL-S), convert both your Table of Contents and Table of Authorities to text using CTRL-SHIFT-F9. If that shortcut key does not convert the TOA to text satisfactorily (sometimes a plugin or other conflict can interfere), use CTRL-Z to undo it. If the text conversion works, then move the entries around manually.
  2. Purchase a plugin that will create a Table of Points and Authorities in your Word document. I highly recommend Best Authority. If you produce briefs with TOAs frequently, and Microsoft Word isn’t producing the correct format for you, this plugin would be a good investment.

Don’t get me wrong: the Table of Authorities feature in Microsoft Word works well, especially if you need it only occasionally or for fairly-straightforward TOA requirements. But if you’re in a heavy appellate practice or practicing before a court with unusual requirements, upgrading to a specialized plugin is a good idea.

Other resources

Any feature this complex is bound to experience some problems. I’ve written about some of these problems elsewhere on Legal Office Guru, so here’s a quick resource list:

  • Copying-and-pasting TOA marked-up text from one document to another. This can introduce some problems into your next magnum opus. Attempting to fix it after the fact can be a little dicey. Before your next copy-and-paste maneuver, click here to review my recommended method for moving marked-up text safely.
  • 7 ways your TOA can get messed up. If you’ve gone over the last few lessons carefully, you’ve probably prevented all of these problems, but click here for a good (award-winning, even!) TOA checklist.

Let’s Review

Here’s what we’ve covered in this tutorial:

  • Repairing a citation without re-marking cases in your brief
  • Troubleshooting missing citations or citations listed twice
  • Forcing citations to wrap at a certain point
  • Points and Authorities format

The next tutorial in this series will cover …

Congratulations! You’ve worked your way through all of the Table of Authorities lessons! Now we’ll turn our attention to generating a Table of Contents.

Leave a Reply

Your email address will not be published. Required fields are marked *

2 Comments

  1. I am unable to use the Ctrl+A, F9 command to get it to update the table of authorities. Is there another way to update the TOA?