
(Note: to view this video full-screen, click the “box” button near the lower-right-hand corner of the video player.)
Our first example: Inline paragraph numbering (0:00)
The first type of paragraph numbering we’re going to talk about is inline paragraph numbering, which looks like this;

This is just your standard paragraph numbering scheme. In fact, you’ve probably already seen those buttons on your Ribbon:

Hint: Always choose multi-level (0:13)
You’ll notice there’s both a single-level and a multi-level button. Always choose the multi-level. Why? Even if you’re only going to use one level anyway, this will give you more formatting flexibility with things like indentation.
Another hint: Create your own lists instead of modifying default lists (0:29)
And why bother creating your own list as opposed to altering the existing lists? The problem with attempting to alter an existing list is that the changes (in my experience) seldom “stick”. Plus, the experience of defining your own list gets you familiar enough with the structure that you’ll be able to diagnose and solve problems when lists go awry. This comes in particularly handy when you’re working with documents others created.
Creating your own multilevel list (0:53)
With all of the multi-level lists we’re going to talk about, the starting place is the same. On the Home tab, click the drop-down next to the multi-level numbering button in the Paragraph command group. Because this first tutorial is covering situations where you just want to number the paragraphs, not build an outline or Table of Contents, choose Define New Multi-Level List:

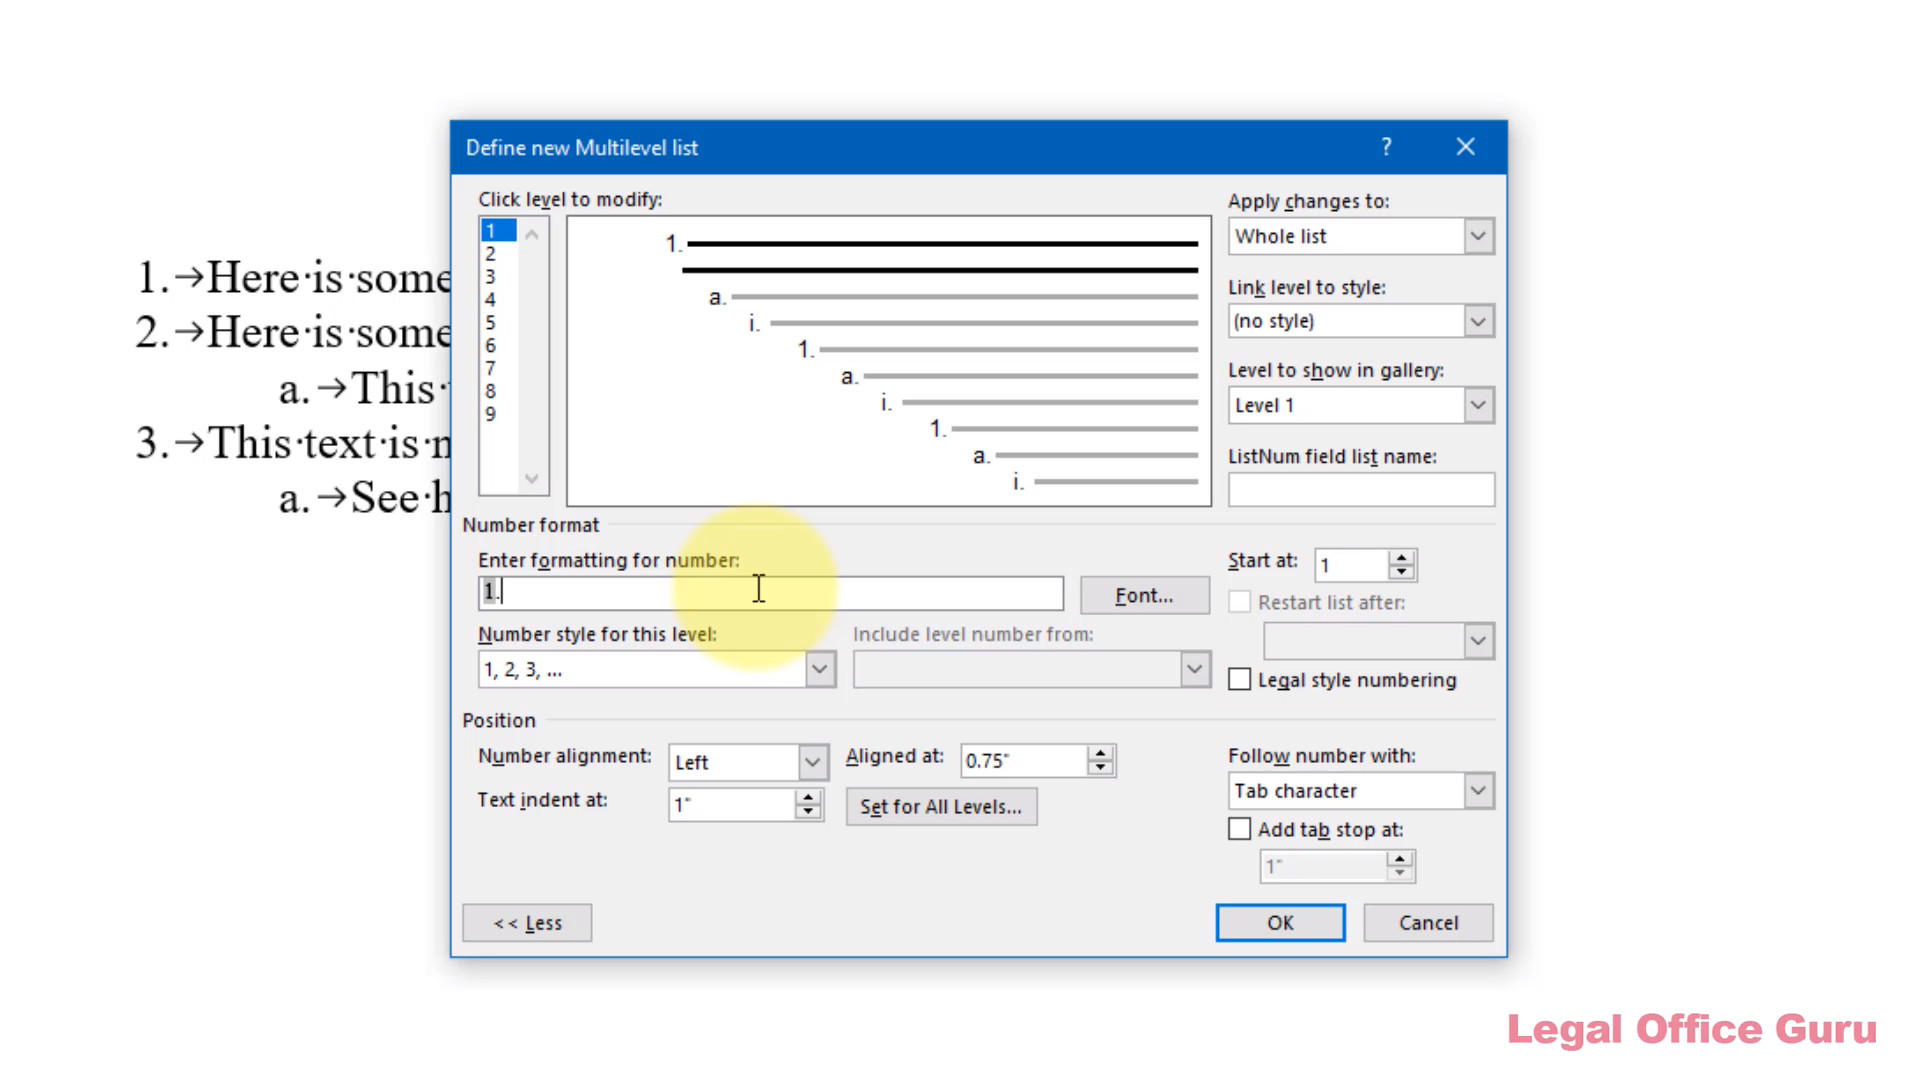
That gets you this dialog box. Be sure to click More …

… so you can see and work with the entire dialog box.

Looks pretty overwhelming, right? Let me walk you through an example customization:
An example customization, step by step (1:30)


- I start off by unlinking level numbers from Styles in the Link level to style drop-down. In this particular example, we’re not doing headings or anything like that, so having each level linked to a Style would just muck things up.
- Now that I’m on Level 1 (which is where this dialog box will start), I choose the Numbering style for this level and add a period after the “1”. If Legal style numbering is checked, I uncheck it. Obviously, if that’s the kind of numbering you want (1.1, etc.), leave that checked.
- Next, I tell Word how I want the numbers and the paragraph positioned. In this example, I’m indenting the first line of the numbered paragraph 0.5″ (Aligned at set at 0.5″) and wrapping the text back to the left margin (Text indent at set to 0″). To start each paragraph’s text at the next tab stop, I set Follow number with to Tab character.
- To avoid having to do this entire positioning exercise down all nine levels, I click Set for All Levels, which simply increments the Aligned at and Text indent at settings 0.5″ for each subsequent level (see “C” below). “A” below corresponds to Aligned at, and “B” below corresponds to Text indent at.
- Once I choose Level 2, you notice that Restart list after is now enabled. Obviously, after paragraph 2, I want Level 2 to re-start at “a”, so I check that box and have it restart after the previous level.
- Once everything is set the way I want, I click OK.

Those settings get me this result:

Promoting/Demoting Paragraph Levels (3:42)
Pressing Enter after each paragraph should (in most instances) give you another paragraph with an automatic number. But say you want to have “(a)” underneath that “1.” you just created?
If you want to start a lower level paragraph, there are three ways you can promote that paragraph to the next level (or demote to a previous level):
- Use the Increase Indent (promote) or Decrease Indent (demote) buttons on the Home tab (my preferred method), OR
- Click the Multilevel list drop-down and choose Change list level, OR

Increase Indent/Decrease Indent buttons (left) and Change List Level menu (right)
- Use the Tab and Shift-Tab method to promote and demote, respectively
Check this setting to use Tab/Shift-Tab (4:26)
That last method requires that you have a particular AutoCorrect setting enabled. Go to the File tab, click Options, choose Proofing along the left-hand side, click the AutoCorrect Options button, and make sure this box is checked on the AutoFormat As You Type tab:

Saving your numbering scheme for future use (5:00)
At this point, you may be thinking to yourself, “Am I going to have to go through this entire exercise every time I want to use this paragraph numbering scheme?” And the answer is “No, you don’t!”
There are a couple of different ways you can save these once you’ve configured them. I’m going to go over another, more complex but more flexible method later in this course, but for now I’m going to show you how to save this numbering scheme into your List Library.
Word has several default choices in the List Library, but if none of those fit your specifications and you’ve created a custom one as we’ve done here, you can find it in the Lists in Current Documents section of the multilevel list dropdown, right click on it, and choose Save in List Library.

Once you’ve done that, you’ll be able to see your custom paragraph numbering scheme here in the List Library.

Your turn
Mark this lesson as complete, then click the Next Lesson button to go to the practice exercise.
Hello, is there supposed to be a video with this lesson? I'm not seeing the video. Thanks.
I don't have the 'Lists in Current Document' section – just 'Current List' and 'List Library' sections. Is this normal? Has something within Word changed?
Assuming you do have an active list in your current document (you may not, which would explain why that section isn’t showing), be sure that All is selected up top:
2 questions:
How do you apply the new numbering scheme to text that already exists (as in your practice doc)?
Why is the single level button highlighted instead of the multi-level button since it was the multi-level button I used to create this scheme?
Hi,
My changes to the defined list doesn't stick for the 3rd level. Any tips?
Thank you.
Be sure your third level is connected to the second level. Also, what changes are you finding don’t stick?
How do you name your custom list so you can tell it apart from all the other lists in the List Library? I saved my custom list to my List Library, but there are now ten lists in the library and some of them look the same.
Unfortunately, Microsoft seems to have taken away the ability to name the lists, instead electing to display thumbnails which, as you’ve observed, are sometimes confusing when list styles look similar.