Microsoft Word’s Table of Authorities feature cannot produce a Points & Authorities format. However, you can create a Points & Authorities format with a custom Table of Contents that uses both Heading Styles (for the points) and Table Entry Fields (for the authorities) as sources.
What is a Table of Points & Authorities?
If you’ve never heard of Points & Authorities, it’s a combination of the Table of Authorities and Table of Contents. Instead of listing the cited authorities in alphabetical order, a Points & Authorities format lists each authority in a different order.
According to Wikipedia, some courts require each authority be listed in order of appearance under the heading or subheading it appears within, while other courts require cases to be listed in order of importance or underneath a description of the issue they support.
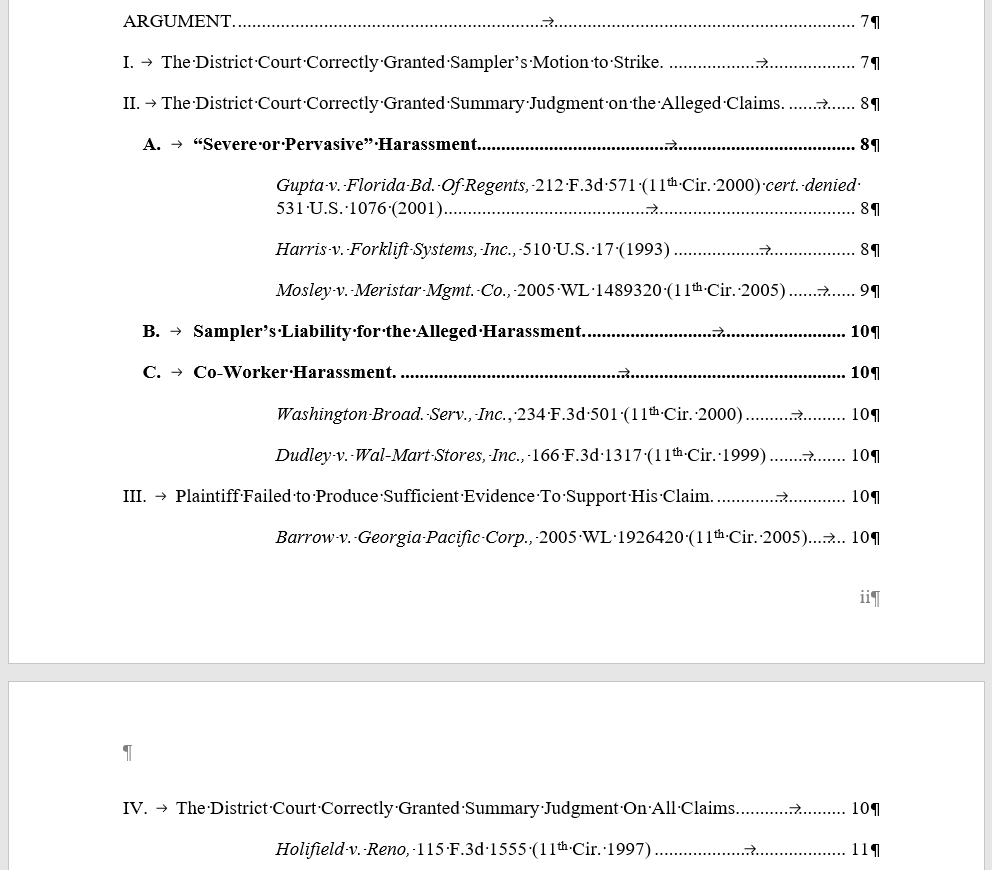
One example format for a Table of Points & Authorities
Your best bet: Get a TOA plugin
If this something you have to do frequently, I recommend that you get a specialized Table of Authorities plugin to produce this format. A Word plugin such as Litera’s Litigation Companion (which now includes the tool formerly known as Best Authority) or Thomson Reuters’ Drafting Assistant (useful for those with Westlaw subscriptions) will make this task more automatic.
However, if you don’t have access to these tools or you only have to produce a Points & Authorities format occasionally, you can produce this format with a creative use of the Table of Contents feature.
The no-cost alternative: Hack TOC to produce P&A
If you don’t have to do this often, or you’re otherwise unable to justify or approve the cost of a specialized plugin, you’re not stuck doing it [entirely] manually. You can bypass the Table of Authorities feature altogether by hacking the Table of Contents feature with a combination of Heading Styles and TOC table entry fields.
Legal Office Guru reader Patrice sent me her example showing how she did it. She said:
Reader Question
I took the Brief Builder’s Workshop course on your website. In Illinois we now have to do a Table of Contents and Points and Authorities under the Argument heading. …We have to do a combined Table. The 7th Circuit uses the type of points and authorities you have in the lesson (an alpha list of cases sorted by what type of citation it is). Have you had to do a table of contents with case citation under the heading? I was able to get it to work, but I cannot format the font correctly.
The requirement, as best as I can ascertain it with some online research, is based on Illinois Supreme Court Rule 341:
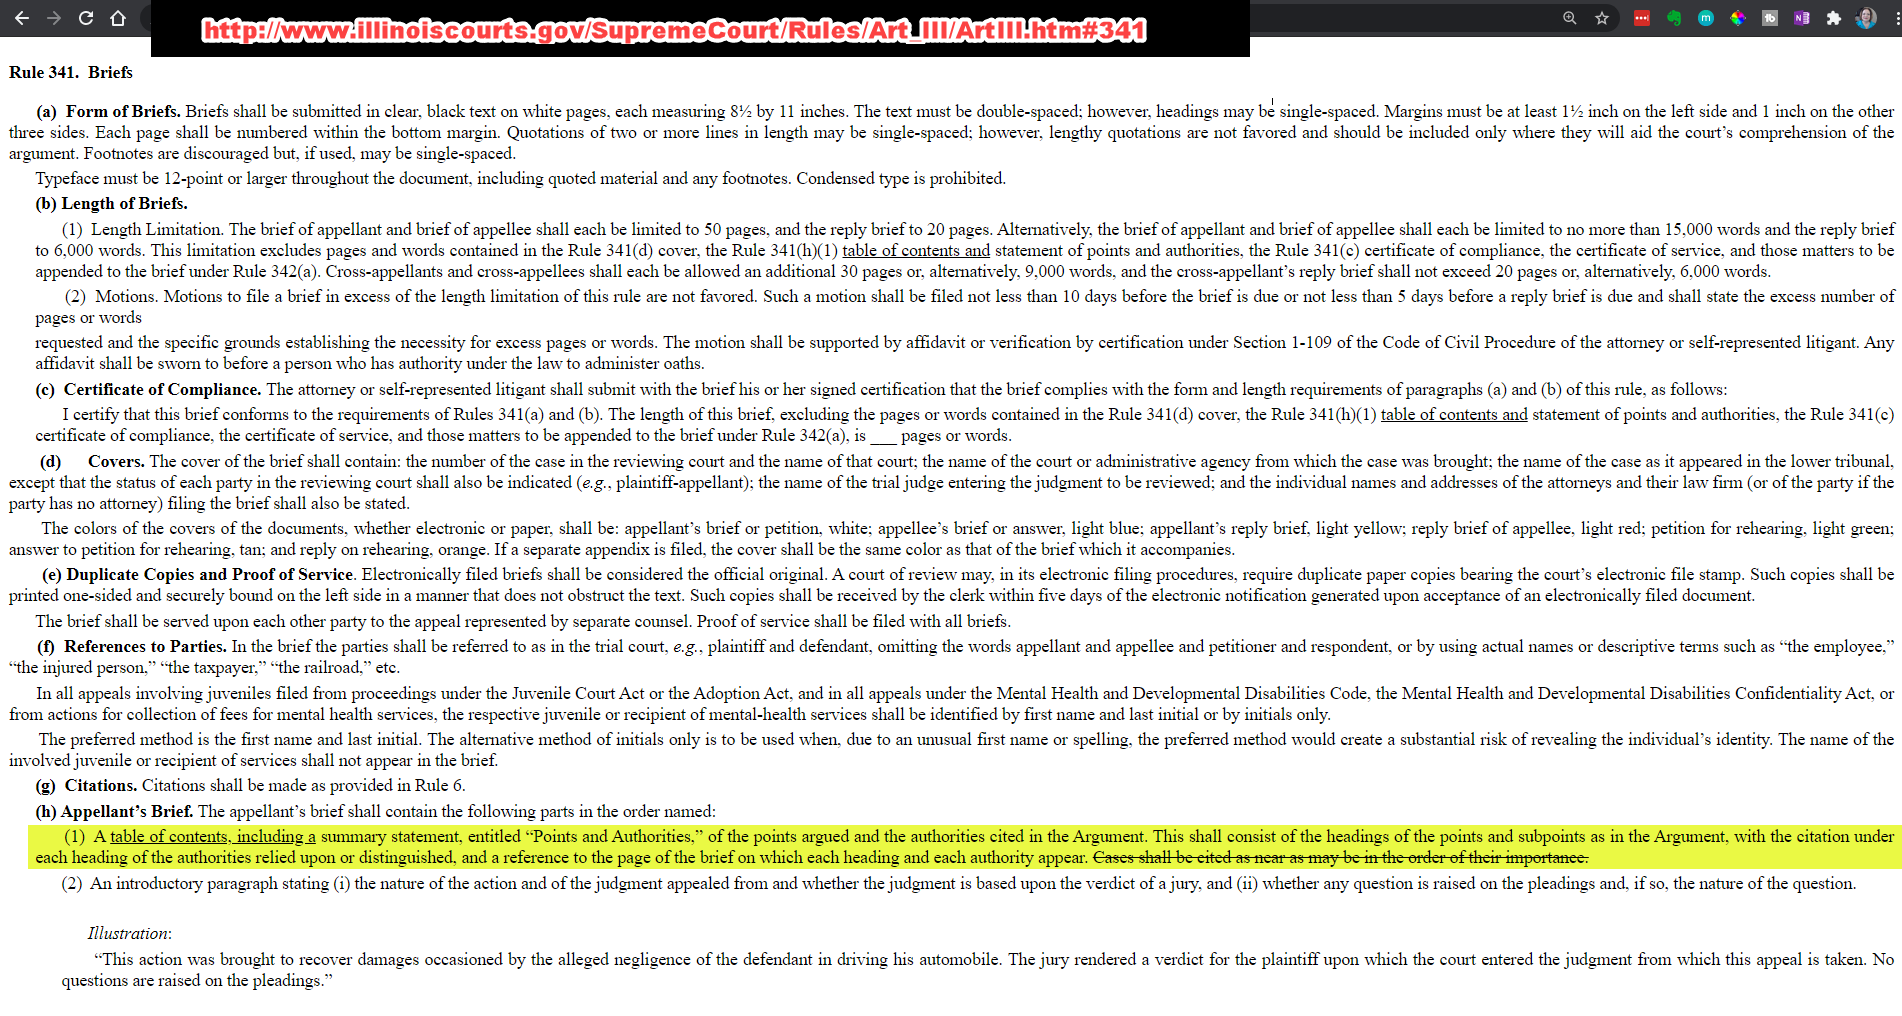
Rule 341(h)(1) (the highlighted portion above) states that each brief shall contain:
A table of contents, including a summary statement, entitled “Points and Authorities”, of the points argued and the authorities cited in the Argument. This shall consist of the headings of the points and subpoints as in the Argument, with the citation under each heading of the authorities relied upon or distinguished, and a reference to the page of the brief on which each heading and each authority appear.
Illinois Supreme Court Rule 341(h)(1)
(Note that the requirement for organizing the authorities “in the order of their importance” has been struck out.)
Simply put, the authorities are listed underneath the subheadings they appear in, and they’re listed in order of appearance in the brief, a.k.a. page number order. This is the easiest example simply because this is the default behavior of the Table of Contents.
So, Patrice essentially hacked the Table of Contents feature to produce a Points & Authorities format for her Table of Authorities using these three steps:
- Configure a custom Table of Contents that uses both Heading Styles and Table Entry Fields as sources
- Use Styles to format the headings (the “points” in Points & Authorities)
- Mark authority citations using manual TOC table entry fields
Headings are Style-based; authorities are TOC-field-based
In Patrice’s TOC hack, the “points” part of her table is driven by Styles, while the “authorities” part of the table is based on Table of Contents entries:

So her Table of Contents is configured like this:
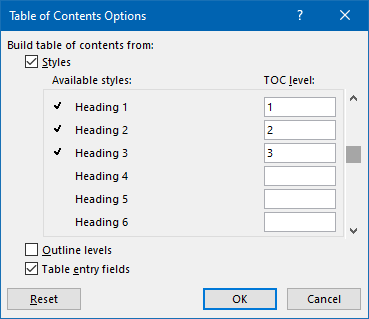
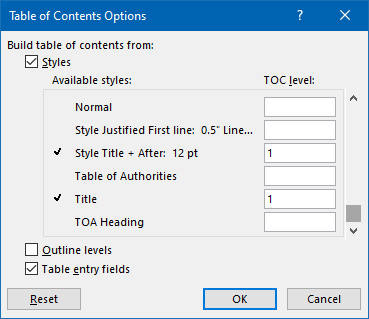
Normally, I would have used just Heading Styles, like this:

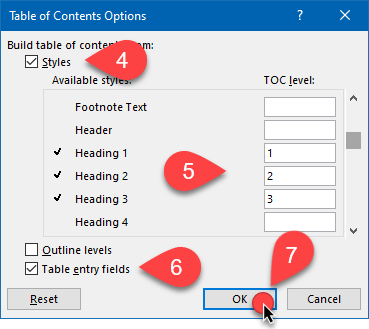
As noted in the Table of Contents Options screenshots above, Patrice’s “Argument” is styled with a Title Style, the Roman-numbered subheadings are styled with a Heading 1 Style, and the lettered third-level subheadings are styled with the Heading 2 Style. I suspect she started with the Title Style so that her major headings would be indented the same as the Roman-numbered first-level points, but that’s just a guess. Both her and my configurations work just fine.
In either case, the “hack” here is using Styles for designating the top three levels of the Table of Contents entries and manually marking the authorities as Table of Contents table entry fields at a lower TOC level. In other words, if we have three levels of headings and the authorities are listed under the third-level headings which are numbered alphabetically, then we can use the Heading 1, Heading 2 and Heading 3 Styles for the first-, second- and third-level headings and the Table of Contents table entry fields for the actual authority citations.
Inserting a Table of Contents that supports Points & Authorities
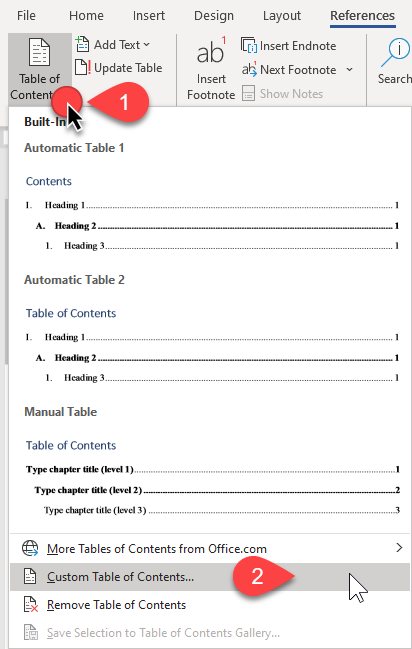
To set this up, go to the References tab and click on Table of Contents, then select Custom Table of Contents:
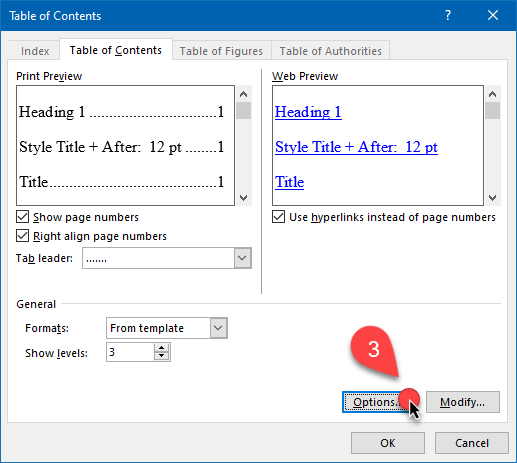
Within the Table of Contents dialog box, choose Options, make sure the box next to Styles is checked and the Heading Styles you are using are listed at their corresponding TOC level (i.e., your Heading 1 should correspond to TOC Level 1, etc.), and check the box next to Table entry fields to ensure your Table of Contents will pick up not only your Heading Styles but also your marked citations.
Citations marked with manual TOC entries (as opposed to using Styles to build the entire TOC) will look like this with Show/Hide turned on:

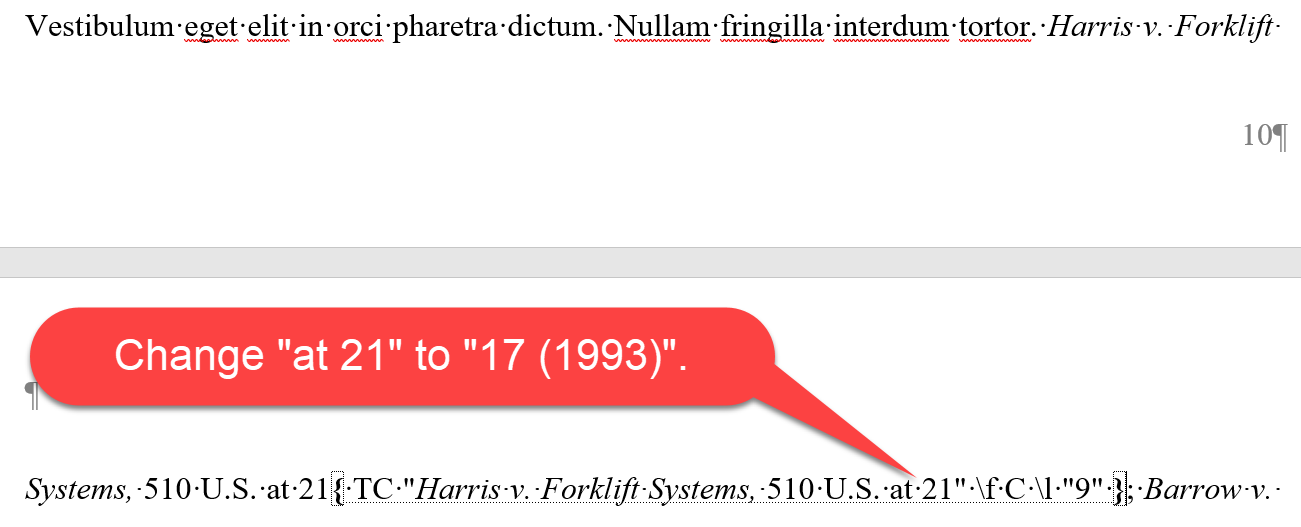
The portion highlighted in yellow in the illustration above is the Table of Contents or “TC” code, starting with the beginning curly bracket, the “TC”, then the text of the entry, then “f C” and “l ‘9’” to signify the table type and level. We’ll get into that in more detail in a moment.
Using Heading Styles for your “Points”
If you’re formatting a brief, you should know how to use Styles to consistently format the various level headings in your document. It’s literally point and click!
If you need a basic primer on how to format Heading Styles and apply them to your headings, click here for a free lesson from my Lawyer’s Guide to Microsoft Word Styles course. To see more free tutorials on using and configuring Styles, click here.
Marking a citation to include in a Points & Authorities format
Once you’ve applied Styles to your headings (the “points” part of Points & Authorities), it’s time to mark the actual citations.
But unlike a regular Table of Authorities, we’re not going to mark them with Table of Authorities (TA) fields. Instead, we’re going to mark them with manual TC (Table of Contents) fields, a.k.a. table entry fields.
You see, the “normal” way of creating a Table of Contents is to use Styles to designate the various headings and their levels (which is what we’re doing with the “points” in our Points & Authorities). However, it’s also possible to mark TOC entries similar to the method you’d use to mark citations for a regular Table of Authorities.
Although the “Mark TOC entry” command isn’t available on the Ribbon by default, you can use its shortcut key ALT-SHIFT-O (that’s holding down the ALT and SHIFT keys and pressing the letter O simultaneously) to start the process.
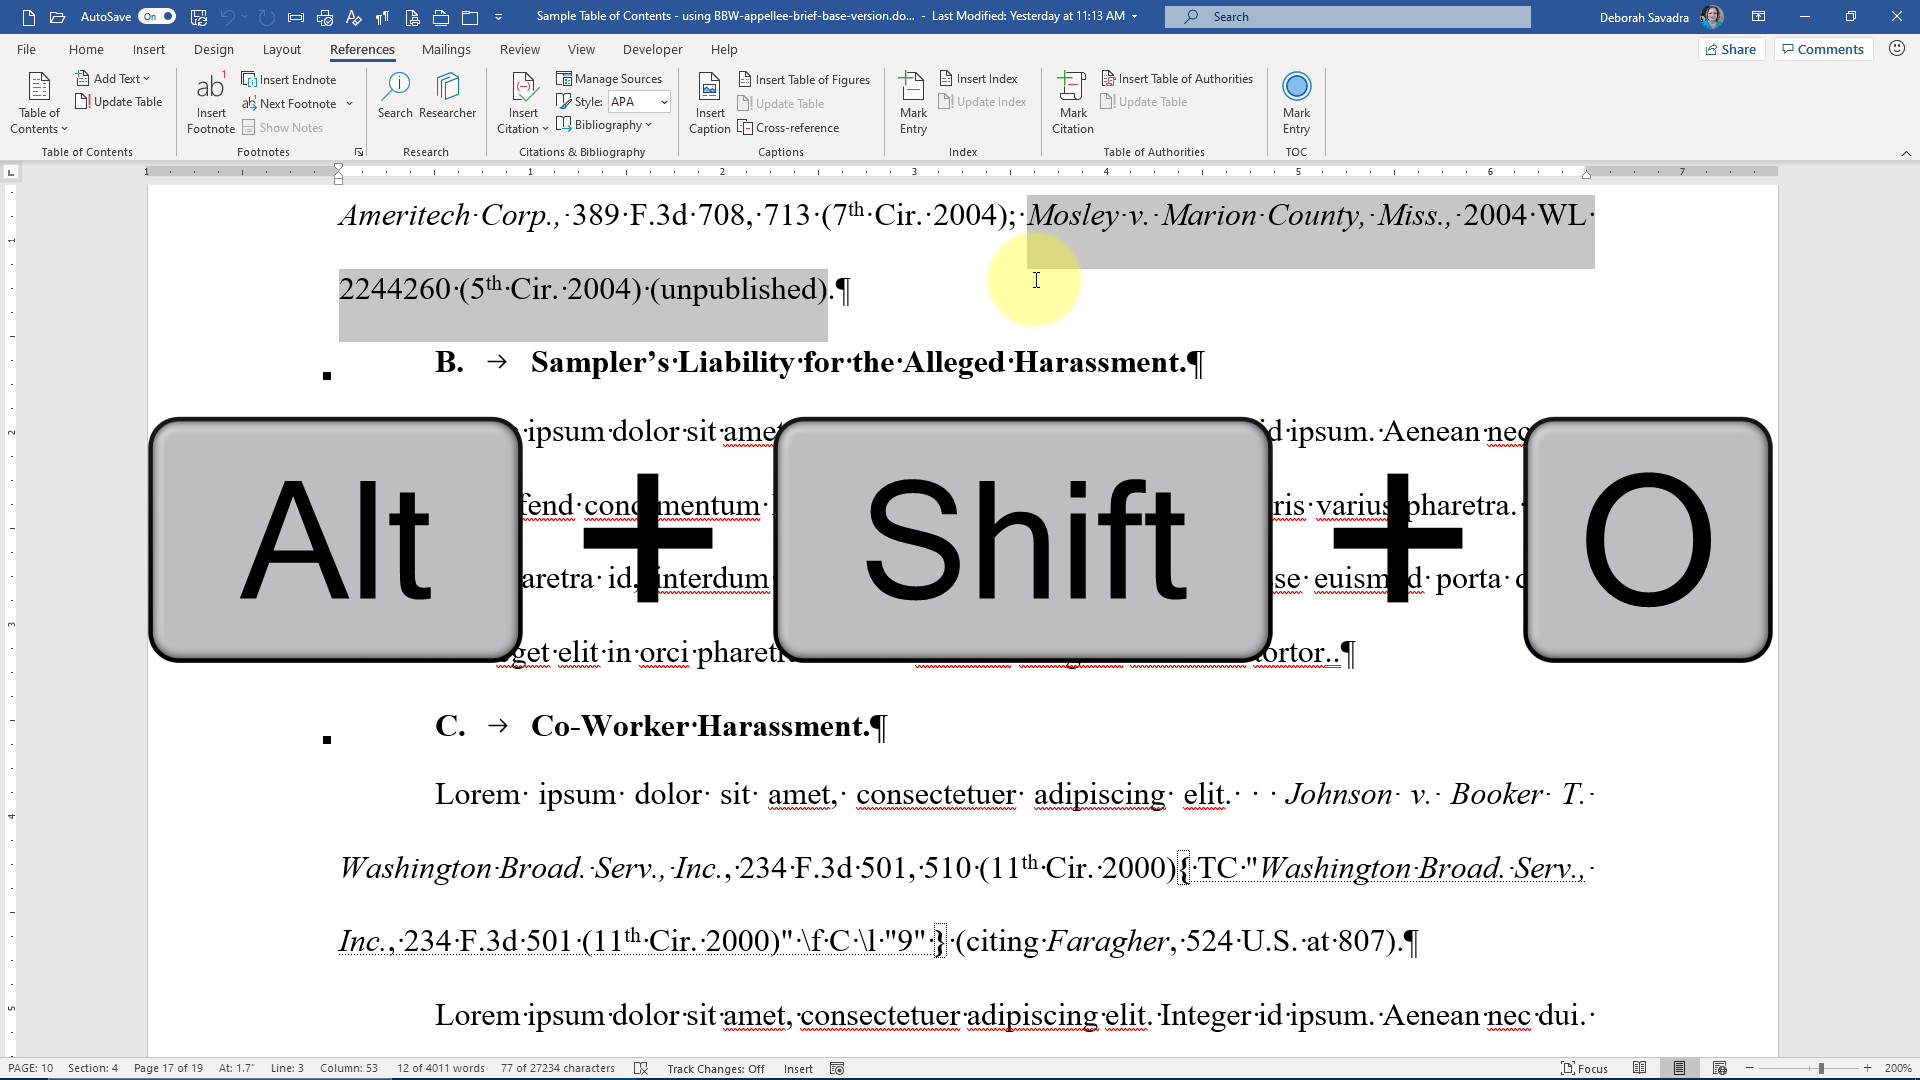
(Note: Video is silent except for mouse clicks. To view this full-screen, click the “box” button near the lower-right-hand corner of the video player.)
If you want to add the “Mark TOC entry” command to your Ribbon as I have done, you can use the technique demonstrated below:
(Note: to view this full-screen, click the “box” button near the lower-right-hand corner of the video player.)
Marking the second instance of an authority
Your brief probably has at least one authority that’s cited multiple times. Unlike Table of Authorities, however, there’s not a different procedure for marking subsequent instances of an authority with a TC code, because the Table of Contents will list that authority separately for each individual occurrence (as opposed to gathering all of the citations together under one line item.
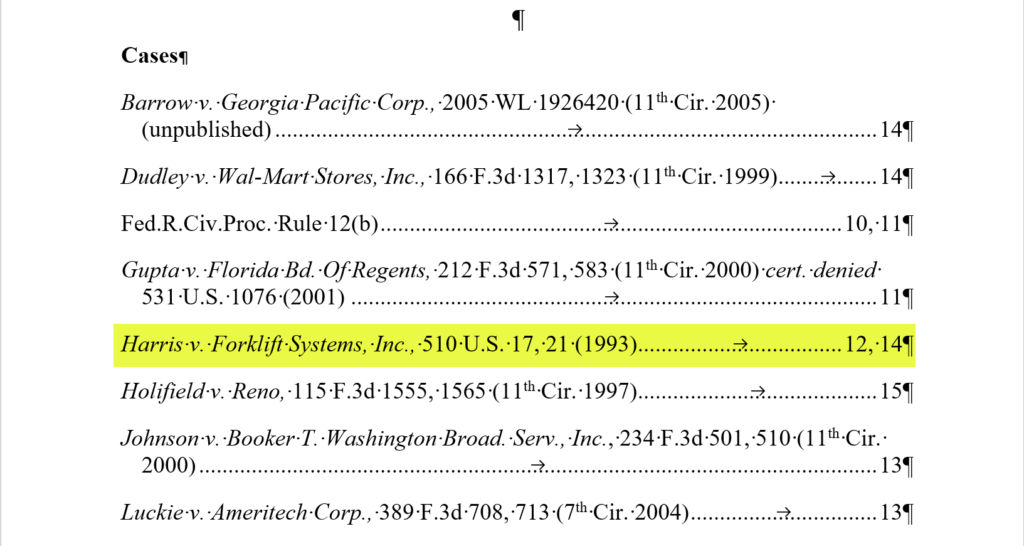
How Table of Authorities normally lists multiple citations of a specific authority
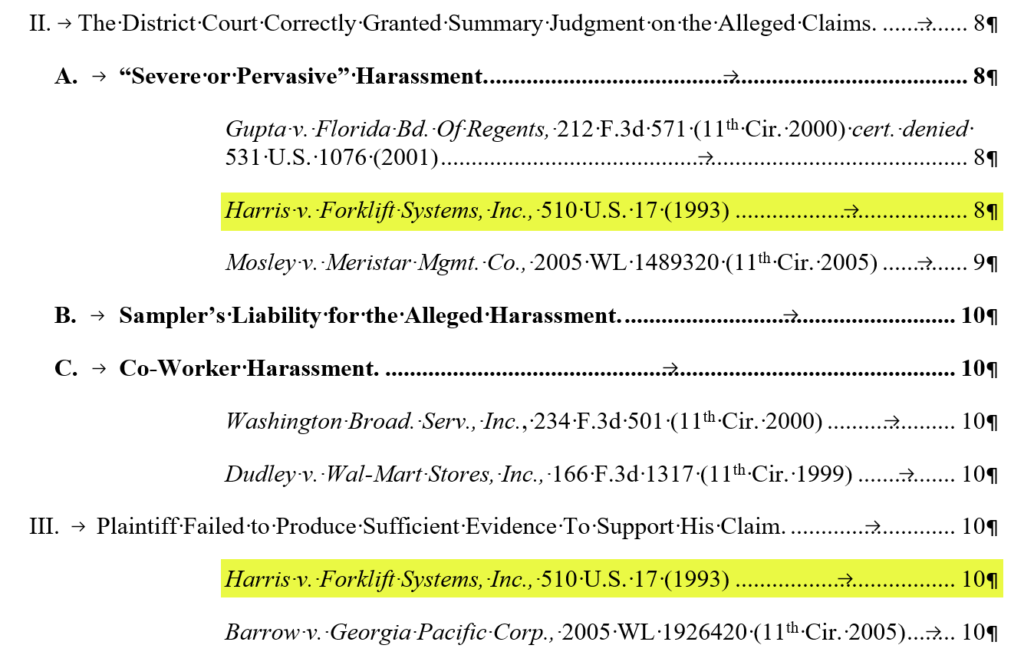
How a TOC-based Points & Authorities format lists multiple citations of a specific authority
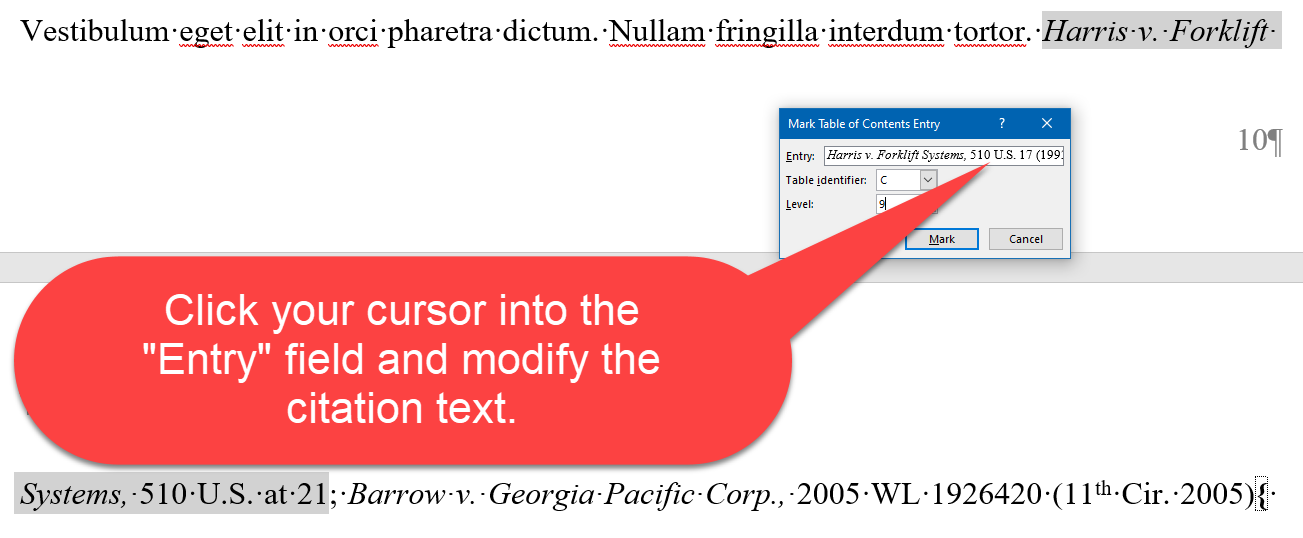
Often, however, the second or subsequent citation of a particular case or other authority doesn’t repeat the entire citation (e.g., just citing “Harris” or including a pin cite). You’ll want to be alert to this and either include the appropriate citation within the Entry field:
… or edit the TC code after you’ve marked it:
Refreshing your table with F9 or right-click
If you do any further editing in your brief or mark additional authorities, you’ll want to update or refresh your Table of Points & Authorities. To do that, either:
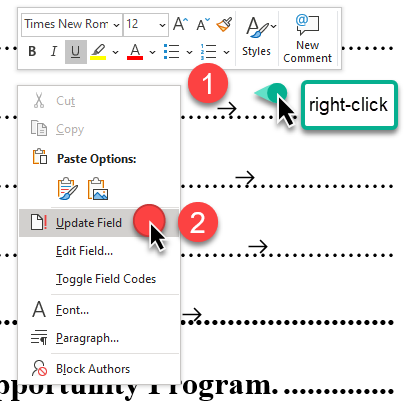
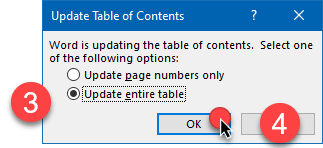
- Right-click anywhere in the Table of Contents and choose Update Field, then Update entire table and OK; OR
- Click anywhere in the table and press F9
“What if this format isn’t quite what I need?”
Once you’ve generated your Table of Points & Authorities, you may decide that something doesn’t look exactly the way you’d like or meet the court’s standard. Whether you’re able to fix those in a way that allows you to re-generate a corrected TOC depends on what adjustment you need to make: stylistic or substantive.
|
What needs to change |
Specific change |
How you’d change it |
|---|---|---|
| Formatting | Indentation of all items at a specific level | Modify the associated TOC Style |
| Formatting | Other formatting (bold, italics, etc.) of all items at a specific level | Modify the associated TOC Style |
| Content | Text of a specific entry | Edit that entry’s TC code within the brief |
| Content | Order of entries (any level) | Convert the TOC to text and edit (wait until ALL other editing is complete!) |
Making formatting adjustments via their underlying Styles
If an entire category of entries (all of the authority citations, for example) have the same problem (e.g. indentation), that is something that can be fixed via an adjustment to the underlying Style.
To figure out which Style controls a particular level of TOC entries, click your cursor into one of the entries and press SHIFT-F1, then look to see what’s listed as the Paragraph Style:
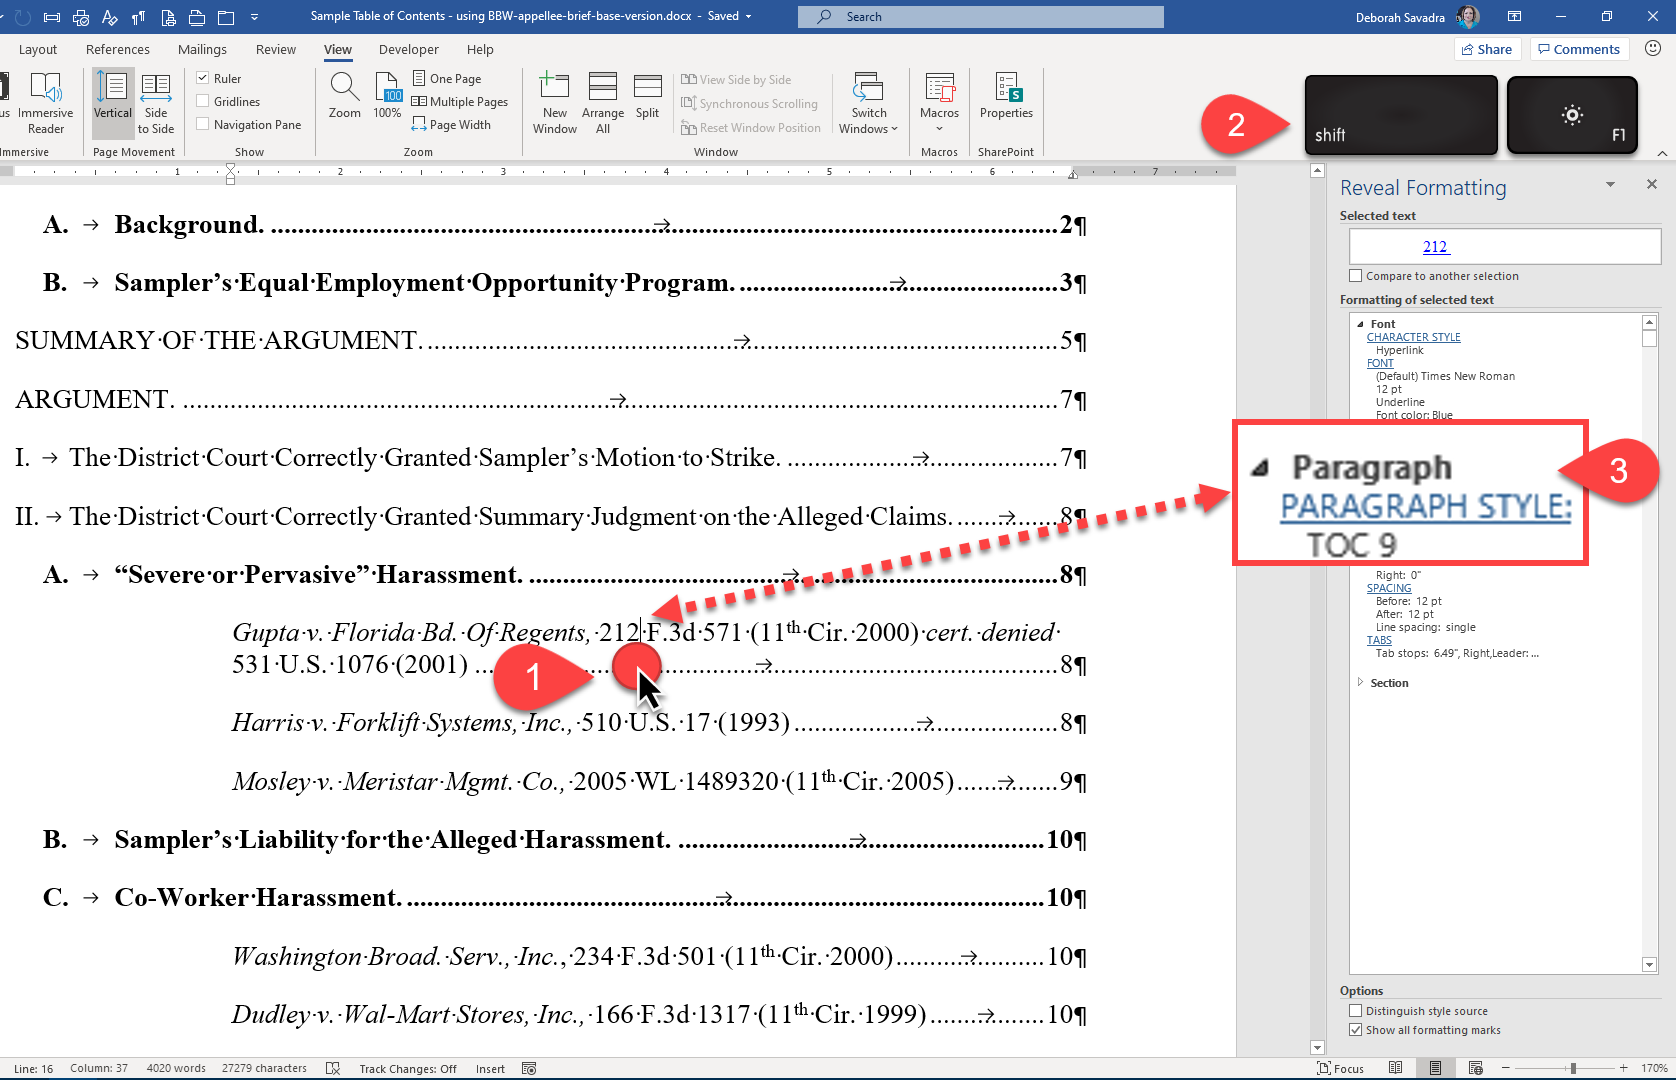
Notice how the text of “PARAGRAPH STYLE” is hyperlinked. You can click that hyperlink to go directly to the Modify Style dialog box to change not only the indentation, but the font style and size, etc.:
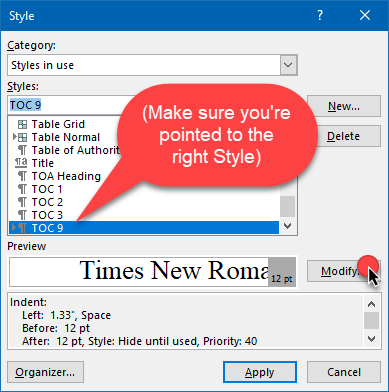
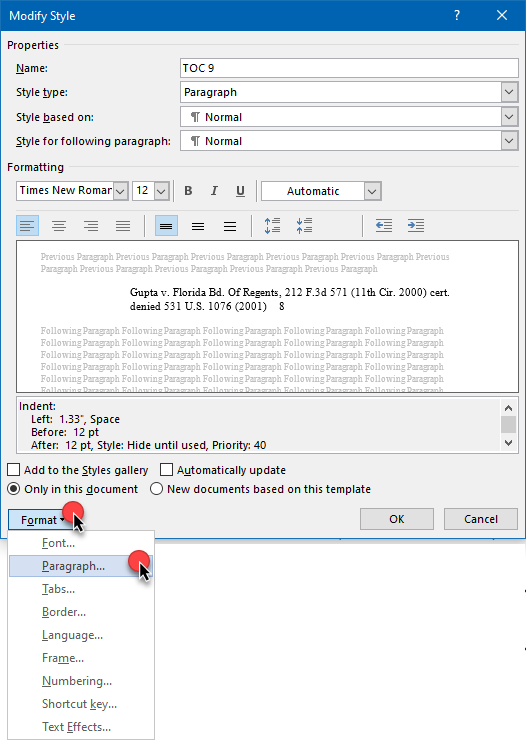
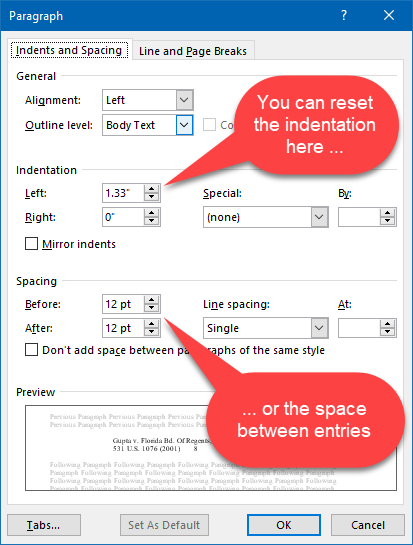
The steps above are an example of how to adjust the indentation, but if there are other aspects of the formatting you need to alter, simply choose the correct dialog box (e.g., Font instead of Paragraph) in the Modify Style dialog box.
Adjusting the actual content of your Table of Points & Authorities
If the problem is the actual content of any of your entries, then it’s a little more complicated.
The easiest problems to fix are things like pin cites within case names. Just like with Table of Authorities entries, correcting pin cites, misspellings and other minor text errors within authority entries requires editing the TC field that creates the TOC entry. It’s not difficult at all once you understand how the TC fields are structured.
Let’s look at our earlier example again:

Whenever you mark any text with a Table of Contents (TC) field, that field will start and end with curly brackets (highlighted in red above). The text of the entry as it will appear in your Table of Contents will be inside quotation marks (highlighted in yellow above) right after the “TC”. The letter after the “f” (highlighted in blue) denotes which table that entry goes to (you can have multiple tables of contents within a single document; this usually defaults to “C”), and the single-digit number after the “l” (highlighted in purple) denotes at which TOC level this entry will appear.
Knowing that, you can easily make some minor text adjustments within the code to change the text of the entry or even which level entry it is. If, for example, you noticed when you generated your Table of Points & Authorities that the Gupta case listed a pin cite, all you’d have to do is edit “, 583” out of the case name within the TC code, then regenerate your Table of Contents.
If your court requires you to place an asterisk before the names of your key cases, you can simply place that asterism just after the opening quotation mark so it appears in the Table of Points & Authorities when you regenerate it.
Re-ordering entries
If your court requires that you list the authorities in order of importance or group them by authority type or in some other order, you’ll need to convert your table into text and re-order the entries yourself. If you attempt to edit the table directly, your edits will disappear the moment you regenerate the table (and depending on your settings, your table might refresh automatically whenever you print the document).
Be sure you’re 100% finished editing your document, then click your cursor inside your Table of Points & Authorities and use CTRL-SHIFT-F9 to convert it to regular text. You can now edit the text normally. However, you will not be able to regenerate your Table of Contents unless you reinsert it using the steps above.
One caveat: If you created your Table of Points & Authorities with hyperlinks, your converted text will also contain hyperlinks. If you unchecked the box next to Use hyperlinks instead of page numbers when you create your Table of Points & Authorities, your converted text will have not have hyperlinks. If you anticipate having to re-order entries or otherwise directly edit your Table, you might want to be sure to uncheck that hyperlink box when creating your Table to save yourself some hassle when it comes time to finalize your brief.
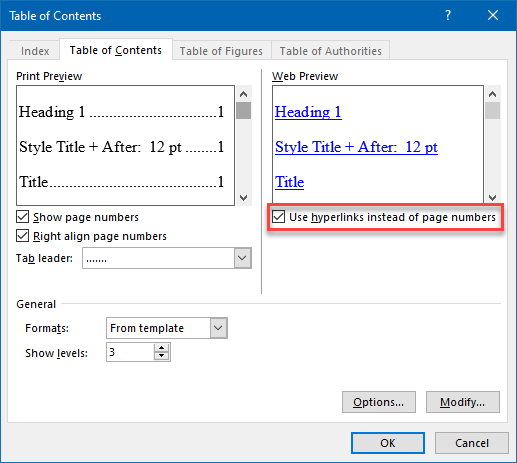
If you leave the “use hyperlinks” box checked when you create your Table of Contents and later convert your Table to text, that text will have hyperlinks.
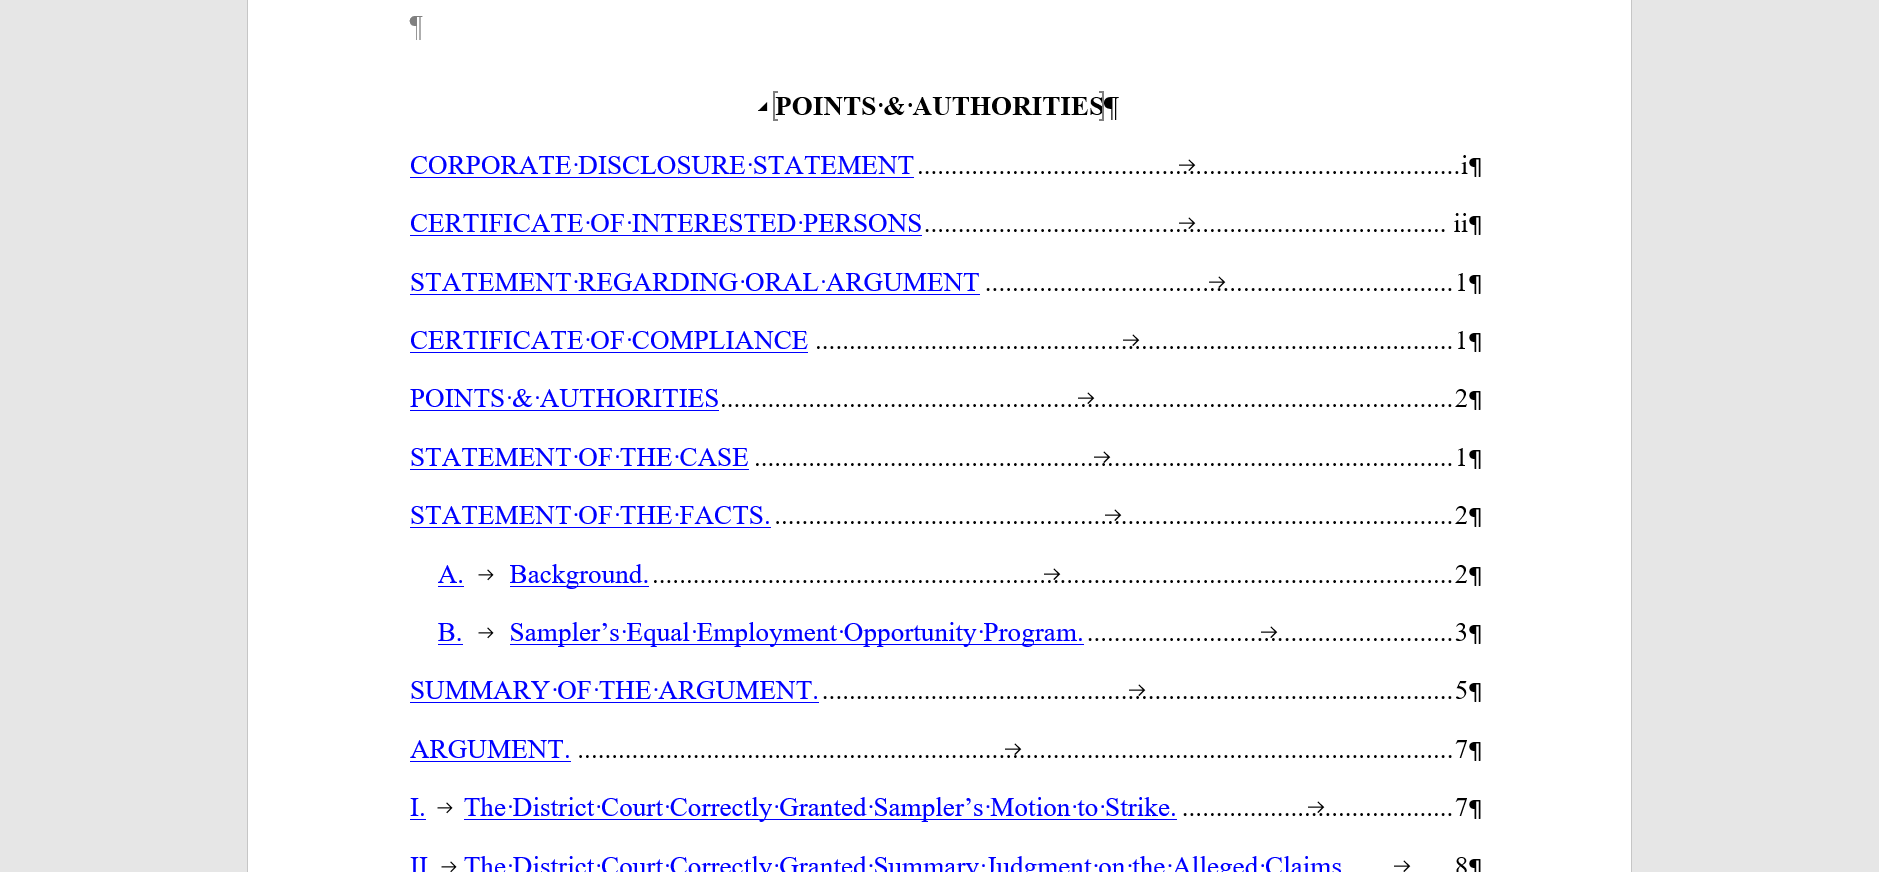
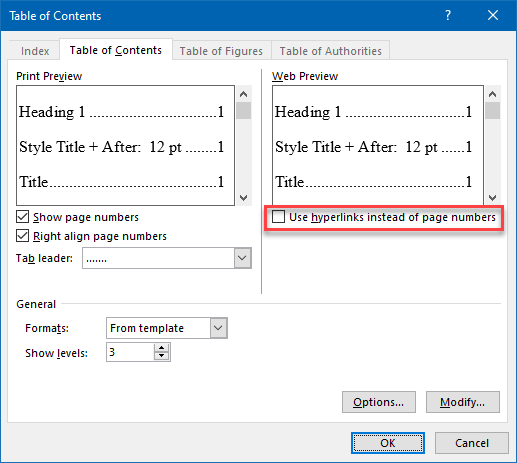
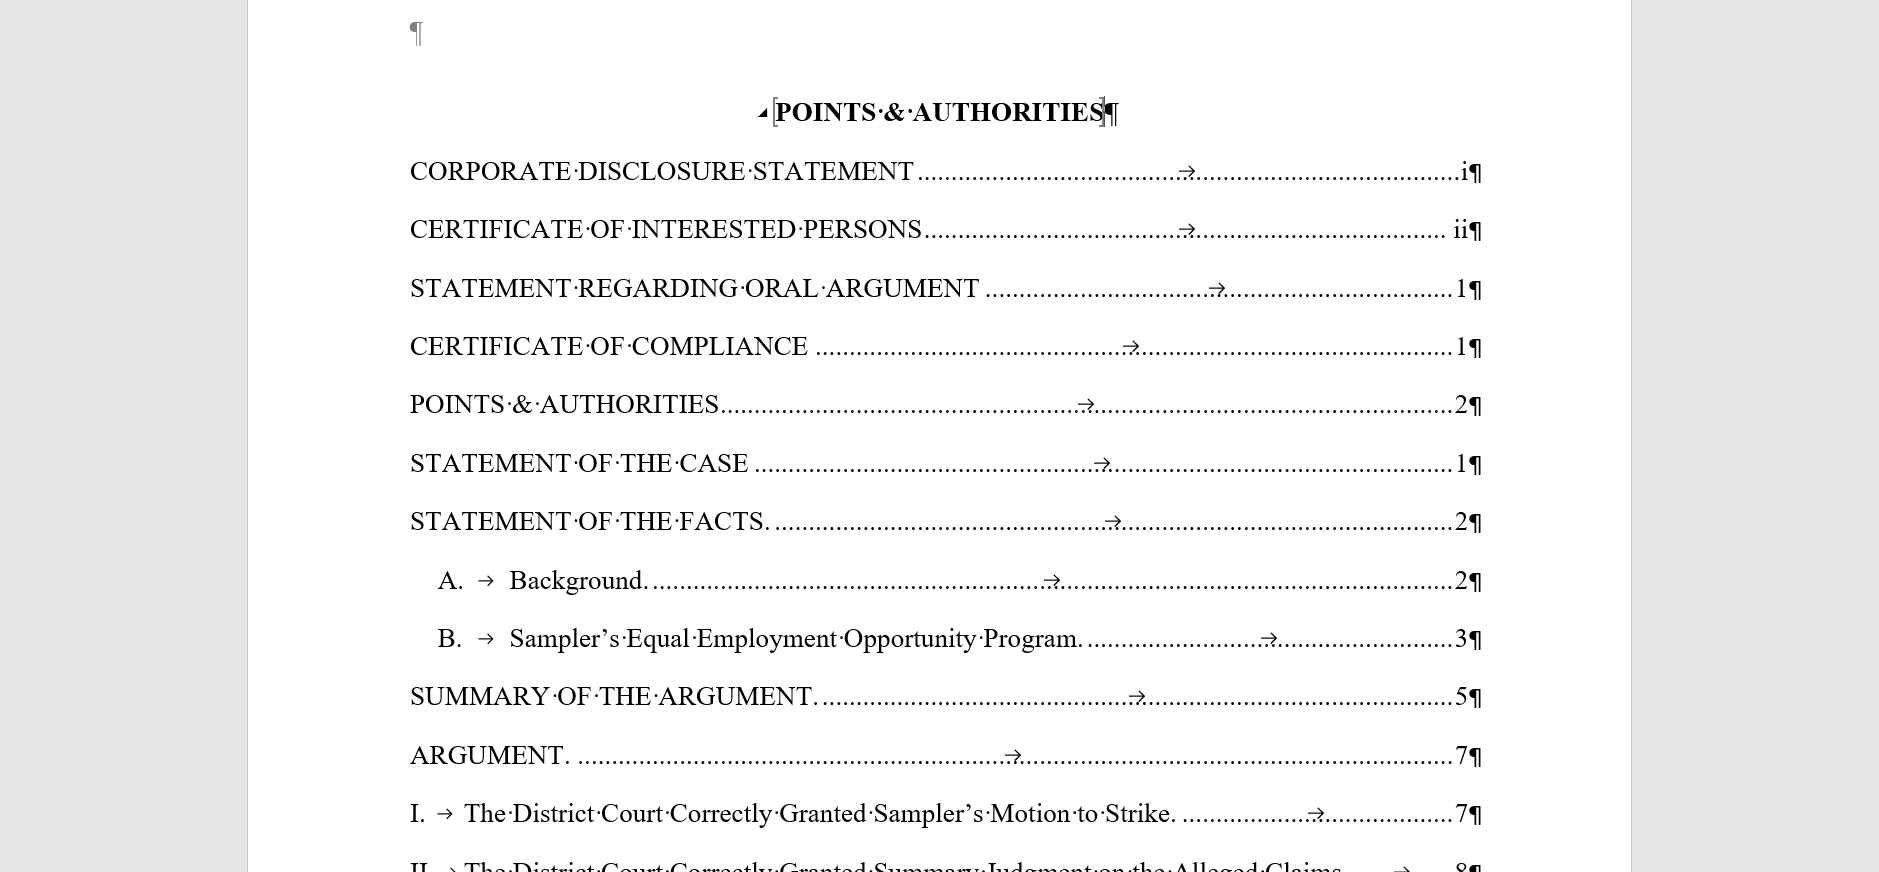
If you uncheck the “use hyperlinks” box, however, your converted text will be much cleaner and easier to edit.
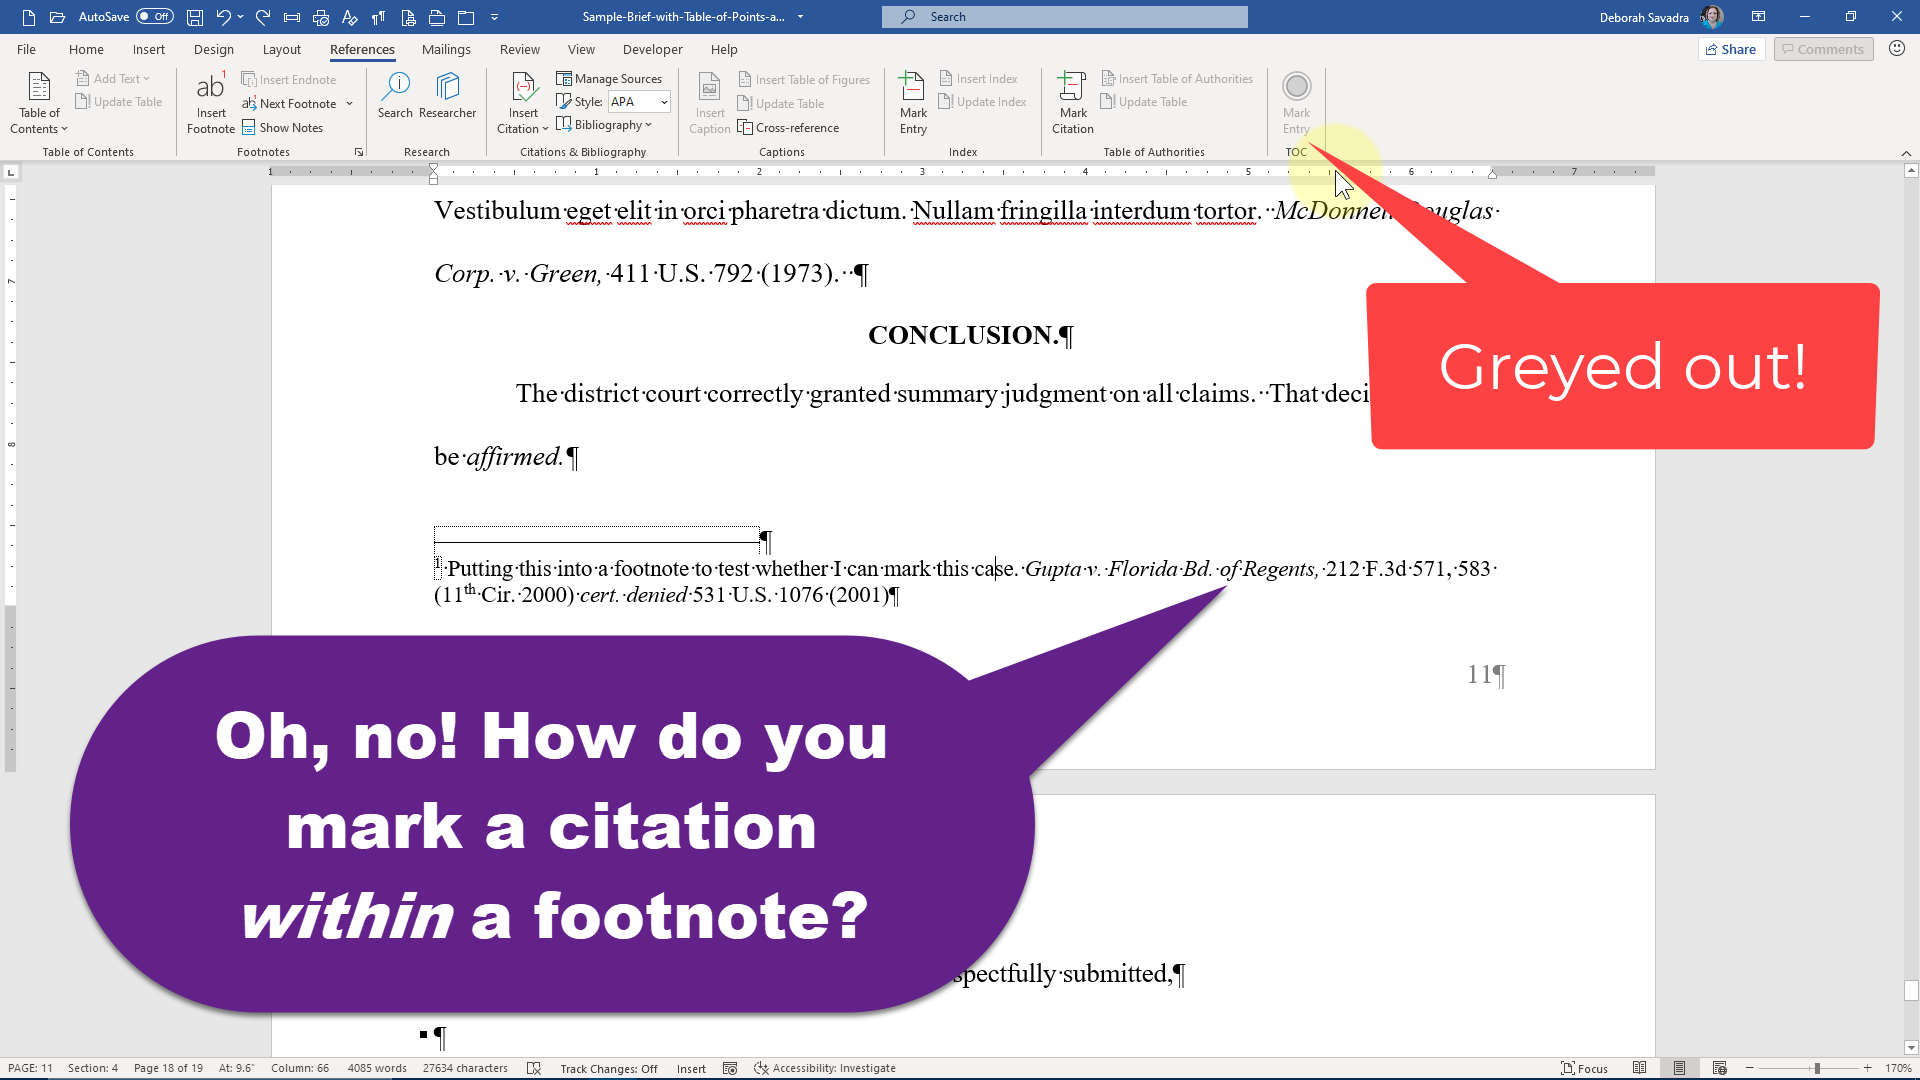
Follow-up: Marking cases within footnotes
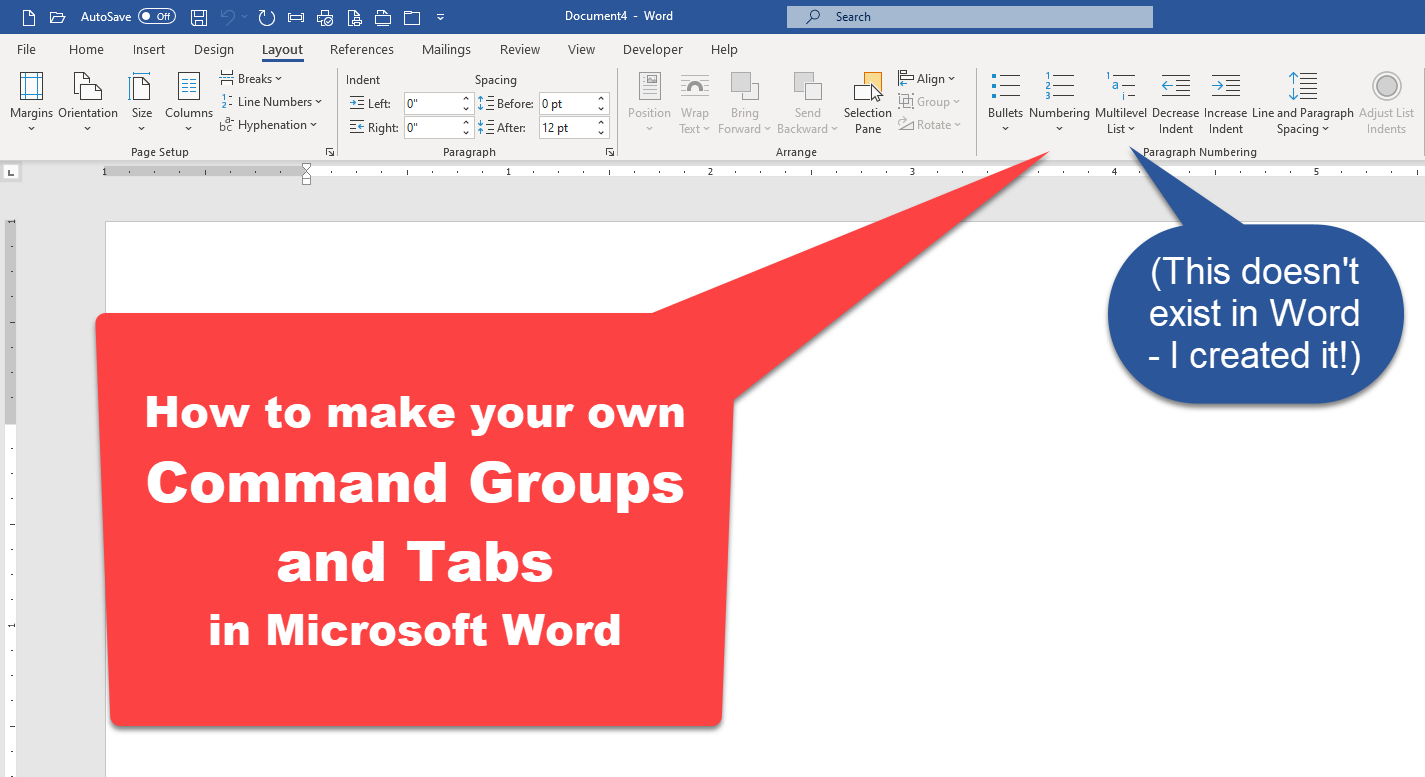
One reader pointed out that the Mark Entry command (either using the button on the Ribbon or the shortcut key ALT-SHIFT-O) isn’t available when you attempt to mark a citation within a footnote. Here’s my workaround for that scenario:

One Comment
Comments are closed.