
Now that we’re in the age of digitized documents, you’ve probably gotten one of those CDs, DVDs, or USB drives containing what would otherwise be reams upon reams of paper. While the digital versions certainly take up less space in your office, there’s no obvious physical structure to what’s been produced. And if you’ve gotten the disk from an adverse party, there’s probably no folder or file list available, either.
So how you get a handle on all that (virtual) paper?
Obviously, printing the whole disk and organizing everything into physical folders is too cost-prohibitive and space-intensive (although I have seen it done). And I was a little shocked when one of our firm’s paralegals decided that the only way to get a definitive list of an expert deponent’s voluminous document production was to take a bajillion screenshots of his USB drives and directories and paste them into a Microsoft Word document for her boss, a task she said would take her all day.
“Oh no,” I said. “There’s a much easier way to do that.”
One simple DOS command saves the day (literally)
As great as a graphical user interface like Windows is, some problems are really best solved by good old command line DOS. A lot of Windows users don’t realize they can still use DOS commands. But you do have to open up a special window called Command Prompt to do it.
The easiest way to get to the Command Prompt window in any version of Windows is to click Start, navigate to the Accessories or System folder (depending on what version of Windows you’re in), and find Command Prompt in the list. Actually, even faster (in Windows 10) is to click into the search bar next to Start and type “Command Prompt” into the search window, and Windows will find it for you.
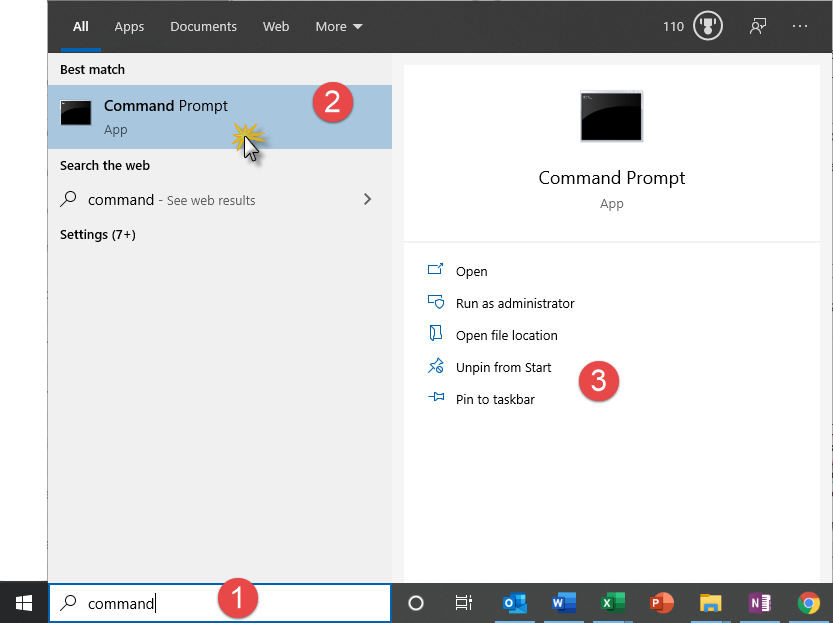
- Type “command prompt” into the Windows Search Bar
- Click the Command Prompt app to start
- Optional: Pin this app to your Start menu and/or your taskbar (along the bottom of your screen) for easy access.
If you’re still using Windows 7 or Vista (why?), you’ll need to right-click on Command Prompt and choose Run as Administrator to get the proper access to the disk. (If you’re still in Windows XP – again, why? – , you may simply be able to left-click Command Prompt, or you may need to right-click it, choose Run As, and choose an Administrator account to get the right permissions).
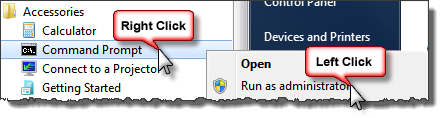
Depending on what permissions you have on the PC you’re using, you may be required to run Command Prompt as an Administrator. Check with your IT person if you have problems.
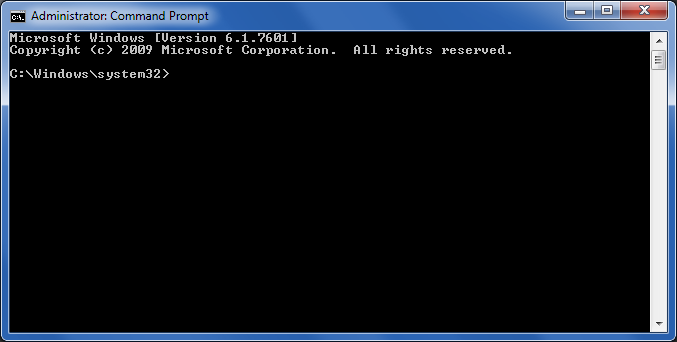
If you get a prompt at this point (depends on your version of Windows), click Yes. Either way, up pops a small window that looks like this:
Now, all you have to do is type one relatively simple DOS command:
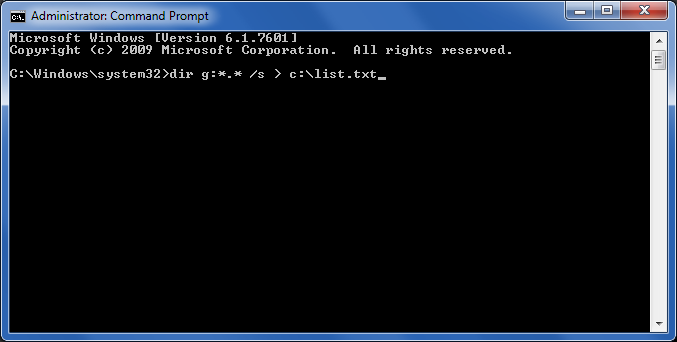
Adapting this command to your situation
For those not familiar with DOS, let me break this example out for you:
| dir | This is the “directory” command in DOS, instructing the operating system to list the files in a certain location meeting specific criteria. |
| g: | This is the drive letter I used for this particular example, an external drive I have attached my computer. In your case, you might want to list the files on d: (your CD or DVD drive) or e: (a USB flash drive) or whatever other disk you’re examining. Just substitute the right letter with a “:” after. (If you don’t know which drive letter is assigned to that particular device, go to My Computer to figure out the right one.) |
| *.* | The asterisks in this part of the command are wildcards which tell DOS, essentially, “I want a list of all the files, regardless of their names or file extensions.” If you just wanted to see just a specific file type (like all the Adobe Acrobat files), you could use *.pdf, or you could use *.xl* to capture all the Microsoft Excel documents (since the file extensions vary slightly between versions of Microsoft Office). |
| /s | This is an example of what’s known as a “switch”; this particular switch modifies the dir command and instructs it to list the contents of all subdirectories. If you’re wanting to get a list of everything that’s on the disk, this is key. |
| > | This is a redirection command. Without it, DOS would simply scroll a list of all the files onto the screen, which won’t do you much good. What you want is for DOS to dump the list into a text file instead. |
| c:\list.txt | For this example, I instructed DOS to save the directory listing in a file on the main hard drive (c:) in its root directory (\) and call the file list.txt (a generic ASCII text file any word processor can use). Obviously, you can redirect the file directory into any disk, directory, and filename (although you will probably want to still use the file extension .txt). |
Once you type in the command above and hit the Enter key, you might feel a little disappointed. The Command Prompt window’s cursor simply returns to the prompt after a few seconds without showing anything — no confirmation, no error message, nothing. But open up a Windows Explorer window, navigate to the drive and directory you designated above, and double-click on the file name. What you’ll see is something like this:
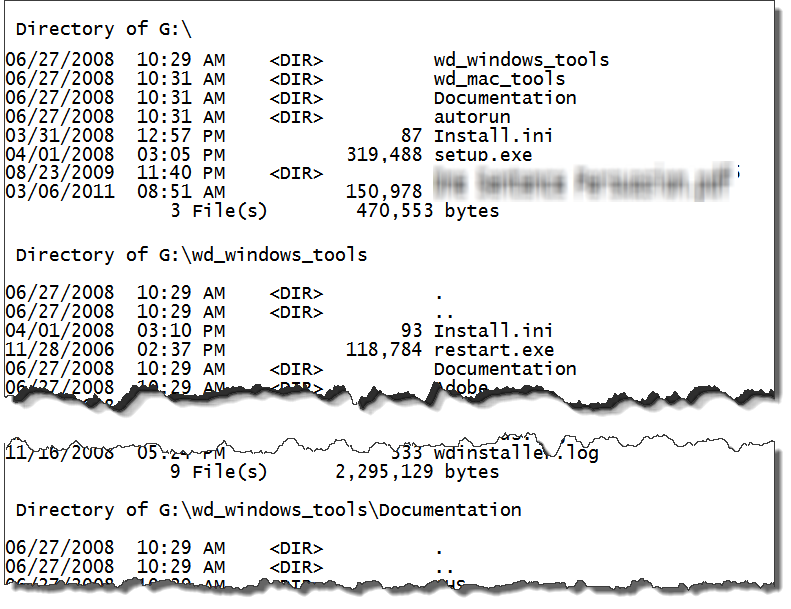
As you can see from the example above, the DOS dir /s command starts by listing everything in the root or top-level directory, then listing everything in the first directory (a.k.a. folder), then drilling down into all of that folder’s subfolders before coming back up to start the process over again with the next folder, etc. The end result is a truly comprehensive list of every folder and file on the disk, logically structured and searchable, too. While you can leave that list in its original text file, you can also copy that into any word processor and dress it up however you please.
Other dir switches to consider
While the /s switch is definitely handy for ensuring you get a list of everything that’s on the drive into a word processor-friendly format, you may have another use in mind for your list of files. Here are some alternate switches to consider for modifying the output. You can mix-and-match pretty much as you please. (A full list is available in Microsoft’s documentation here.)
| /w | Displays in wide format (up to 5 file names/directories per line) |
| /d | Same as /w but files are sorted by column |
| /o[[:] | Sorts the output in a particular order. For example, /o[n] will sort alphabetically by name, and /o[s] will sort files by size smallest to largest. Prefixing any of these with a minus sign (-) will reverse the sort order (Z-A as opposed to A-Z). If you use multiple sorts, separate them with a colon (:). |
| /s | This is an example of what’s known as a “switch”; this particular switch modifies the dir command and instructs it to list the contents of all subdirectories. If you’re wanting to get a list of everything that’s on the disk, this is key. |
| /b | Just the file names and directories – no date, time, file size, etc. Good for a list you want to copy into Excel. |
Getting the 10,000 foot view with ‘tree’
If you just want to be able to see the directory/folder structure (i.e., how the files are organized), use the tree command rather than dir. See Microsoft’s documentation on the tree command here. Do note that there are different switches available for tree than for dir.
10 seconds versus an entire day
When you’re hurriedly preparing for a deposition (as was the case here), the last thing you need is busywork. (Our under-the-gun paralegal was thrilled that I’d just freed up several hours of her time to work on something else just as critical.) If you work in litigation or another practice area where electronically produced documents are the norm, this one DOS command is a good little trick to have in your back pocket. And the best part is, it doesn’t cost you a dime.
Yes, I know there’s an app for that
Invariably, someone will point out that there are various apps that will do this sort of thing for you. Here’s an example of a free one in Microsoft’s Windows App Store. But I tend to prefer this trick because (a) I can use it in virtually Windows version I happen to find myself working in and (b) I don’t have to install something else (something I’m restricted from doing in a typical law office network environment). But if you’ve got a different solution you prefer, hey, I’m happy for you.
About this tutorial
This post was originally published as a guest post on Lawyerist in 2012. It has since been removed from their site and is being republished here with updates/modifications.
Can you this command in some way with OneDrive or Dropbox? When I tried it on the cache directory on my local machine all I get is “Access Denied.” Even though I can access such both online and through File Explorer. We are getting more and more shared folders rather than USB / CDs for discovery. Thanks! Scott
Scott: I can’t tell from your description whether the error is being generated because you’re denied access to read the folder or write to it. I’m going to copy here the response I sent out to my newsletter readers:
First, let’s talk about reading the contents of your Dropbox or OneDrive folder. Here are a couple of examples of me switching to those directories on my own computer within the Command Prompt window:


In the first example above, since my OneDrive folder is on the C: drive (where I already am), I just used:
cd/Users/[my user name]/OneDrive… to switch to my personal OneDrive directory. Just underneath that, I used a variation:
cd/Users/[my user name]/OneDrive - [corporate OneDrive name]… to switch to my corporate OneDrive folder.
In the second example, because my DropBox is on drive G: rather than drive C: (where I am by default when I enter the Command Prompt window), I had to switch to that drive first, then switch folders.
Now, I’m in Windows 10 – your results may vary in a different version of Windows. But the common thread here is that (if necessary) I switched to the correct drive first (my DropBox is on a different drive than C, but both my personal and corporate OneDrive directories are on C), then I used the cd\ command to change directories.
So if you’re switching to your OneDrive, you’d type:
cd\Users\[your Windows user name]\OneDrive–
So that takes care of reading the right drive. But if the problem is on the writing end – in other words, you can’t write the result of the “dir *.*” command to a file because you’re denied access – there’s still hope.
You see, in my own environment at work, I can’t write a file to my C:\ drive using the method I detailed last week. It’s apparently a security thing.
However, I can still get a list using the dir command. The trick I have to use is to copy the result of the dir command from that Command Prompt window into a NotePad window myself, then save it.
Yeah, it’s an extra step, and yeah, I hate it, but that’s what I have to do at work. (At home, I can just write the result straight to a file.)
Try that and let me know if it helps.
Hi Deborah: Is it possible to index a directory drives, let’s say on a server, the same way? Sometimes documents are produced via download, which means they’re going to appear first on my C: drive, and then I’m going to move them onto the server into folders where those who will work with them can get them. I’d really like to be able to index a folder on the server without taking screen shots. Is that possible? Thanks!
Sara: I think it depends on your security settings on the server and what features that particular cloud service will support. As far as the latter, do you have a particular service in mind (Dropbox, etc.)?
I could kiss you right now.
Yeah, I use this trick ALL. THE. TIME. It’s a lifesaver!