To generate a Table of Contents in Microsoft Word in which the content or formatting of your TOC items differ from your document’s headings, use TC fields to mark your entries and/or modify the TOC Styles to change formatting. Other manual changes may still be necessary, depending on your document.
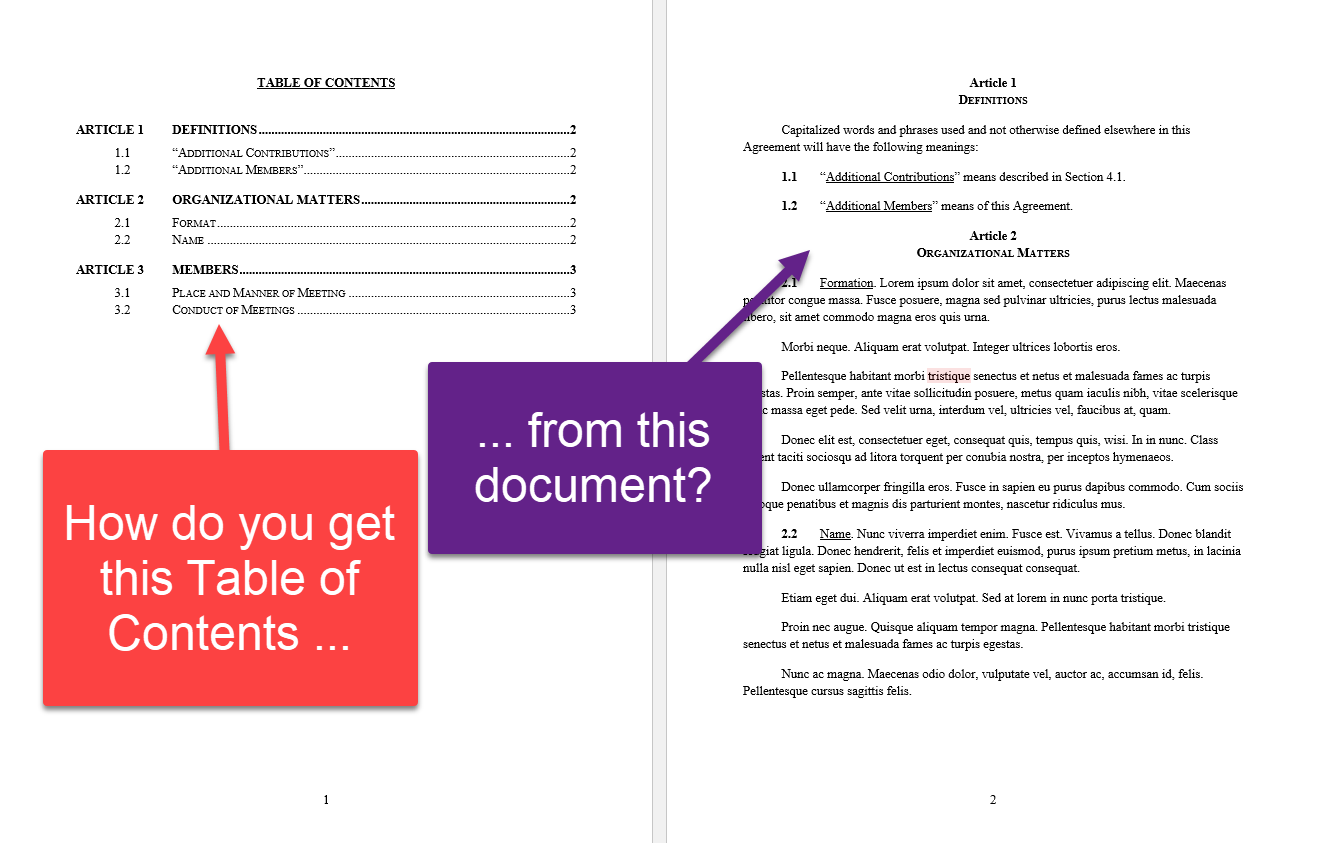
Does your document look like this?

But your Table of Contents needs to look like this?
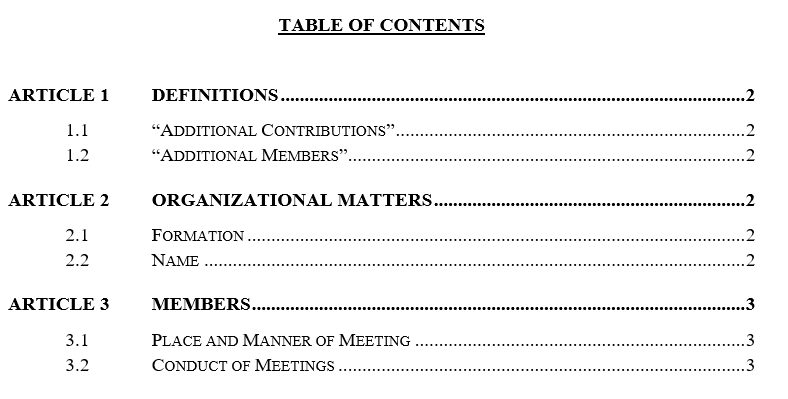
That’s the dilemma fellow Legal Office Guru reader Carol had:
Reader Question
I work in both the real estate and transaction areas of law and use Table of Contents rather frequently and consider myself fairly advanced in using styles. I still have one issue that I have not been able to figure out. Would you please give me your professional opinion on whether or not the TOC can look like the snippet below and, if so, how to accomplish it?
She very helpfully sent me snippets of her document (what’s illustrated above are my mock-ups).
Styles: The preferred way to build a TOC
Normally, I tell people that if, at all possible, you should use Heading Styles in your document to populate an automated Table of Contents. Using Styles accomplishes multiple things at once: It gives you consistent, easy-to-update formatting in your document, it enables you to use the Navigation Pane to get a bird’s eye view of your document, navigate it by heading, and even reorganize your document with drag-and-drop.
Why I can’t use Styles to build this TOC (and what I’m doing instead)
If you know anything about generating an automatically-updating Table of Contents in Word, though, you immediately see a couple of possible barriers to using Styles to populate that Table of Contents:
- The Article number and the remainder of the heading (the first level heading) are separated by a soft paragraph break in the text but need to be separated by a tab in the TOC
- The number in the second level heading is bold in the text but needs to be not bold in the TOC
Other formatting inconsistencies such as the use of all caps and small caps don’t necessarily preclude using Styles to populate the table, but the other two inconsistencies I just mentioned already mandate that we use TC fields rather than Styles to create our Table of Contents.
What are TC fields?
TC fields, a.k.a. table entry fields for Table of Contents, are the legacy way of marking text to include in a Table of Contents left over from pre-Ribbon versions of Word. While using Styles to populate a Table of Contents is the preferred method, TC fields offer some advantages:
- You can customize the content of the TOC entry; in other words, it doesn’t have to match exactly with the text of the document itself
- You can also customize at which level your TOC entry will appear, regardless of how it appears in the hierarchy of your document
- You can include TOC entries that aren’t based on headings
Granted, TC fields are a little harder to set up, but in situations like this where there are inconsistencies between the way the entries appear in the document versus the way they appear in the Table of Contents itself, these fields give you some needed flexibility.
The plan of attack for this TOC
To build this Table of Contents to Carol’s specifications, I’m going to:
- Mark the first- and second-level entries with TC fields
- Deal with the content inconsistencies between the headings in the document and the TOC entries
- Revise the Styles for the TOC entries to include boldfacing, all caps or small caps as appropriate
First, turn on Show/Hide
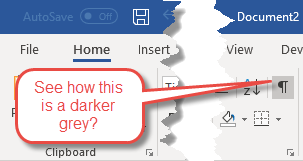
Before getting started, I need to turn on Word’s Show/Hide feature so I can see the non-printing characters, which will also include the TC fields. To do that, click the button that looks like a paragraph character on the Home tab:
Marking first-level TOC entries
Microsoft really prefers you build your TOC with Styles. They prefer it so much that they’ve literally hidden the command for marking a TOC entry! It’s not available on the Ribbon, and unless you already know the shortcut key ALT-SHIFT-O (that’s holding down the ALT and SHIFT keys simultaneously and pressing the letter “O”), you wouldn’t have a clue how to insert a TC field. If the shortcut key works for you, great. I, however, prefer to see this command on the Ribbon so I don’t have to remember it.
Adding Mark Entry to your Ribbon
To put that command on your References tab, right-click somewhere in the gray area of the tab and choose Customize Ribbon. That will bring you into the Options dialog box.
First, I’m going to add a new command group to my References tab to hold this command and call it TOC. I click New Group at the bottom and Rename to rename it.
Now, I have to find the Mark Entry command to put into that command group. Since I know what this command is called, I can choose either All Commands or Commands Not In Ribbon and scroll down the alphabetical list to find it. Once I’ve found it, I can choose my new command group, then choose the Mark Entry command and click Add to add it to that new command group. Once I’ve done that, I can click OK to finish, and I’ll see Mark Entry TOC on my References tab.
To mark a TOC entry, simply select it with your mouse or keyboard and either use the shortcut key ALT-SHIFT-O or the Mark Entry command you’ve just added to your Ribbon. That will bring up the Mark Table of Contents Entry dialog box:
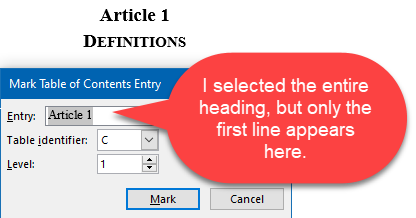
In this example, you’ll notice immediately that it really only picked up the word “Article” and the number after it. That’s because there’s a paragraph break (in this case, a soft paragraph break inserted with SHIFT-Enter). Here’s the first of our manual adjustments: typing in the remainder of the heading into the Entry field:

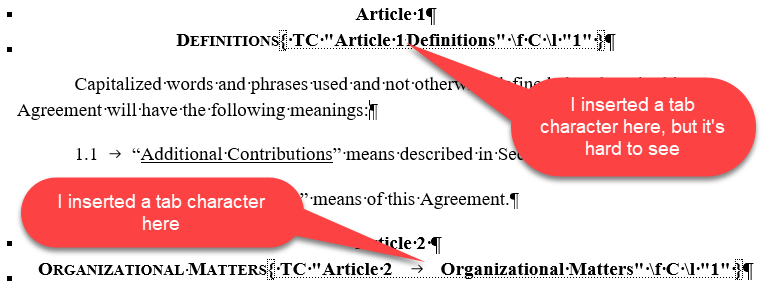
And now here’s the second manual adjustment we need to make: the TOC will need a tab character between the article number and the text of the heading. I can’t insert that within the Mark Table of Contents Entry dialog box, but I can insert it within the resulting TC field.
To do that, though, I need to finish marking this entry. I’m going to leave the Table identifier as “C”, and because this entry will be in the first level of the TOC, I will leave the Level at 1. Then I’ll click OK to finish.
Once I’ve done that, Word will insert a TC field just after the text I selected. The TC field is made up of three parts:
- The text of the entry as it will appear in the TOC (within the quotes after “TC”)
- The table identifier (after the f)
- The level (after the l)
At this point, I can manually type in a tab character after the Article number so it is included in the TOC entry once I insert the Table of Contents.
Inserting the Table of Contents
Now let’s see how our Table of Contents looks with just these first-level entries. On the far left-hand side of the References tab, I’ll click Table of Contents > Custom Table of Contents:
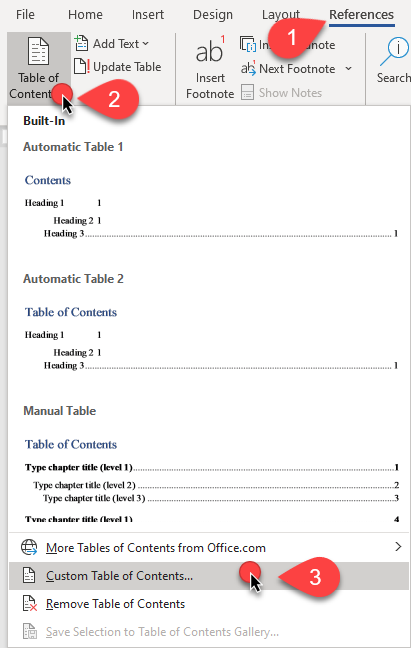
That takes me into the Table of Contents dialog box.
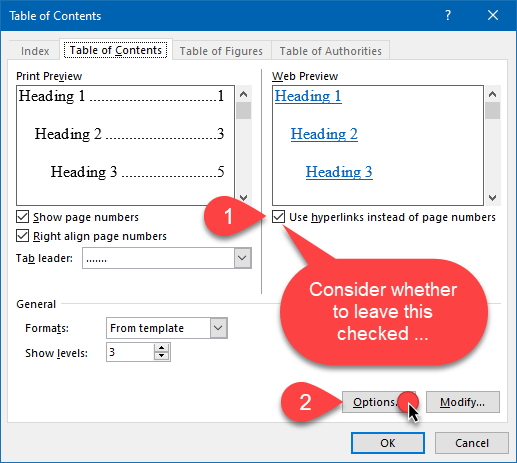
First, I need to decide whether the entries in the Table of Contents should be hyperlinked. The advantage is that it makes navigating within the document easier, both while you’re editing (you can CTRL-click to jump directly to the referenced text) and potentially once you’ve converted your document to a PDF.
The disadvantage, however, is that, if you have any reason to convert your table to text for more editing (only necessary if you find that the Table of Contents feature doesn’t allow you to meet a certain requirement), the converted text will also have hyperlinks which can be a bit difficult to remove. The choice to uncheck the box indicated in Step 1 in the illustration above is yours.
Within the Table of Contents dialog box, click Options to open the Table of Contents Options dialog box:
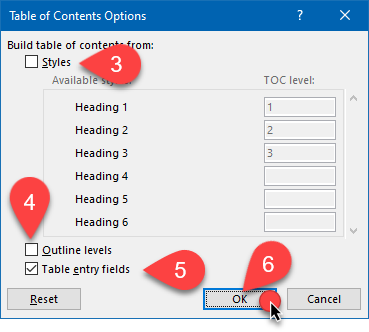
Steps 3-6 (illustrated above) are critical to getting this particular type of Table of Contents right. Because Microsoft prefers you use Styles to build your table, that’s what selected by default (Step 3). Uncheck both that box and the Outline levels box (Step 4), since Heading Styles are usually also linked to outline levels. Then check the Table entry fields box (Step 5), then click OK (Step 6) to go back to the Table of Contents dialog box, where you can click OK to finish inserting the Table of Contents.
Immediately, I see one discrepancy between my table and Carol’s: her Level 1 entries are in all caps and bold.
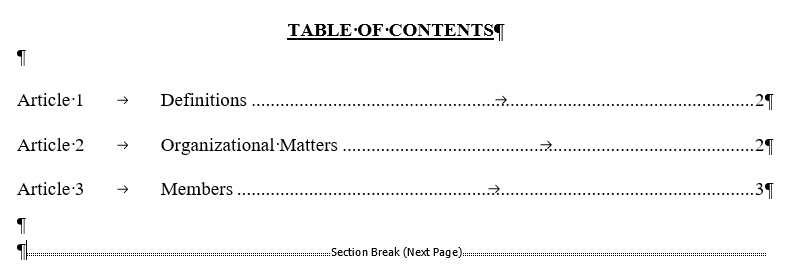
I could simply select the entire table and change the formatting to all caps and bold, but that would be counterproductive because those changes would be undone every time I refreshed the Table of Contents.
Instead, I’m going to modify the Style that controls the formatting of the Level 1 TOC entries. To find out what Style that is, I’ll use SHIFT-F1 to bring up the Reveal Formatting pane, and when I click my cursor inside any of those entries, I see this:
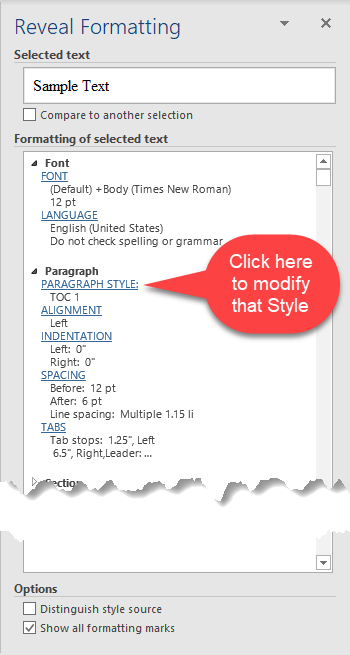
The Paragraph Style entry tells me exactly what I need to know: these entries are controlled by the TOC 1 Style. So I click on Paragraph Style, and that hyperlink takes me directly to the Style dialog box:
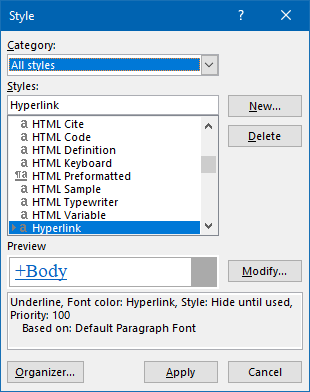
In some cases, more than one Style may be applied to a particular piece of text, and Word does its best to guess which one you want to modify. In this case, it went automatically to Hyperlink. That’s not the one we want to modify. Instead, I’ll scroll down to TOC1 and choose that one, then click Modify:
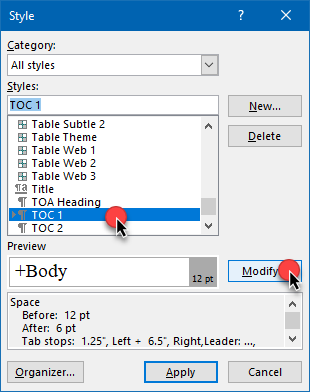
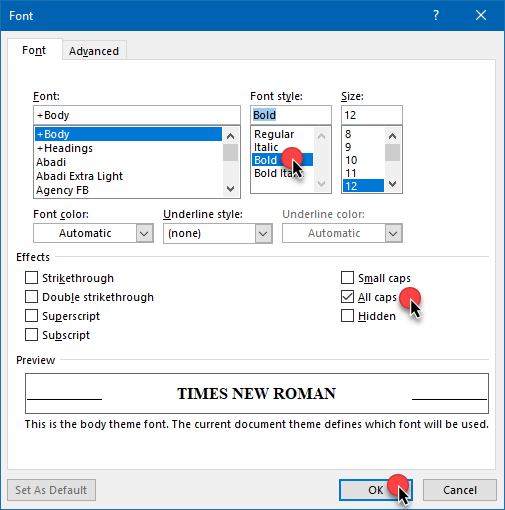
That takes me to the Modify Style dialog box. I can do some formatting changes (like boldfacing) within this dialog box, but to choose All Caps, I need to click Format > Font to go to the Font dialog box:
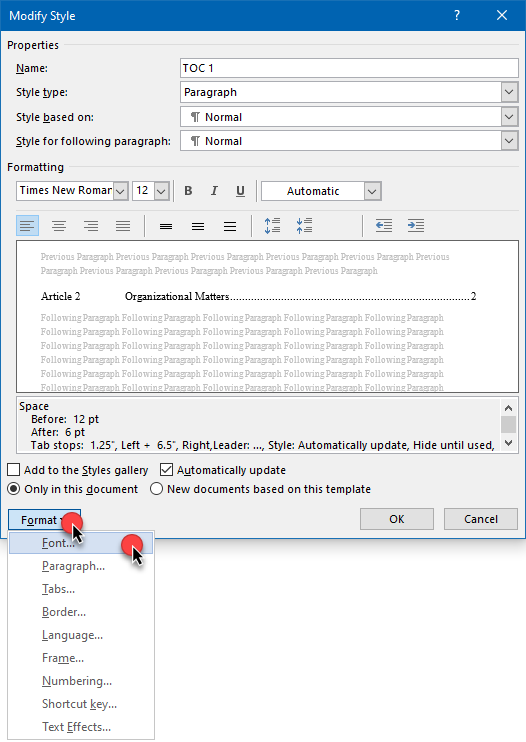
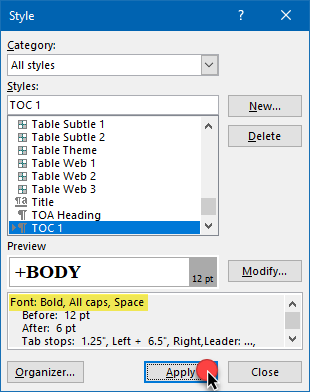
Once I’ve chosen Bold and All Caps, I can click OK to make those font changes, then click Apply to change the TOC1 Style:
Now, my Table of Contents’ first-level entries are in all caps and boldfaced.
Marking second-level TOC entries
Now we can start marking the second-level entries. The process starts the same way: select the text with your mouse or keyboard, then use either ALT-SHIFT-O or the Mark Entry command you’ve added to the References tab of the Ribbon:
The tab character that will need to appear in the eventual TOC entry is already embedded in the text in the document, so there’s no need to compensate for that with these second-level entries. These will be Level 2 entries, so I’ll choose that level within the Level field and click Mark.
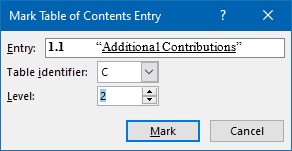
By the way, you can mark multiple entries in the document while the Mark Table of Contents Entry dialog box is visible. Just scroll through your document, select the text for your next entry, then when you click back into the dialog box, the newly-selected text is in the Entry field. Click Mark, then move on to your next entry. Click Close when you’re finished.
Refreshing the Table of Contents to show the second-level entries
Once I’ve marked all of my second-level entries, I can go back to my Table of Contents and refresh it to add them. To do that, I can either click inside the table and press F9, or I can right-click anywhere within the TOC and choose Update Field:
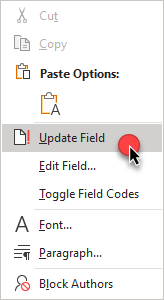
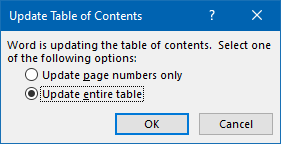
Either way, Word will ask me if I want to just update the page numbers, or the entire table. Because I’ve added new entries, I want to update the entire table:
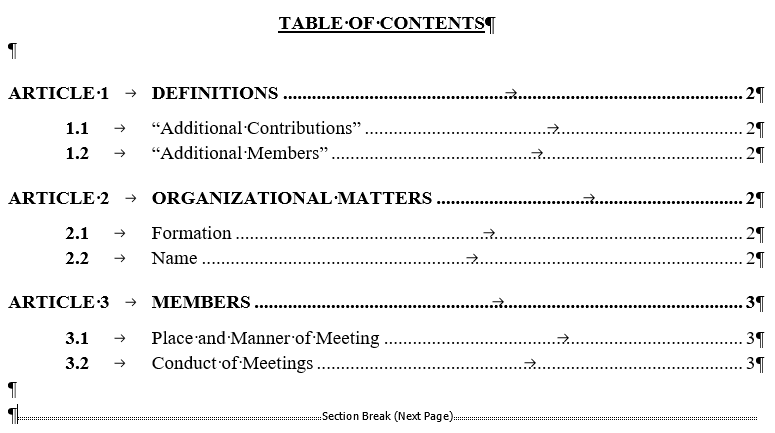
Once it’s updated, I need to compare it to the result Carol wanted:
I see two disrepancies:
- Carol wanted the headings to appear in small caps. These appear in mixed case. This is something I’ll need to fix in the TOC2 Style.
- Carol wanted the entire heading to appear in regular text rather than having boldfaced numbers. This is something I’ll need to fix within the TC fields themselves.
Let’s fix the second problem first. Within each of the TC fields, I’ll need to remove the bold formatting from each entry’s numbers. To do that, I’ll select the numbers within each TC field and either use CTRL-B to toggle off the boldfacing or use the Bold command on the Home tab.
Once I refresh the TOC, the numbers are no longer bold in the TOC, but they’re still bold in the body of the document.
To force the second-level TOC headings to be in small caps, I modify the TOC 2 Style using the same process I used for the TOC 1 Style, namely, going to the Modify Style dialog box via the Reveal Formatting pane.
Once I do that and refresh my Table of Contents, everything looks as Carol envisioned it:
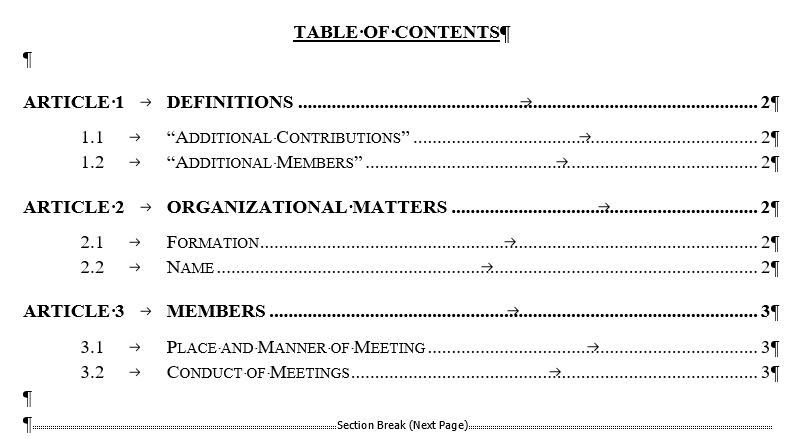
Before finalizing your document, turn off Show/Hide
Before you refresh your Table of Contents one final time, be sure to turn off Show/Hide; otherwise, your pagination will be thrown off by the TC fields. Just click the button with the paragraph symbol on the Home tab to toggle that setting off.
A little tough love: Does it need to be this complicated?
I told you earlier that Styles is really the preferred way of building a Table of Contents but that the TC fields method also works (and gives you some flexibility with formatting and content). But now you’ve seen that flexibility can introduce some real complexity into setting up the Table of Contents.
The more inconsistencies you insist on between your document’s formatting or content and your Table of Contents, the more manual labor it takes to meet your requirements and the less automatable everything becomes. How much value are your exacting requirements really adding to the document? Be honest. Is the extra work worth it?
So that begs the question: Is it worth it? Your preferences are your preferences, and you’re absolutely entitled to them. But the more inconsistencies you insist on between your document’s formatting or content and your Table of Contents, the more manual labor it takes to meet your requirements and the less automatable everything becomes. How much value are your exacting requirements really adding to the document? Be honest. Is the extra work worth it?
Those are questions only you can answer. And, as I said, you’re entitled to your preferences. What you’re not entitled to, however, is any insistence that Word automate your every formatting whim. Word’s pretty flexible, but it’s not a mind-reader. I know that’s uncomfortable for some folks to hear, but it’s reality.
The video tutorial
Want a copy of the example document?
If you’d like to download a live Word document (.docx) that includes the features demonstrated in this tutorial, complete the form below. (Once you’ve downloaded it and after you open it, you may be prompted to “Enable Editing” before you can work with the document.)


H Deborah, I disagree with your solution – it is not necessary to use TC fields. Modify the TOC yes but that's quite a normal thing to do. You modify the TOC and outline styles to suit your needs. And this user has specific needs.
I am a Word specialist and work with global documents from US and Australia and other parts of the world in the legal sector.
Solution 1: Use macro when the TOC is updated and document is in final form that can be rerun – 1 second. Puts in the tab between
Article 1 – Definitions in TOC only. Well if the document is required then this is the best solution especially if a one off document or needs to get out the door.
You can also edit the Heading style to insert the Tab. Works fine. Five minutes worth of fiddling. Then you don't need to use the TOC macro. The TOC will be correct when the styles are edited and you set the tabs in the TOC properly.
In Australia we do not use Style Separators (very rarely) because of the document's layout for the definitions you can use the style separator before the full stop. Had it not had the quotes I would use the linked character and paragraph styles. I don't like direct formatting but US documents seem to use direct formatting everywhere but for outline numbering. Makes for messy documents.
Happy to send the sample document I set up.
Yes you modify the Style for Heading 1 and modify the TOC 1 and TOC 2 styles to apply the small caps and bold or whatever the requirements were in the posted image.
I do use a character style for the Heading under the outline numbering so when the line break is entered I use a shortcut key to apply small caps for my heading Definitions as I don't like direct formatting in documents. I can then change the character style or delete as necessary.
Please email me I am happy to send you the document.
Have a great day.
I would actually be interested to see your solution, particularly how it handles the “I want a line break between the Article number and the description” problem. I’ll contact you by email.