You’ve built a Table of Contents in Microsoft Word using the Styles feature to mark the TOC entries or by marking them manually. And just when you’re about to pat yourself on the back for having an automatic Table of Contents in your document, you notice something’s a little … off. Maybe the font’s not quite right. Perhaps the font’s okay but the spacing’s not. Or the indentation. It could be you want/don’t want the dot leaders running up to the page numbers.
Suffice it to say you just want to alter the format of it. But how?
First, let’s take a look at a sample generated Table of Contents:
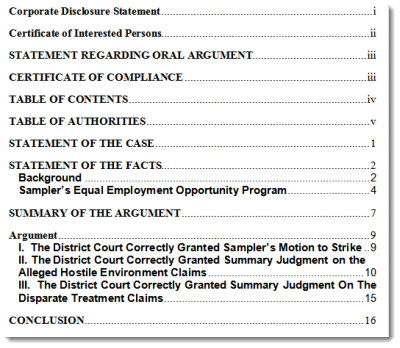
Right away, I see several problems:
- Fonts are not consistent. There’s a mix of Times New Roman (the font for the rest of the brief) and Arial.
- I’d probably prefer a bit more white space between the second-level entries.
- I don’t like the way the right indentation on the second-level entries is behaving — too close to the page numbers.
Table of Contents: fix = replace
To fix the Table of Contents, I basically replace it. Yes, there are other ways to modify TOC entries (if you’re already comfortable with Styles), but I prefer this method because it doesn’t involve me searching all over the document for each Style and modifying it separately. To-may-to, to-mah-to.
First, we select the entire Table of Contents with the mouse and hit Delete.
Next, we can re-define the Table of Contents the way we want. To do that, we go to the References tab and find the Table of Contents menu on the far left:
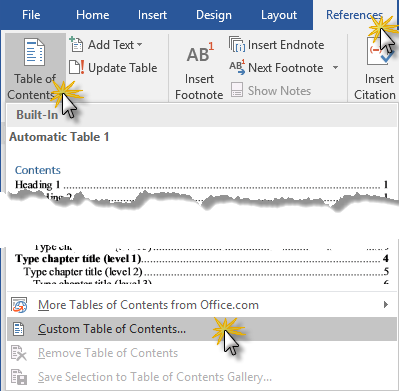
That brings us to the Table of Contents dialog box. We’ll click Modify at the bottom:
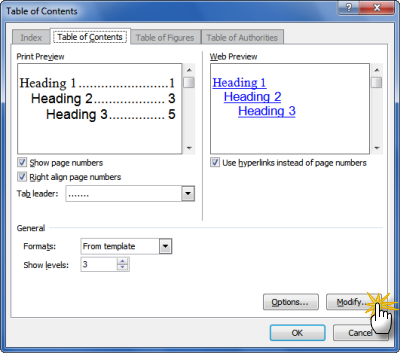
… which will take us to the Style dialog box:
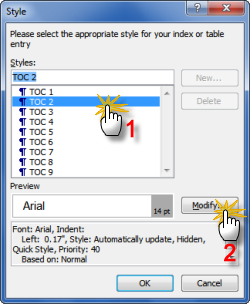
The secret to controlling TOC formatting: Styles
This dialog box lists all of the Styles associated with Table of Contents entries. Since the Styles control the formatting of the entries in the Table of Contents, we need to modify the Styles to correct the formatting. The first entry that has incorrect formatting is TOC 2 (the second-level entries). Click on that (click #1 above) to see the current settings in the Preview window, then click on Modify (click #2).
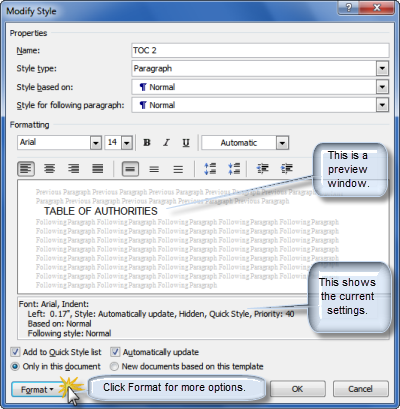
Here’s where we can fix everything that’s wrong with the second-level TOC entries: we can change the font from Arial to Times New Roman with the drop-down in the center, and we can fix the paragraph issues (the right indentation and the amount of vertical space before and after) by clicking on the Format button at the bottom and choosing Paragraph from the menu.
That will take us to the familiar Format Paragraph dialog box:
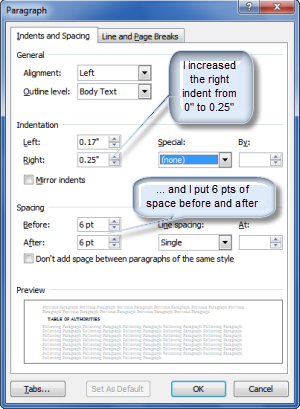
We can repeat the same steps for any other TOC entries that need adjusting, but you get the idea, right?
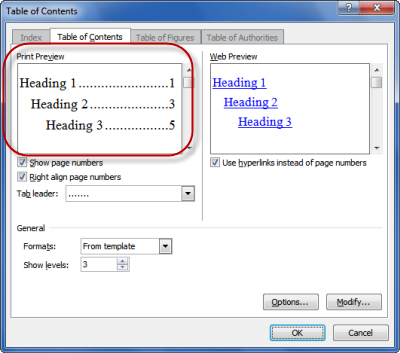
To check our progress, we go back to the Table of Contents dialog box:
Use Print Preview as a guide

Before …
… and after.
Notice how the Print Preview window (circled in red) has changed from the first time we saw it. Also notice that, if we want more/fewer TOC levels, or we want to alter or delete the dot leader, those options are available under General (in the lower third of the dialog box).
Now that we have finished modifying the TOC Styles, we can click OK to insert the new Table of Contents.
So, for my friend Judy, who has asked me repeatedly to do a tutorial on how to modify the format of a Table of Contents … there it is!
This content is part of a course
What you’ve learned here is just a small part of my Brief Builder’s Workshop course, where you can learn all sorts of skills for building better briefs, such as creating a Table of Authorities and configuring a Table of Contents (two ways). Click here for more information.

My current issue is how do you have it BOLD in the heading of the brief but attorney says NO bold in the TOC.
Also, the page #ing for a Federal Appellate Brief in 11th circuit requires some strange page numbering and I’m trying to get the first few pages to auto generate with a C-1 of 3, C-2 of 3, and C-3 of 3 on the bottom of the page in the footer (can make that happen) but when TOC generates, it only shows page 1, page 2 and page 3. ARGHHHH!
And I was told there is something about turning on F1 and viewing the formatting and you have to edit in the Para Heading and not the actual brief content! Double ARGHHH!
As for how to have the heading that appears in the brief bolded without pulling the bold attribute into the TOC:
The trick is to apply bolding within the heading style itself. That is, modify the heading style and apply the bold attribute in the style, rather than using direct formatting to apply bold to the heading text as you type it. As long as the corresponding TOC style (TOC 2 for a Heading 2 style, etc.) does not incorporate the bold attribute, the heading should appear in regular type (not bolded) in the generated TOC.
I learned this trick from the venerable Word MVP Suzanne Barnhill (on a similar issue, see this somewhat dated but still relevant exchange: http://www.tech-archive.net/Archive/Word/microsoft.public.word.formatting.longdocs/2005-07/msg00064.html).
Hope it helps.
Jan Berinstein
CompuSavvy
Computer Training & Consulting
Author, Formatting Legal Documents With Microsoft Word 2010 and
Formatting Legal Documents With Microsoft Office Word 2007
Thank you, Jan! I’ve forwarded a message to Judy alerting her to your solution.
Thanks Jon, It worked for me as well in MS Office Word 2010.
Your method is identical to modifying the TOC x styles with the Modify Style dialog — although I grant that accessing it through the ToC dialog may seem more intuitive. However, there are two additional points I’d make:
1. In the Modify Style dialog, be sure to turn off the “Automatically update” checkbox. For some obscure reason, the default is “on” — but with it turned on, any direct formatting change made by a user to an instance of that style will automatically change the style definition! So, if a user decided to make a given TOC 3 line italic, all TOC 3 lines will suddenly become italic. Worse, subsequent levels based on TOC 3 will change as well.
2. Your instructions cause the TOC styles to be modified for the default template (Normal.dotx). This will work, but it can create future problems if a different document based on Normal used different settings — and then you re-opened this one. It is better practice to attach a custom template so you can be sure the style definitions are retained and can be archived with the document(s) associated with them. This is particularly true in a multi-user environment, or if you want to maintain several quite distinctly different document layouts.
Interesting site !!
Question: Does anyone know of a fix for this problem:
I installed word 2007 (home and student) into another computer (windows 7)
Tables do not appear (print preview) or print properly. (Left side is missing.)
Any ideas?
Thanks,
Sandy
I’m currently using Microsoft 2013 and have terms and conditions at the end of my document which is formatted using subheadings (ie 1.0., 1.2 ect) problem is I don’t wish to include all this text within the TOC, however I would like the page noted. How can this be done as whenever I press update TOC the whole text is included making the contents page about three pages long! I wish to create a template for future documents so it would be good to learn how to avoid all of this text being included. Many thanks for your help.
Clare: You can isolate the range of a table of contents by using the “\b BookmarkName” switch within the TOC field code.
Select the part of your document you wish to have included in the table of contents and assign a bookmark name (Insert > Links > Bookmark). For discussion, say I used the name “UseInToC”.
Now edit the TOC field code (Alt-F9 toggles the display between the result and the code) to add the switch. It will end up looking something like this:
{ TOC \o “1-3” \b UseInToC }
Toggle the view back and press F9 to update the TOC field. The results will now only include entries for heading levels 1 through 3 found within the bookmarked range.
In your case, since your T&Cs are included at the end, your bookmark range should probably include just up to the first heading within the T&C section so it gets included in the table of contents.
This method can be used to create multiple tables of contents. For example, you could have a ToC for each of several appendices by including a TOC field code for each one with the \b switch limiting the range to just the contents of a given appendix.
You could use Eric’s suggestion above (I haven’t tried that, so I can’t attest to it), but the most common way to control the content of a Table of Contents entry (it sounds like you don’t want to pick up the entire heading) is to NOT use Styles to build your TOC. Rather, mark the entries manually using ALT-SHIFT-O (that’s the letter “O”, not the number “0”). Then, when you start to insert your Table of Contents, go to the References tab, click Table of Contents | Insert Table of Contents. You’ll need to click the Options button at the bottom of the dialog box, then uncheck “Styles” and check “Table entry fields” as the basis of your TOC.
Thanks both! I adopted Deborah’s method as this seemed to be the easiest. Thanks!
Clare
The Alt-Shift-O method inserts a TC field code to be used by the TOC field code when a table of contents is generated. I wouldn’t agree that this is “the most common” way to control a ToC (after all, the default settings use the outline levels inherent in Word’s built-in Heading styles).
The TC method is particularly useful when the headings within text don’t necessarily work as ToC lines: for example, a long heading may be inappropriate in the ToC, but could be abbreviated within the associated TC code. Similarly, the TC code method is the only practical way to include lead-in lines from a paragraph within a ToC.
However, if you use the TC method, you will need to be careful if a heading is ever edited. When you make it with the Alt-Shift-O method, the resulting TC field code is set as invisible text and the content is not automatically updated if the originally-selected content is ever changed. (i.e. it won’t show to be edited unless the setting has been selected within the View Options or if field code visibility is toggled on with Alt-F9).
Word’s TOC field code can use switches to include content of >1 type at once, so you are not limited to either/or with heading levels and TC codes. Moreover, the \t switch lets you build a ToC from any style name, and all 3 methods can be included in a single TOC field code.
The other point to note is that the TC code method can be combined with others to include copy that isn’t even included within the main body. For example, old books often included structures like this within a ToC:
Chapter 3. Ahab approaches the leviathan . . . . . . . 98
In which Ahab and his men row out into the
black and surly waters to the mighty beast.
To accomplish this, you could create a TC entry containing the “In which … beast.” text at the beginning of the paragraph following the “Chapter 3 … leviathan” heading within the text (say for this example, by choosing level 3 when you do the Alt-Shit-O). Assuming the “Chapter 3 …” part had been set as a Heading 2, you could edit a basic TOC field code to include switches like this:
{ TOC \o “1-2” \l 3-3 \n 3-3 \b ToCMain }
Consider how the switches in this field code will accomplish the task. The \o “1-2” part collects outline levels 1 and 2 (usually by default, Heading 1 and Heading 2 paragraphs), and maps them to TOC 1 and TOC 2 styles within the table of contents. The \l 3-3 part collects any TC field codes set to level 3 (here, the “In which … beast.” part) and maps them to TOC 3 paragraphs within the ToC. The \n 3-3 part drops the page numbering for just the level 3 items. Finally, the \b ToCMain part limits the range of the table of contents to include only the content within a bookmark named “ToCMain”.
Word’s dialog boxes give you access to a few basic TOC options, but many more switches can be included to easily manage much more complex tables of contents.
Thank you for your contribution.
I have two issues when creating a table of contents.
1) I would like to sort the table alphabetically, PERMANENTLY. I know how to sort it, but it sorts itself back according to page number whenever it’s updated.
2) When I sort it alphabetically, I end up with several identical lines (though with different page numbers) because a given header comes up in different sections. I would like to have a single line, but the page numbers on one line, in the form of a enumeration (eg. 18, 21, 44, 55).
Any help would be appreciated.
If you want something alphabetical and with one entry per term, you want an Index, not a Table of Contents. You can put an Index in the front and title it Table of Contents if you want.
Has anyone tried to do this and found that the “modify” button is grayed out/not available?
When one updates the TOC, it drops the “letter” off and reverts back to just the roman numerals.
If you’re appending/prepending a character with your roman numeral page numbers, then Word doesn’t recognize that character as part of the page number. Sorry.
You can use a workaround to rectify this as long as you remember to redo it if you need to rebuild the ToC (vs just updating the numbers).
Select just the portion of the generated ToC that needs the letter. Use Crtl-H to bring up the Find & Replace dialog, and change a tab (^t) character to a tab plus the letter you want (for example, changing ^t to ^tA- would put “A-” in front of all the page numbers within the selected part of the ToC). Repeat for the sections you need.
Word’s generated table of contents will retain edits through numbering updates, but edits will need to be redone if the table is rebuilt.
Note that the method above assumes a single tab in the ToC lines; if ToC lines have >1 tab within them you may need to use a more specific F&R expression (with wildcards for example).
Thank you so much for this, I nearly launched my laptop out the window are the TOC selected every clause in my legal document!
You saved me an extraordinary amount of time and effort – thank you for sharing 🙂