
Have I told you lately how much I appreciate you, reader? Seriously, if it wasn’t for all of you, I wouldn’t find out about all sorts of things in Microsoft Office.
Case in point: a reader contacted me a few weeks ago and asked me this:
Reader Question
We recently upgraded from Word 2007 to 2013. In 2007 I had set up an auto correct for the term Id. In 2013 I can’t get the AutoCorrect to underline the term. Any ideas? — Sharon
(Note: to view this full-screen, click the full-screen button near the lower-right-hand corner of the video player.)
Frankly, I never knew you could format AutoCorrect entries. So I took to the interwebs to investigate.
Sure enough, it’s possible to teach AutoCorrect to correct both the spelling and formatting of an entry. But there’s a trick to it.
Normally, you’d enter an AutoCorrect entry by going to the File tab and clicking Options (for those using Word 2007, substitute “Office Button” for File tab), the Proofing, then AutoCorrect Options:

If you want to insert a formatted entry, though, you’ll need to start by typing and formatting your AutoCorrect entry first:

Turn on Show/Hide to see the end-of-paragraph marker. You DON’T want to select that character along with id.
Note: be careful NOT to select the “end of paragraph” symbol at the end of the text. You can’t see it above because I’ve turned on Show/Hide (the button that looks like a paragraph symbol in the middle of the Home tab). If you see your selection extend out over what looks like an empty space, you’ve accidentally included it. My advice is to select the text using your keyboard. Place your cursor before the first character, press and hold the Shift key, then press the right arrow key until the entire word/phrase is highlighted. That way, you have some tight control over exactly how many characters are selected. (By the way, you don’t have to actually copy the text with CTRL-C; just selecting it will do the trick.)
Then go to File ¦ Options ¦ Proofing ¦ AutoCorrect Options (see first screenshot above) and you’ll get this dialog box:

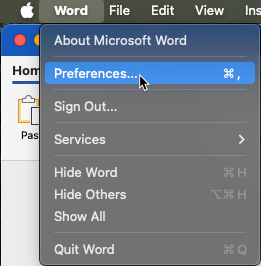
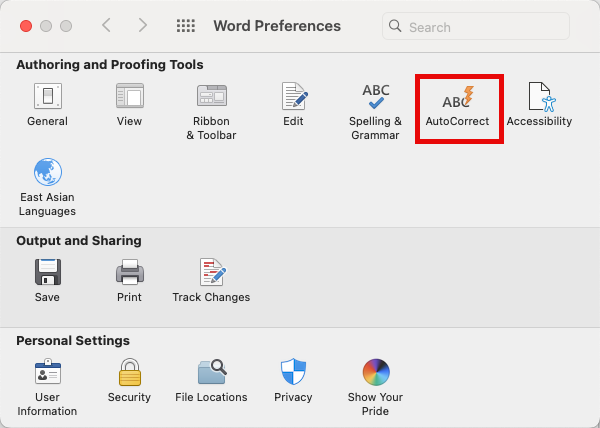
On the Mac, AutoCorrect Options are available from Word > Preferences:
By the way, if you prefer italics like I do, you can do that instead:

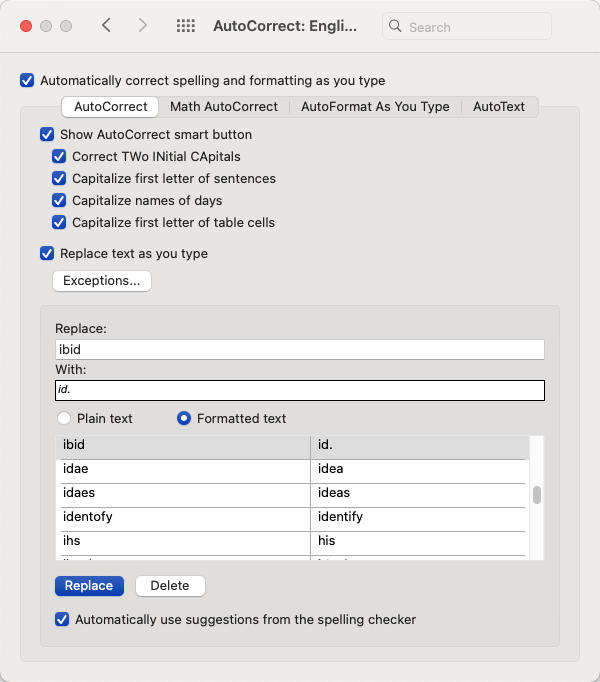
The text you previously selected will appear automatically in the With field on the right (or below on the Mac). Make sure that the “Formatted text” button (see highlight above) is selected. Then, type the text that you want AutoCorrected into the Replace field. For example, this reader wanted Word to AutoCorrect whenever she typed the word “ibid” and make it into id.” So “ibid” goes into the “Replace” field and “id.” will be in the “With” field.
Make sense?
(By the way, you may have noticed that I put “ibid” rather than “id.” in the Replace field. I used to be able to use id. as the prompt; however, that seems to turn on italics or underlining for everything that’s typed afterward. Not sure when that changed between versions, but a hat tip to Ben Kusmin at Excel Esquire for tipping me off to this change. Using “ibid” as the prompt to insert id. or id. seems to work fine.)
Once you’ve done all that, click Add, then OK at the bottom (or, on the Mac, click Replace, then close the dialog box).
The abbreviation for ibid is a great choice for this type of AutoCorrect. And now, thanks to this reader, I can install this AutoCorrect entry on my own computer and save myself a bit of fiddly typing.
Hat tip: https://wordribbon.tips.net/T006097_Cant_Save_Formatted_AutoCorrect_Entries.html