
So when should you use Quick Parts versus AutoText? I’ve got an example showing which tool to use when in this tutorial.
I received an email from a reader a while back who was using AutoText to create form letters. She has fifty-plus boilerplate text snippets that she’s saved into her templates as AutoText, and she wanted my advice on how to better organize them.
Some of her problems stem from her AutoText entries not reliably popping up based on their prompts, which (she guessed) was due to them being named so similarly. That really shouldn’t have been the case; I have three sets of discovery objections all with the same four letters starting their names, and mine work fine. I’m assuming all her AutoText entries are in the same template, but perhaps not.
The bigger problem, though, is that dozens of AutoText entries means dozens of typing shortcuts to memorize (unless you’ve got a cheat sheet somewhere nearby), and each shortcut has to be at least four characters and absolutely unique.
As she described it, she had groups of letters (some to courts, some to clients, some to lienholders), and within each of those letter groups she was basically inserting the appropriate text as the body of the letter. Those paragraphs are what she was saving to AutoText.
One of the challenges of using Microsoft Office generally and Word specifically is selecting the right tool for a particular context. It’s one thing to know how to do something; it’s another thing to know when that particular feature will solve a given problem.
Here’s one instance in which I would argue that Quick Parts is actually a better solution. Yes, I know, AutoText lets you keep your hands on the keyboard, but is that worth having to memorize or consult a list of dozens of shortcuts? Instead, I’m going to propose a different solution: Quick Parts available within dropdowns within the form letter. See what you think.
NOTE: Demonstration starts at 2:35
First, let’s do a sample letter for sending returns of service to the court clerk for recording. I’ve typed an extremely basic form letter for enclosing a return of service to the court clerk.
Plan of Attack (2:35)
Here’s our plan of attack (we’re turning this into a letter that I can use for both a single return of service and multiple returns of service).
- First, inserting a letter date that will update itself
- Second, inserting a dropdown that will let me choose which court clerk to send the return of service to
- Third, inserting dropdowns for singular versus plural in several places
How to save your templates for easy access (2:50)
But before I do all that, I’ve already done two things:
First, I’ve saved this document as a .dotx template. That’s just a different file type from a normal .docx file type you normally use. I’ve saved it in a file location that will allow me to access that template from my Personal Templates folder in the backstage area of Word when I click File > New.
If you’re curious about where you can save your personal templates and how to set up a personal templates folder, for the sake of time, I’m going to direct you to the webinar inserted below (go to the 3:11 mark below for how to set up your personal templates area):
For now, I’ve just saved this document as a .dotx file in the personal templates I’ve already established.
Enabling the Developer tab on the Ribbon (4:06)
The second thing I’ve done is enabled my Developer tab, because that’s going to be key in creating some of the form features demonstrated in this tutorial. If you don’t see a tab called Developer across the top of your ribbon, go to File > Options > Customize Ribbon, and on the right, check the box next to Developer:
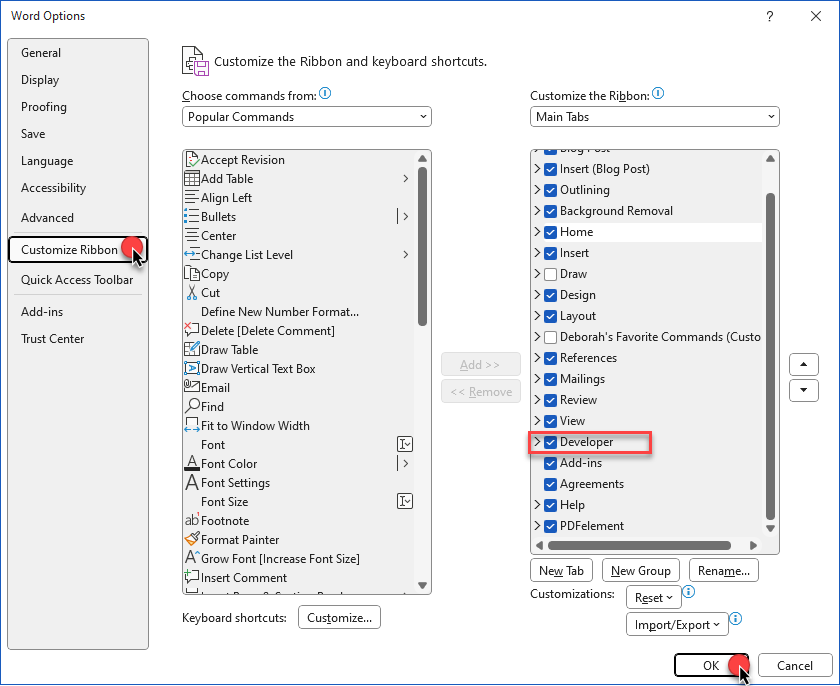
Click OK to return to your document.
Now let’s start editing.
Inserting a self-updating date field (4:46)
First, let’s take care of the date. I’m going to place a self-calculating field here which will show the last date the document was saved. To do that, I’m going to go to the Insert tab and under Quick Parts, choose Field. That will bring me to the Field dialog box:
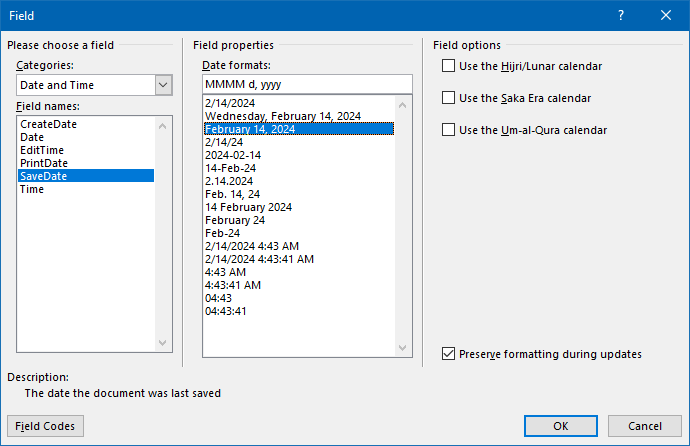
Under Categories, I’m going to choose Date & Time and then choose Save Date and pick the date format to the right. This will always display the last date the letter was saved. I’m assuming here that you would save this cover letter in your document management each time you created it. If, however, you’re just going to create the letter, print it for signature, and not save it, use the Date field instead, which will always display today’s date.
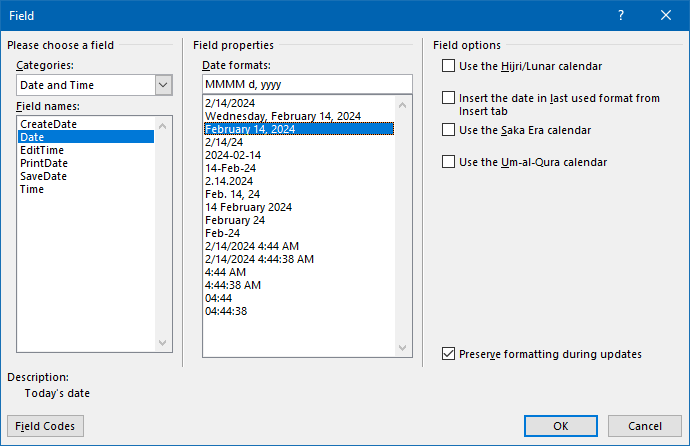
Whichever date field you choose, click OK to insert that date field.
While you’re working with this as a template and before you use this template to save an actual letter, the Save Date field may display as “XXX 00, 0000”. Don’t worry; when you save and print the letter, it will update to the correct date.
Inserting a dropdown that chooses an address from Quick Parts (6:06)
Now that we’ve gotten the date out of the way, let’s move on to the address. You may be in a situation I’ve been in where you could be sending this letter to any one of a number of different courts. For example, we’ve got one circuit court just down the street and another circuit court we frequently have cases in that’s located in the next county. So what we’re going to do here is create a dropdown that lets you choose which court clerk and address to send the letter to.
The dropdown I’m going to create here is going to give you a choice between two Quick Parts I’m going to create or, alternatively, allow me to choose a generic “Office of the Clerk” and fill in another address for a different court for those infrequent instances in which we’re sending this somewhere other than the two courts we deal with most frequently.
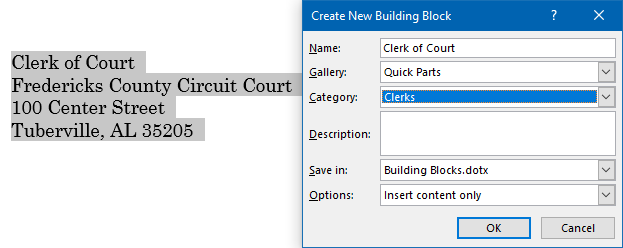
I’m going to type in the first address so that I can use this to make a Quick Part, then I’m going to select this entire address and on the Insert tab, choose Quick Parts > Save Selection to Quick Part Gallery. I’m going to name it “Clerk Johnson County” and leave it in the Quick Parts gallery.
But here’s a very important step: Instead of leaving it in the General category or putting it into my special category @DES, I’m going to create a new category called “Clerks” to save this Quick Part into. That’s going to become key when I create the dropdown.
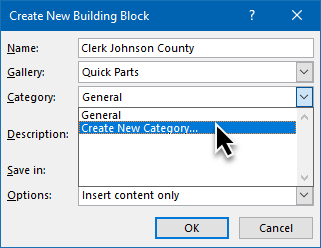

And because I’m going to be using this in my form letter return of service template, I’m going to store that Quick Part into that template rather than the default Building Blocks template. (I’ll explain later why that’s important.) Under Options, I’m going to Insert Content Only, then click OK to finish.
Now I can type in the second address for the other county and repeat those same steps.
So now that I have three addresses saved in Quick Parts under the Clerks category, I can take this address out and replace it with a dropdown that will let me choose between those two addresses or a blank.
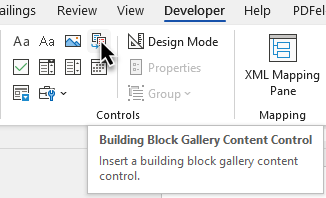
After making sure my cursor is in the right place, I’m going to go to the Developer tab, and in the Controls command group, choose Building Blocks > Gallery Control. This will insert a dropdown that will allow me to pick a Building Block from a particular gallery such as Quick Parts.
But if you’re like me and you build a lot of Quick Parts, you don’t want to have to scroll through all of them to find the one you’re looking for. That’s why I saved both addresses into their own category: Clerks.
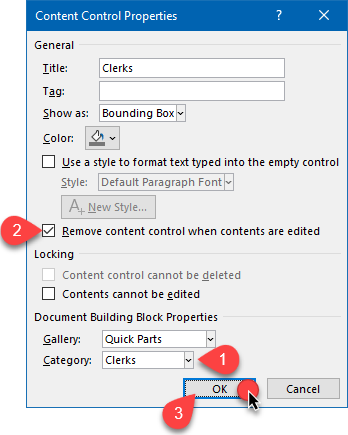
Once the content control is inserted, I can select it and click Properties to refine it a bit. First, I can give it a title (although that’s not strictly necessary). Most importantly, though, I want to limit the Quick Parts category to Clerks at the bottom of this Content Control Properties dialog box.
And because I may occasionally want to send this letter to a clerk other than the ones listed in my Quick Parts, I’m going to check the box next to Remove Content Control When Contents Are Edited. That way, I can choose a generic clerk’s entry and immediately enter the address without the content control getting in the way.
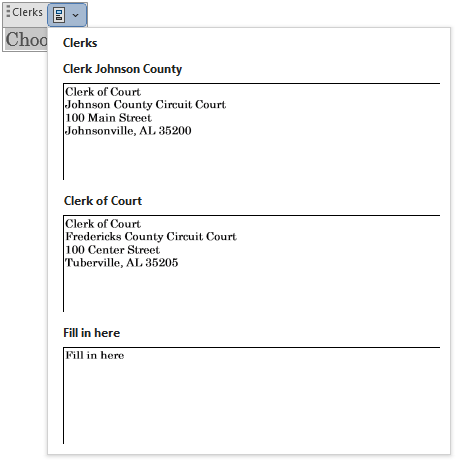
Now I can click OK and test this out. When I click on the dropdown, I only see three entries: one for each of the most common counties and a generic “starter” that I can edit once I choose it.
And of course because I checked that box next to Remove Content Control When Contents Are Edited, I basically destroyed my content control, so I’m going to re-create it and, this time, leave it alone and save my template.
Inserting dropdowns for singular vs. plural (10:55)
So now I’ll be building the changes necessary to convert singular to plural in various places. I’m sure there are some more elegant solutions, and if you know of one, let me know in the comments. But this is a good opportunity to demonstrate a different kind of content control on the Developer tab.
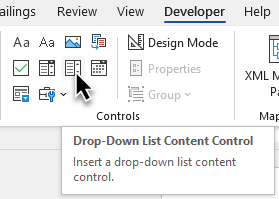
First, let’s select the word “return,” the plural of which would be “returns.” This time, I’m going to pick a Dropdown List Content Control which is going to allow me to create a list of acceptable values. When I select that control and click Properties, the Content Control Properties dialog box allows me to add several values by adding them using the Add button, typing in a value, and clicking OK.
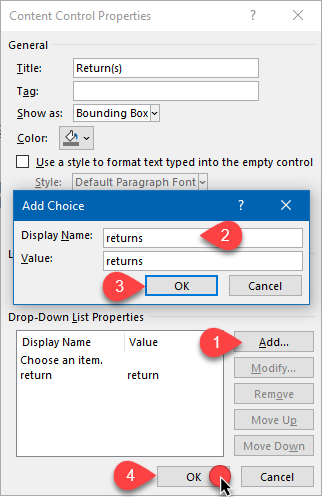
As with the content control I did for the clerk’s address, I can give it a title. In this case, choosing Remove Content Control When Contents Are Edited is up to you, but I’m going to leave that unchecked so I can test this one without destroying it. Now I can click on the word “return” and choose either the singular or plural form from the dropdown. I can do the same thing for the words “defendant” and “enclosure” elsewhere in the letter.
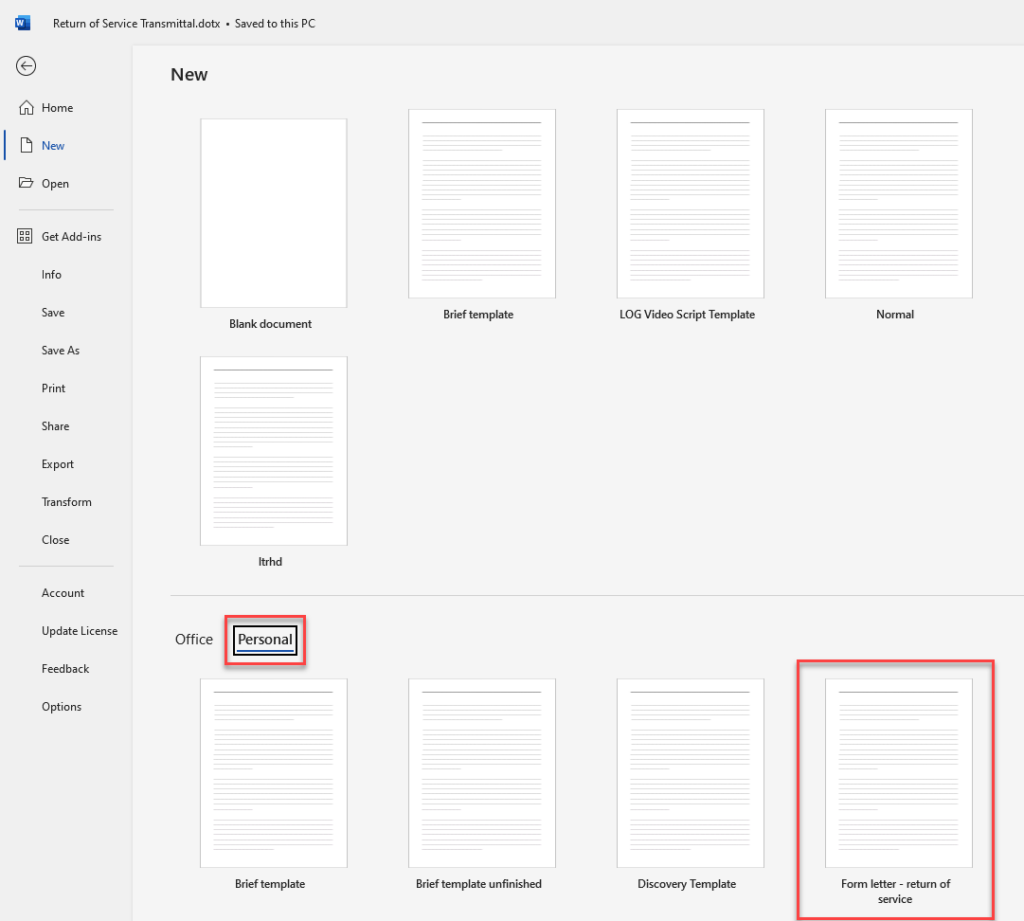
Saving the template and using it to create a new document (13:09)
Now I’ll save this template one final time, close it, then use it to create a new letter. I’ll go to File > New > Personal Templates, and there’s my template for “form letter return of service.” When I click that, I get a new document based on that template, and I can use the various dropdowns to customize the letter and type in the case style and the defendants’ names into the blank spaces I’ve left for those.
When I was creating the Quick Parts for the clerks’ addresses, I was careful to save those into this template, because my personal templates are not as vulnerable to being overwritten by a system update as the Normal and Building Blocks templates are.
If you’re not sure you’ve saved yours to the right place, go to the Insert tab and click Quick Parts > Building Blocks Organizer, then find your new Quick Part in the list and choose Edit Properties, then switch the Save In dropdown to your new template. If you don’t see your new template listed in the Save In dropdown, be sure you either have the template itself or a document based on that template open so that Word has access to it.
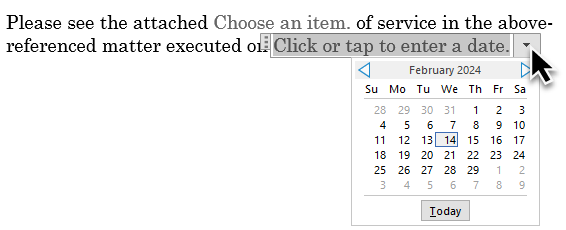
Second example using date picker dropdown (14:53)
Here’s another example using a couple of other techniques. We have something in our area called a Rule 37 letter that we send to opposing counsel when they’re late answering our discovery. We say, basically, “Hey, we served some discovery on you more than 30 days ago and haven’t seen a response. Please serve your response before we have to file a Motion to Compel.” It’s a pretty generic letter, with a couple of variables.
The first variable is the description of the actual discovery. Here’s where I can use another one of those dropdown list controls and add a bunch of combinations of discovery so I can pick exactly what’s been served.
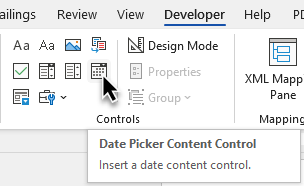
The other variable is the date the discovery was served. For that, I can use a date picker content control, then use Properties to control how the date is formatted when it’s inserted into the letter.
Do either of these examples help you? Let me know in the Comments
So, does having a specific set of Quick Parts available within a drop-down in your document something you’d find useful? Or would that just create more problems than it would solve? Let me know in the comments below what scenarios you can envision in your daily work.
Hi Deborah. I am the reader that contacted you about converting templates to QPs v. AutoTexts. Our office was changing programs and I was worried about losing my templates. Fortunately, they did not delete my templates and I was able to save them. As fate would have it, I began making an effort to building more QuickParts and templates just last week…and then I got this tutorial. I must have been sending out vibes through the network directly to you!
This tutorial is absolutely fantastic! I will definitely be reconfiguring some of my templates using the drop down feature. It seems like it will really streamline things for me, especially where I now work for a team of 4 attorneys, with 2 more to start in May.
I absolutely love your tips and tutorials. Please keep them coming!!
That is an amazing coincidence! I’m sure someone will think I planted this comment, but I swear I did not! 🤣