
My friend Karen has issues. No, I’m not talking about those kinds of issues. She’s got issues with Microsoft Excel. Every time her boss gives her one of those monster Microsoft Excel spreadsheets (the kind that span 10 pages across and have 20,000 rows of data) and says, “Print this,” she panics. And then she comes to my desk and begs me to print it for her.
I can’t say I blame her. Unless you’ve worked with Microsoft Excel a fair bit, the prospect of formatting something that large for printing is pretty daunting. (I always felt the same way about Lotus 1-2-3 for DOS back in its heyday. Yes, I am that old.)I promised her I’d break this process down for her so, in case I’m on vacation one day when she really, really needs something printed now, she’ll know how to do it herself.
Taming the large spreadsheet: the process
Once you’ve acquired some basic skills in Excel, the process for formatting a sheet to print is really pretty straightforward:
- Setting the Print Area and Print Titles
- Inserting Headers and Footers
- Controlling Margins, Page Orientation, and Page Size
- Inserting/Adjusting Page Breaks
- Previewing the final result and tweaking where necessary
Let’s step through it.
Setting the Print Area and Print Titles
Right off the bat, you’re going to need to decide how much of the spreadsheet to print.
Most of the time, you need to print the entire thing. But that doesn’t let you off the hook here.
That’s because, even if you want to print all the data (the Print Area), you’re probably going to want to print the row and column labels on each page (the Print Titles).
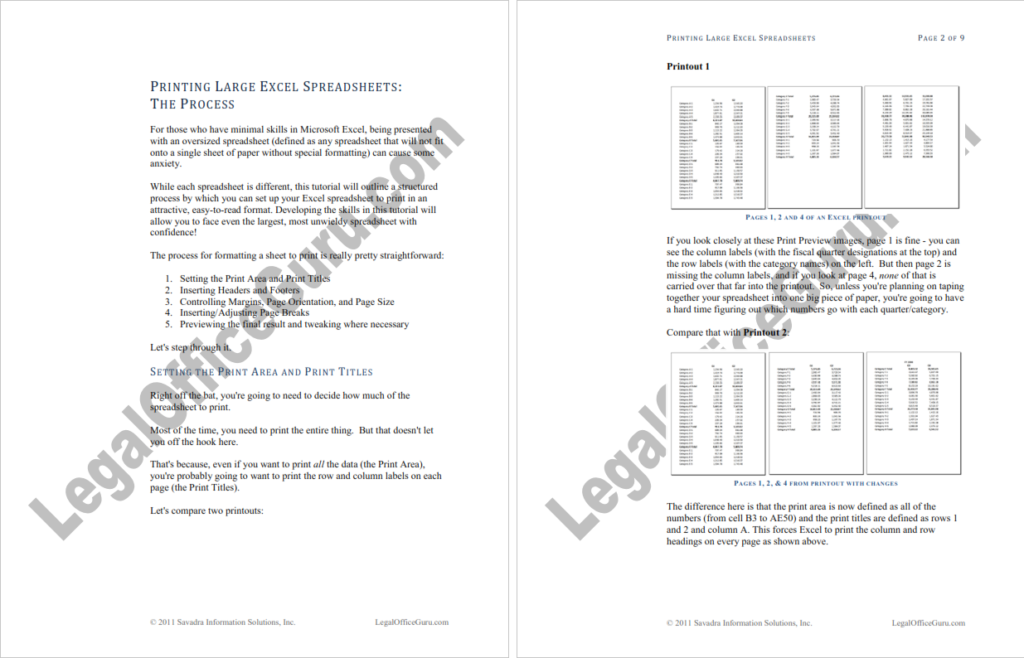
Let’s compare two printouts:

Printout 1: Pages 1, 2 and 4 of an Excel printout (click to enlarge)
If you look closely at these Print Preview images, page 1 is fine – you can see the column labels (with the fiscal quarter designations at the top) and the row labels (with the category names) on the left. But then page 2 is missing the column labels, and if you look at page 4, none of that is carried over that far into the printout. So, unless you’re planning on taping together your spreadsheet into one big piece of paper, you’re going to have a hard time figuring out which numbers go with each quarter/category.

Printout 2: Pages 1, 2 & 4 from printout with changes (click to enlarge)
The difference here is that I’ve defined the print area as all of the numbers (from cell B3 to AE50) and the print titles as rows 1 and 2 and column A by going into the Page Setup dialog box from the Page Layout tab, then selecting the Sheet tab:

That’s what enables the row and column labels to print on every page.
Inserting Headers & Footers
Once you’re in the Page Setup dialog box, you can define headers and footers to print on every page on the Header/Footer tab. For example, you can insert a custom title at the top and page numbers at the bottom by clicking the Custom Header and Custom Footer buttons:

Controlling margins, orientation and page size
The printout is starting to look somewhat better, but there’s some further tweaking to be done here. For instance, maybe the sheet makes more sense (and prints more attractively) printed landscape rather than portrait. Or perhaps it’s a good idea to print this on Legal size paper (8.5″ x 14″) or even on Ledger size (11″ x 17″) rather than Letter (8.5″ x 11″).
Given we’re already in the Page Setup dialog box, we’ll just need to explore the other two tabs: Page and Margins.

As you can see from above, you can adjust the placement of the headers and footers and the page margins on the Margins tab, and control the orientation (portrait versus landscape) and the page size (letter, legal, ledger, A4, etc.) on the Page tab. You can even scale the spreadsheet up or down by a set percentage, or force the spreadsheet to print on a particular configuration of pages across/down (if you want everything to fit on one page, you’d choose 1 page(s) wide by 1 page(s) tall, for example).
One more thing: if printing gridlines on your sheet would help improve readability (you know, borders around each cell to make following rows/columns easier), go back to the Sheet tab and check the Gridlines box:

Notice here, too, that you can also control whether the row and column headings (1, 2, 3 for rows, A, B, C for columns) print on your sheet. Excel will also let you set whether the printout order goes horizontal then vertical or the other way around (in other words, whether you want the pages to print across, then down).
At any point, you can click Print Preview to check your progress.
Inserting and adjusting page breaks
With some sheets, you may want to be sure that certain information appears together on a page. In the sample sheet, it would probably make the information more readable to print all of a fiscal year’s information one sheet across.
You’re probably familiar with page breaks in Word. Excel’s are different in one key respect: you can define page breaks horizontally and vertically.

The easiest way to deal with page breaks in Microsoft Excel is in Page Break Preview mode. Go to the View tab on your ribbon and click Page Break Preview.
Excel will automatically place some page breaks for you. In Page Break Preview mode, you can literally drag those pre-defined page breaks around on the screen until they’re placed where you want them.
If you need to manually insert a page break within your Excel sheet, select the row or column directly after which you want to insert the break, then go to the Page Layout tab and, in the Page Setup section, click the drop-down under Breaks to insert the appropriate break:

If you make a mistake in where you insert your page break, simply drag the page break to the right spot (since you’re in Page Break Preview mode anyway).
Previewing and adjusting the final print result
At virtually any point in this process, you can go to Print Preview to check your progress and make a note of any adjustments you need to make.
You can also make adjustments directly in Print Preview:

The above menu appears directly to the left of the preview of your document. You can make on-the-fly adjustments within this menu, or click Page Setup at the bottom to go back to the Page Setup dialog for more options.
The final result
After all that, here’s how the sample spreadsheet finally prints:

Nice, huh?
The Video
Because these things sometimes are more easily explained by showing you step-by-step, I’ve added a video below, along with a transcript and a downloadable illustrated version of this entire tutorial.
(Note: to view this full-screen, click the full-screen button near the lower-right-hand corner of the video player.)
This is a common problem when working with Excel – thanks for sharing your techniques! 🙂
I was never very good at printing excel spreadsheets – the wrong bits would come out in the wrong places! Word documents are much better behaved 🙂
One more trick on printing Excel spreadsheets – sometimes there is too much data to be contained reading across so it cuts off rows and puts them on the next page. You can fix this with the scaling feature in page setup, but a quick fix is to select Fit To and put a really large number (like 999) in the second box. It will automatically scale to keep the data going across on the same page. You may need to change your paper size and orientation to keep it readable, but at least it won’t spill over onto the next page.
Cool trick, and easy too – thanks, Lucy!
Turn on page break preview and drag the page break to make orphaned text fit on the page.
thank u
small correction Ledger size (11″ x 14″) is incorrect. Ledger size (11″ x 17″), Legal is (11″ x 14″) or refer to http://www.dpandi.com/paper/index.html
Oops! I think we’re both having a little problem keeping our US paper sizes straight! Letter is 8-1/2″ x 11″, Legal is 8-1/2″ x 14″, and Ledger is 11″ x 17″ (like two Letter size pages laid side-by-side, which is why they’re used for tabloid publishing of letter-size newsletters, among other things). Thanks for the heads-up!
Hi
Thanks, and keep up the good work.
1. Now if i want to print all rows for “GURU”, how do i do it?
2. In Word it is possible to change small letters to CAPITAL LETTERS by “shift”+F3.
is anything like this in EXCEL?
lot of thanks
tomy
@Tomy –
1. Not really sure what you mean. Are you wanting to filter rows based on certain text? That’s possible on the Data tab.
2. Yes, but it’s not as easy as in Word. See http://blogs.office.com/b/microsoft-excel/archive/2011/03/10/a-capital-idea-changing-case-in-excel.aspx for details.
I’ve found that the print preview screen does not alway reflect what actually gets printed. I’ve assumed that what I saw on the preview screen was what I would see on paper and it hasn’t turned out that way. This can make one look bad when the paper isn’t proofed before using it in a meeting 😉 This happened when I was doing a lot of tweaking to get things right. I was using the page break feature, and others, and the “print preview” was showing something other than what appeared on paper.
Great, now how do I get my monster excel sheets into Word 2007 with the row and column labels on every page?
Do you really want to import an entire large spreadsheet from Excel into Word? Why?
I have to submit my thesis with appendices as one single pdf. My appendices are all big (though not huge) spreadsheets, which also need to be fronted by cover pages (eg. blank page with Appendix A on it). When I try to copy the spreadsheets (formatted nicely for printing) into word, using different paste options, the formatting, such as the row headings on multi-page sheets, don’t stay, and the column widths also shift, which results in a lot of messing around trying to get them to look good again, insert rows with row headings, and then the whole thing’s messed up again.
I would recommend, instead, that you pdf the spreadsheet and, using whatever pdf software you have, insert the appendices at the appropriate spot into the pdf of your main document. It’ll be much cleaner, and the formatting of both documents will be easier to control.
I don’t know what pdf creator you’re using, but in Adobe Acrobat, the Insert Pages command is under Document on the menu bar.
I am trying to set up my Excel 2010 worksheets to be ledger (tabloid) size. I have gone into Page Layout and Size, but 11×17 is NOT one of the options. How can I convert my worksheets to this size? I need help ASAP!
Did you click “More Paper Sizes” at the bottom of the Size drop-down?
Yes, I did. But, it doesn’t show it there either.
I just had someone tell me to go to File, Print, Send to OneNote, Advanced…..and then I can change to tabloid. But, that’s not exactly what I had in mind. I don’t need the “white space”. In addition, I would like to view it in Tabloid, not just print it in that size. Any suggestions?
Oh, and the trick of using OneNote doesn’t save the Tabloid size if I close the file and reopen it. It defaults back to Letter size instead of Tabloid size.
I just found this on mrexcel.com, but not sure how to do this or what a macro is. Plus, since it was a post from 2004 it may or may not be relevant. Can you help??? I really need to be able to convert these documents on my laptop to Tabloid size layout and Print Preview them as such.
“I ran into this before, with a client who only wanted that size paper, which in VBA code is referred to as xlPaper11x17 or xlPaperTabloid.
The issue is the printer(s) that are attached to the computer running the workbook. Those printer(s) (the default one or whichever you assign at the Control Panel level) must have the capability to print on that size paper. If the printer cannot print it, you won’t see that size as an option in the settings. Are you sure their printer can accommodate that size? Maybe you are designing the workbook for them but on your computer, your printer is not the type that handles that size paper.
That was what I ran into, so I asked my client to record a macro of them printing on that size paper, they emailed me the code, and I was able to complete the macro at my desk by recording my print macro and plugging in their VBA paper size reference from the recorded code (it’s not always recorded as xlpaper11X17 or xlPaperTabloid, sometimes one or the other depending on Excel version), then sent them the finished workbook product. Maybe you are not working with VBA in this case, but just letting you know, I think it’s a local system issue with printer types”. (Tom Urtis, May 7, 2004)
Is there a way to print multiple worksheets to a single pdf where all the worksheets have a different header?
I’ve tried everything under the sun and can’t come up with a solution within Excel.
Any help is appreciated!
I am printing several worksheets as one double sided print workbook job, so because the pages are sometimes in groups of an eneven number of pages I have had to add a trailing blank page every now and then. My problem is finding a way of supressing the page titles for the blank pages. Can you actually set separate print areas in the same workbook and define which print area has titles and which does not? The annoying thing is that I did achieve this somehow but don’t know how I set the printing up so can’t replicate it now.
You can define multiple print areas on a single Excel sheet, but I don’t see any way to define different headers/footers for them. If you’re printing multiple worksheets double-sided and you have one or more worksheets that work out to an odd number of pages, you can either manually break the pages so that you have an even number of pages per worksheet, or you can insert a blank worksheet immediately after an odd-page worksheet so it will print as a blank page.
If you have lots of Excel documents to format and print http://www.rapidformat.com can help.
Thank you so much for posting this, Deborah! I have been trying to print a year’s worth of PayPal sales records and was terribly frustrated. Before finding your post, I made the mistake of printing 80 pages worth without turning titles on and minimizing the margins–which meant they couldn’t be hole punched without punching through data. I’m relieved not to have to get out the scissors and tape. 😉