
One of the many reasons I’m such a cheerleader for Styles is how many formatting problems you can prevent just with intelligent Styles use.
For instance, ever see a heading get separated from its first following paragraph by a page break? Most people “solve” that problem by putting in a bunch of hard returns before the heading to move it onto the next page. Trouble is, that just invites more editing headaches down the road as the document continues to change.
Here’s a better idea: Set up the Heading Style to always stay connected to the next paragraph.
That’s just one of the six Styles settings I recommend Word users implement for their Styles. Read on for all six.
1. Always choose “Keep with Next” for Heading Styles
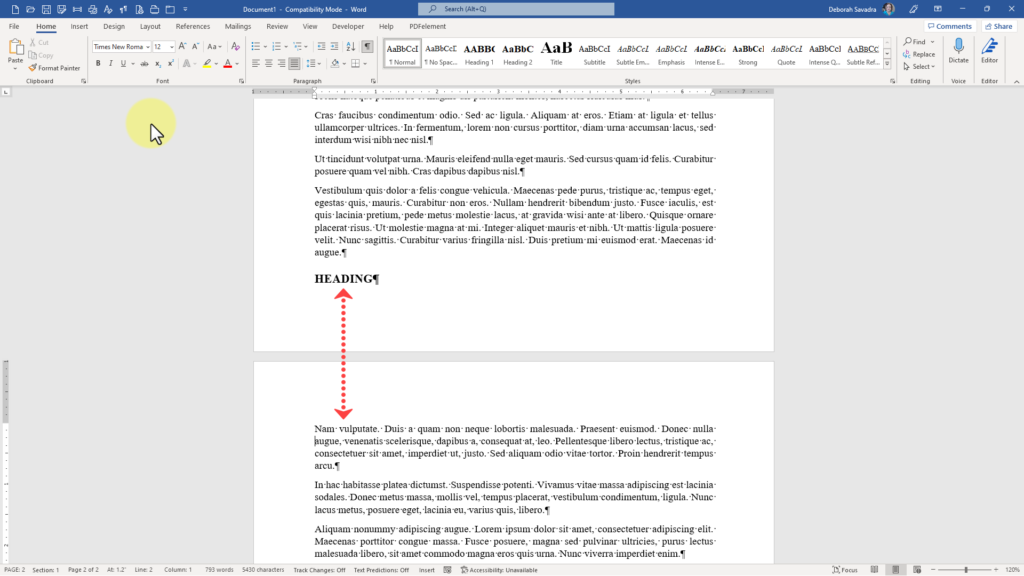
If you want to be sure your headings are always connected to their following paragraphs and not separated from them by a page break, be sure to turn the Style’s Keep with Next checkbox on. To do that, right-click on the Style, choose Modify, and in the lower left corner of the Modify Style dialog box, click Format > Paragraph, and on the Line and Page Breaks tab, check the box next to Keep with Next, then click OK to return to the Modify Style dialog box. Be sure to check the New documents based on this template radio button to keep from having to do this every time you start a new document.
2. Never select “Automatically Update”
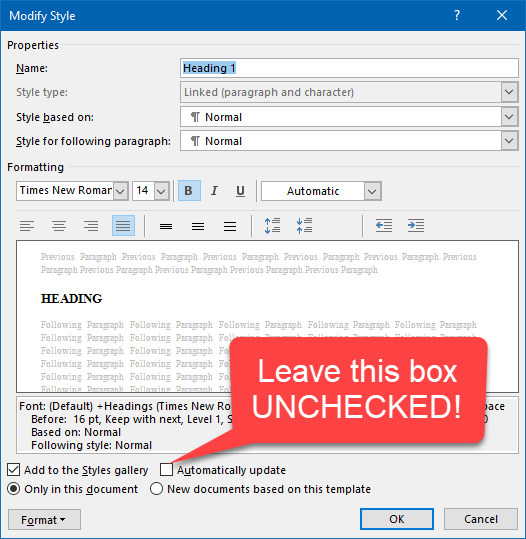
While we’re here in the Modify Style dialog box, you may be tempted to check the Automatically update box near the bottom. Don’t! This setting tells Word to save any text formatting changes you make to styled text to that document Style. In other words, if you do any direct formatting of your text, you’ll find that all of the text with that Style applied suddenly takes on those same characteristics. With very rare exceptions, you don’t want to set that precedent; rather, you want to preserve your ability to do a bit of direct formatting here and there without wrecking your Styles.
3. If you don’t use a Style often, don’t show it in the Styles Gallery (or at least move it down the line)
If the Style you’re creating or modifying is a Style you very seldom use, you may not want it cluttering up your Styles Gallery on the Home tab. You can uncheck the Add to the Styles gallery box to remove it completely, or you can assign it a sorting value to send it to the end of the gallery so only your top priority Styles are visible in the first row.
To re-assign a new sorting value, open the Styles Pane by clicking the small launcher arrow in the lower right-hand corner of the Styles Gallery, then click Manage Styles at the bottom. Find that Style on the Recommend tab in the Manage Styles dialog box and use the Assign Value button to assign it a high enough value to move it down the list. Alternative, you can use the Make Last button to move that Style to the end of the list.
4. Don’t use Linked Styles unless you really, really must
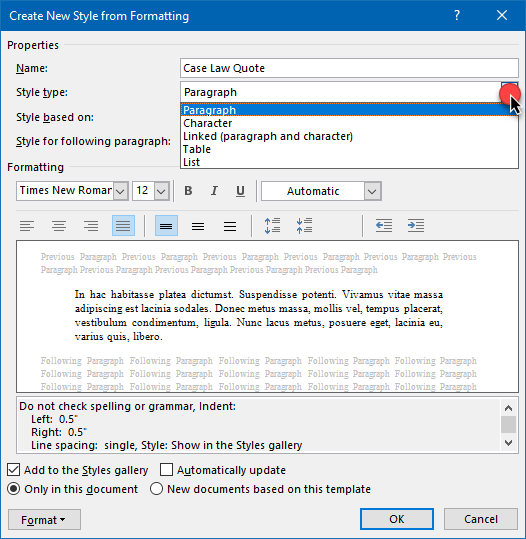
Styles come in three basic flavors: character, paragraph, and linked. That last one combines both character (e.g., font, type size, etc.) and paragraph (e.g., justification, line spacing, etc.) formatting. Unless you have a very specific need to control both the font formatting and the paragraph formatting within a single Style, pick either character or paragraph under Style type. For example, if I was creating a Style for a block quote to use for case law, I’d want that to be a paragraph Style, because all I want the Style to control is the line spacing and indentation. Otherwise, I’d want the Style to pick up whatever default font that’s already in the document I’m working in. If I were to make it a Linked Style, it would always carry over whatever font formatting happened to be present in the document I first created that Style in, which may not match my current document. That could create a huge mess you continually have to clean up, and that’s not a very efficient way to use Styles!
5. Choose Style for following paragraph deliberately
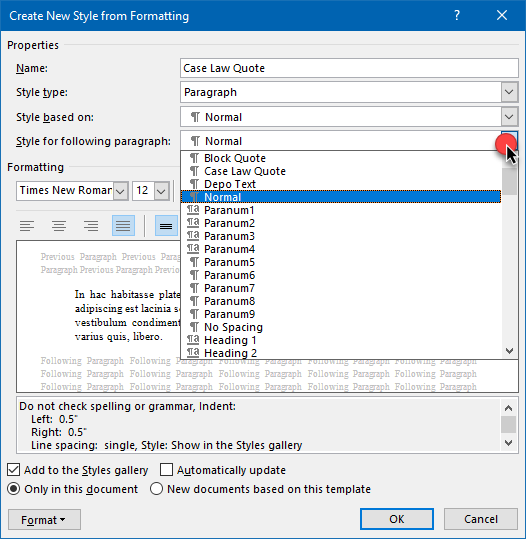
When you’re creating your own custom Styles to use in your documents, take a second to think about what’s going to happen when you press the Enter key. Do you want to keep formatting text with that same Style, or do you want to go back to Normal or some other Style?
Here’s an example: If I’m using my Block Quote Style to format some quoted case law excerpts, I may want to return to Normal text after I’m finished with that paragraph. If I’m using my Depo Text Style to format quoted deposition testimony, though, it may make more sense to continue in that same Style for multiple paragraphs.
6. Embed extra vertical space in your Style (instead of hitting hard return multiple times)
A lot of people don’t realize they can set a certain amount of space to automatically appear after each paragraph, rather than having to hit the Enter key every time they start a new paragraph.
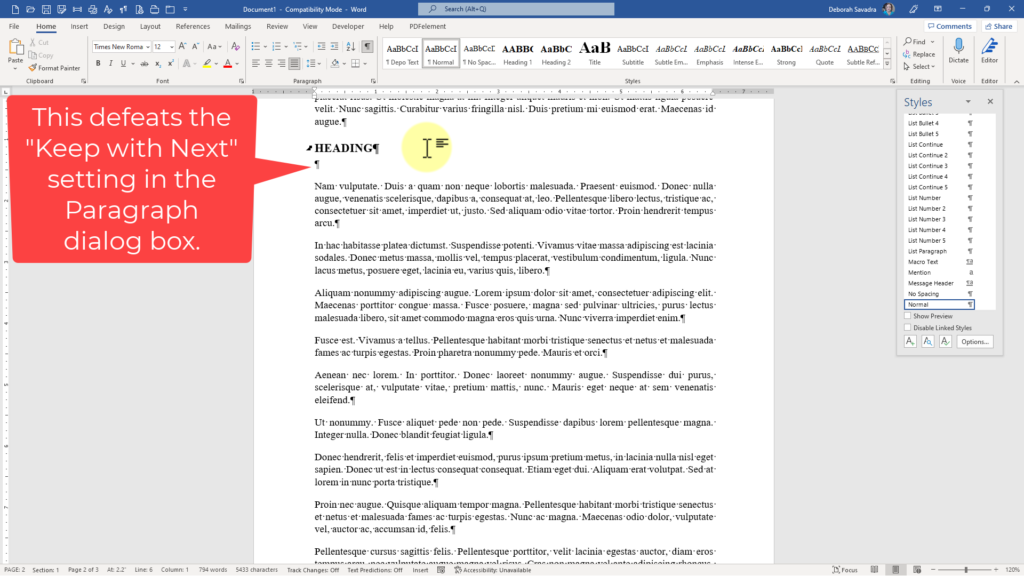
For one thing, who needs an extra keystroke? Second, putting that extra space in manually defeats the “Keep with Next” setting I showed you earlier, since the “next” in that scenario becomes a blank line rather than the first line of the next paragraph.
All you have to do to set some automatic vertical space between your paragraphs, or between your headings and their following paragraphs, is to go to the Paragraph dialog box and put a value in the Spacing After field. If you’re in the Create New Style from Formatting or Modify Style dialog box, click the Format button in the lower left-hand corner and choose Paragraph, then fill in the Spacing After field (you can either type a value straight in or use the spinner arrows to increment or decrement the number).
Now every time you hit Enter, your paragraphs and headings are very attractively spaced!