
(Note: to view this full-screen, click the full-screen button near the lower-right-hand corner of the video player.)
Microsoft Word Styles are the most basic building blocks in Word. One of the first things you’ll need to learn after you master the interface and basic formatting is using the Quick Styles listed on the Home tab. Often, though, the Quick Styles don’t contain a particular Style your document needs.
If the default Microsoft Word Styles don’t fully meet your needs (for example, you need one for block quotes), you can create a new one. There are a couple of different ways to do this. I’ll start with what I think is the easiest one first.
Creating a new Style from an example
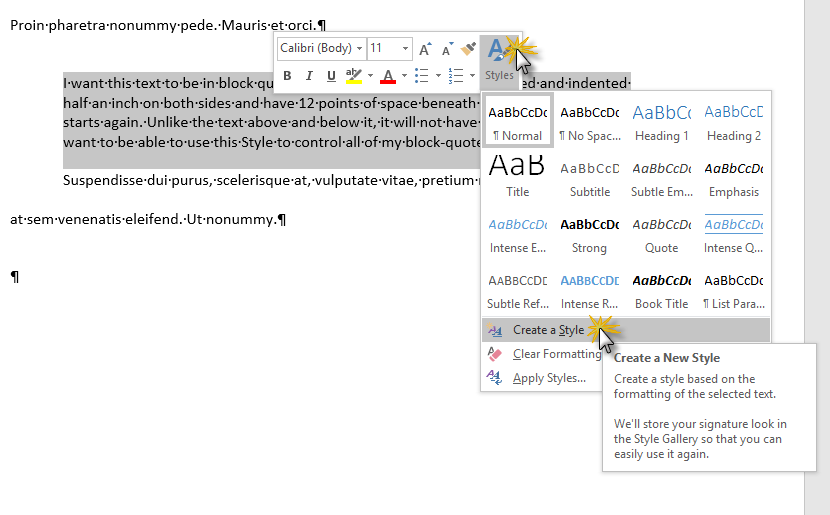
If you’ve already got some text formatted just the way you want it (going back to the previous example, a block quotation that’s already nicely indented with all the right paragraph settings), you can use it to create a new Style. The easiest way is to select the text you want the Style to emulate, right-click and select Styles, then select Create a Style:
You’ll get this dialog box:
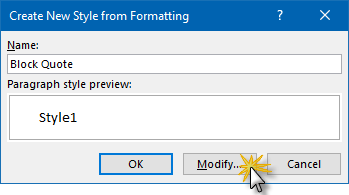
You could simply click OK here, but I want you to see what your options are in case you want something other than the defaults Word will choose for you:
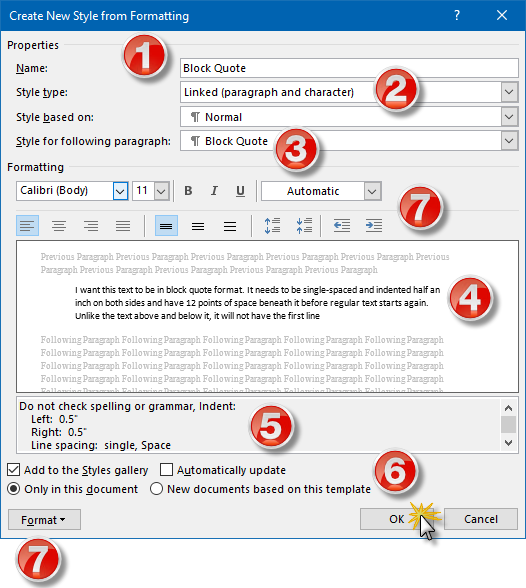
- Word will automatically name this Style1; you’ll want to rename it here if you did not already do it in the previous dialog box as I did.
- Word has several Style types: Paragraph, Character, Linked (which combines Paragraph and Character), Table and List. Since this is really intended to be a collection of paragraph settings, Linked isn’t really the best choice, because if I change the font style or size elsewhere in the document and apply Block Quote as a Linked Style, it’s going to change the text back to Calibri 11. The Style type Paragraph is a better choice in this instance.
- If I’m typing a Block Quote paragraph and I press the Enter key, what Style do I want the following paragraph to default to? That’s the question answered here. It’s a matter of personal convenience and obviously depends on what sort of document you’re working on.
- Any changes you make in formatting (see 7) will show up in this Preview window …
- … and you can review the settings themselves in this window.
- These settings control three things: (a) whether you can access this Style in the Styles Gallery on the Home tab (if you want to keep this one handy, leave that box checked); (b) whether you want any Styles to automatically update themselves based on manual formatting you do in your document (for example, if you altered the indentation on one paragraph that had the Block Quote Style applied to it, checking this box means that the Style itself reflects those changes, and all the paragraphs with Block Quote applied will change, not just the one you edited). I recommend leaving this one unchecked—it tends to wreak havoc in documents; (c) whether you want this Style to be available only within this document or any documents you create in the future in this template.
- You can make further format changes to your Style settings in both these places. The area at the top will let you make some font and spacing changes, but the Format button will take you to various dialog boxes (Paragraph, Numbering, etc.) for more advanced formatting.
Once you’ve configured everything to your liking, click OK.
Creating a new Style from scratch
If you’ve got a specific set of requirements and are fairly adept with character and paragraph formatting, though, you can simply create a new Style from scratch. For this example, I’m going to create one for quoted deposition text.
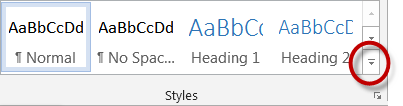
To start, click the drop-down arrow at the bottom right-hand corner of the Quick Styles area to open the Styles pane:
Then click Create a Style:

You’ll get the now-familiar dialog box:
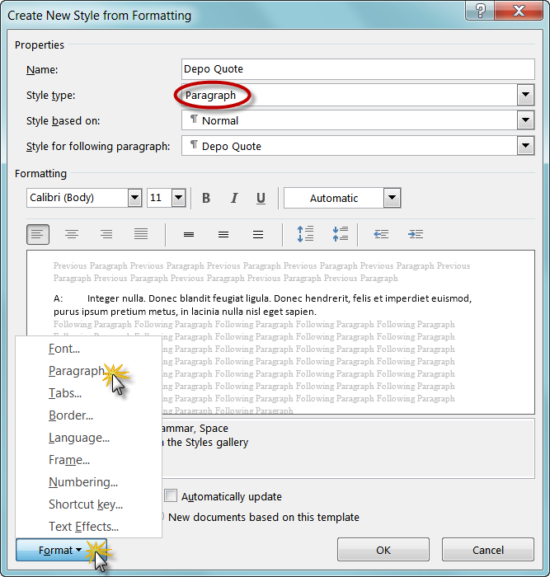
You’ll notice that I designated this to be a Paragraph Style. Since this Style is intended to control how the text indents and spaces, I want it to be independent of font settings, etc., so I can use it with any font settings in any document.
To get those indents and spacing, click on the Format button at the bottom and choose Paragraph to go to the Paragraph dialog box:
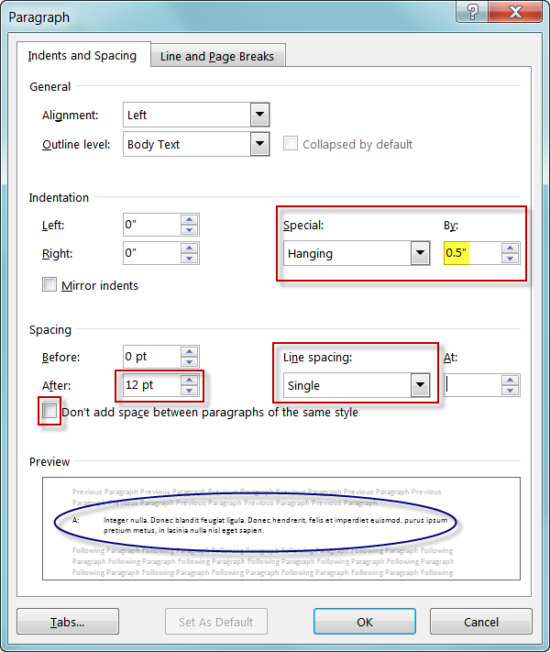
I did three things here (circled in red):
- I chose a half-inch hanging indent
- I selected Single spacing
- I inserted 12 points of space between the paragraphs and made a point of instructing Word to insert that space even between paragraphs of this same Style.
You can preview the results in the Preview pane (circled in blue above).
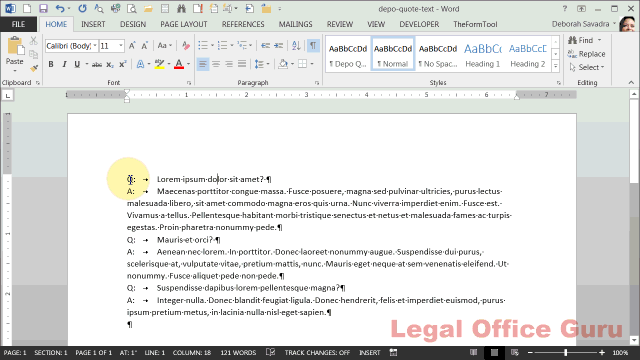
Once I click OK in both the Paragraph and New Style dialog boxes (making sure to check the settings at the bottom) and return to my document, applying the Style to the text is a matter of two clicks:
This content is part of a course
What you’ve learned here is just a small part of my Lawyer’s Guide to Microsoft Word Styles course, where you can learn how to leverage the power of Styles to control document formatting and structure and to make global document changes with just a few clicks. Click here for more information.
Hi there,
I work with Styles and Auto-Text. I also use a software interview program for Estate Planning which when the interview is complete, the program spits out a hot docs version of the document. It is formatted in its way and while it can be changed, it is time-consuming and cumbersome. I set up 3 styles that work perfectly as designed. The problem is because the hot docs assembly is not something I generated, the Styles I built cannot be used with the assembled hot docs document. Is there ANYTHING I can do to avoid having to redo the Style each document? I work with up to 50 new documents generated per week. HELP…
I’m trying to use Multi Level Lists and styles and outline levels together (horrible idea? I hope not). And would like for the first level of the List to be linked to a Style using Outline Level 2, so that it will appear in the Table of Contents.
Seems that I can only get one of two things to work, either it’s linked to the Style and the Outline Level 2 and the next line is no longer by default part of my Multi Level Outline OR it’s not linked to the Style and the Mulit Level Outline continues to work as expected. When I try to link the Style with the “List Paragraph” Style (or even “no style”), the “Outline Level” under paragraphs is grayed out. So I link it with Heading 2, but then I’m back to not having the next line be part of the list.
Make any sense? Have any ideas what I’m doing wrong or a work around? Thanks.
Word 2016 on PC, FWIW.
Thanks for your (off forum) response. I’m not sure where I finally figured out the Answer: from resources you sent me, google, or just fighting it until it submitted, but here’s what I’ve found to work.
First, make a new “Number Format” (NOT multilevel list) for the top indent level you want in your document. I used “Article *” to make Article I, II, etc. Put in some dummy text using the number format. Edit the font, color, bolding, paragraph settings, indents, tabs, etc. to your liking. Highlight the text and “Create a New Style from Formatting.” In that menu, if you want it to show up in the table of contents, under Format>Paragraph menu go to Outline level and give it a level to appear in the Outline. If you want to save this as a template and not have to go through these steps again, check “New documents based on this template.”
Repeat and make a new “Number Format” and “Create a New Style from Formatting” for every outline level you want to have. I used “Article I (Level 2); Section 1. (Level 3); 1.1 (plain text for the rest); (a); (A); (i)” which was plenty for my use.
Delete all your dummy text.
Then “Define a New MultiLevel List.” Click on “More>>.” Link the corresponding level to style. Click the next level and do it for the next.
(Maybe option additional step; not sure if this was necessary or I did something out of order and had to fix it). Put in some more dummy text and enter and tab to get to your next level. In the Style menu, “Update [each] Style to Selected Text” for each of your Styles.
Delete everything. Save as a template. Start typing (or pasting text and apply the appropriate styles).
The document will now have each of your styles formatted correctly, and will switch to the next style and level when you tab.
Now when you create a table of contents, your headers and Styles with Levels will appear. E.g.:
“Table of Contents…. 1
Parties….2
Recitals…..2
Agreement……3
Article I Purchase Agreement……3
Section 1. Assets…….3
…
Hopefully this both clears up what I was trying to accomplish and (at least one way) how to get there. If it’s helpful to anyone, it’s yours. If you’ve got a better way to get there, I’d be interested.
Oops, I realize that adding spaces didn’t make tabs in the web form. Final TOC looks like:
Agreement……3
Article I Purchase Agreement……3
Section 1. Assets…….3
That didn’t work either. How about this :
Agreement……3
(TAB) Article I Purchase Agreement……3
(TAB) (TAB) Section 1. Assets…….3
Nice post. Thanks. Once I get finished with a scheduled trial, I really want to figure out styles. Getting the step-by-step information and the animation you provide, it is much easier to conceptualize and remember. Do you have a searchable resource or one with an index? It would be helpful to get to these tips as an issue comes up. Keep the styles posts coming.