
When it comes to displaying information side-by-side, it’s tough to beat Tables in Microsoft Word for ease of use and stability. But most Word users don’t know the ins-and-outs of formatting tables, so they don’t appreciate just how flexible they can be. Here are my seven favorite table tricks (video timestamps shown for each trick):
Repeat Header Rows (1:05)
If you’ve got a table in your document that spans across more than one page, you’ve probably seen this happen: the rows on the second and subsequent pages don’t have a header, so you have a hard time telling one column from another.
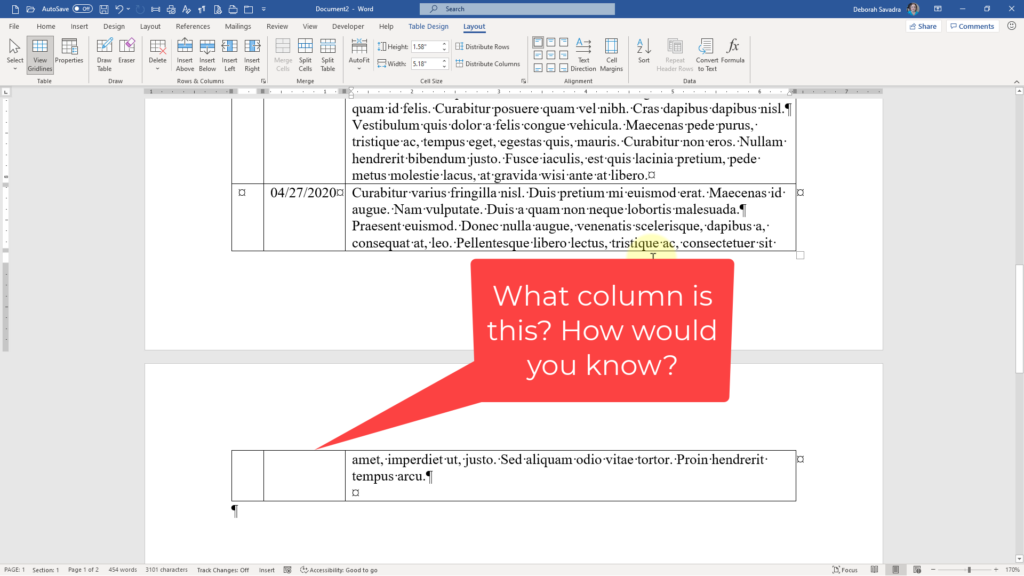
Fortunately, this is easy to fix. Just hover your mouse just to the left of the row or rows you want repeated on every page, then click to select that row or rows. You’ll see two more contextual tabs pop up above the Ribbon on the far right: Table Design and Layout. Click on the Layout tab, then in the Data command group, click Repeat Header Rows. That’s it! That row or rows will repeat at the top of the table on every page.
Stop row splitting (1:57)
You’ve probably also noticed that, if a table row on the bottom of a page is a bit too large vertically to fit on that page, Word will insert a soft page break right in the middle of the row. That can be really annoying, particularly if you’ve got information in multiple columns that really needs to be kept together to make sense.
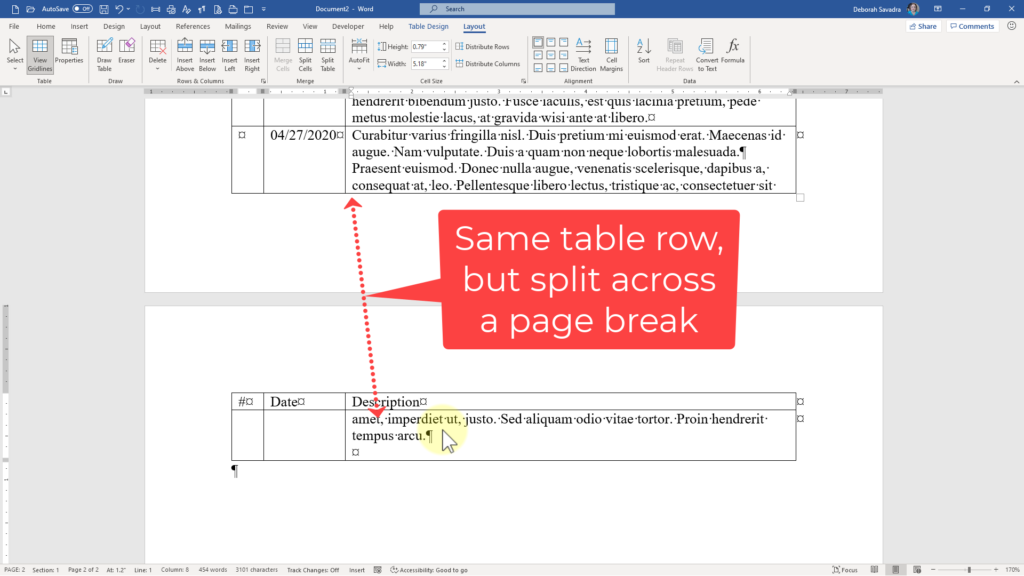
Word by default allows rows to break across page breaks, but you can turn off that setting by selecting the entire table with the crossbar that appears when you hover over the top left-hand corner of the table. Then, go to the contextual Table Layout tab, click on Properties on the left, then go to the Rows tab in the Table Properties dialog box and uncheck the box next to Allow row to break across pages. That will reset that setting for your entire table, although if you skip the “select the entire table” step, it will only reset that setting for the row your cursor happens to be sitting in.
Make table rows number themselves (3:06)
If your table rows need numbers, then here’s an easy way to get the rows to number themselves. Click your cursor into the first cell that will need a number, then go to the Home tab and, in the Paragraph command group, click the single-level paragraph numbering dropdown and pick the number format you want.
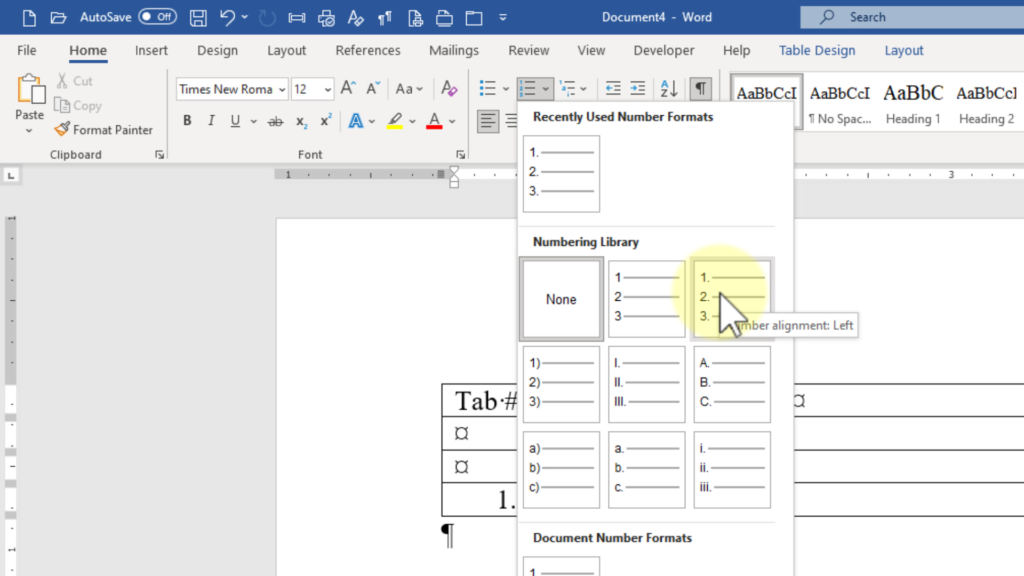
The number will likely be indented, which you may not want. That’s fixable. Just right-click on the number and and choose Adjust List Indents. Put zeros in the Number position and Text indent fields and choose Nothing in the Follow number with field, then click OK. Now, when you use the Tab key to add the next row, it’ll automatically number. If you need to insert that numbering scheme into some other unnumbered rows, use the Format Painter. Click inside the cell that has the first number, double-click the Format Painter button to make it persistent, then click into each cell that needs a number. Once you’re done numbering, press the Escape key to turn Format Painter off.
Save as a Building Block (4:37)
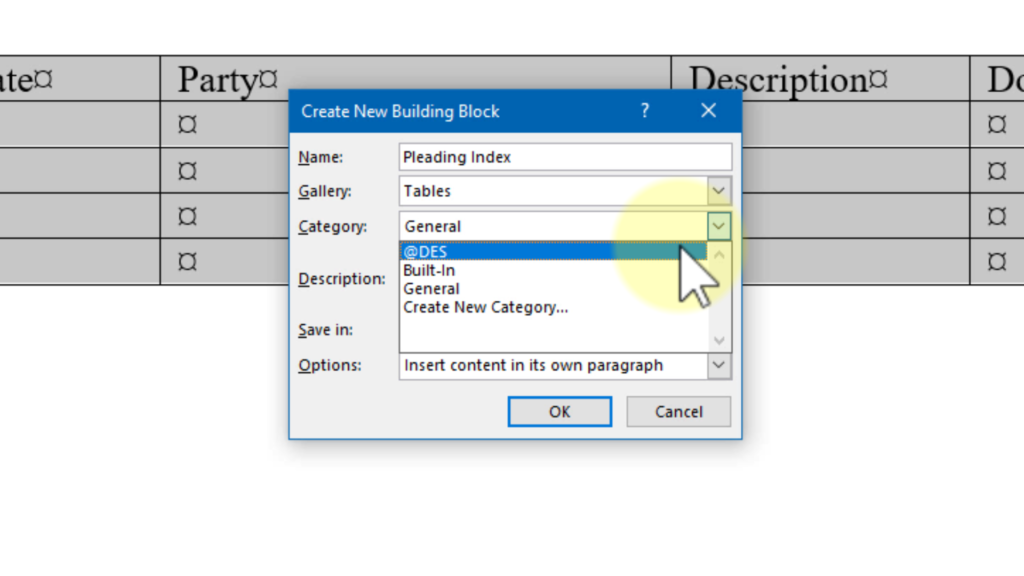
Have you created a table type you’d love to be able to use in the future? Save it as a Building Block so you can drop it into any document from the Insert > Table menu.
Once you’ve gotten your table formatted to your exacting specifications, select it with the crossbar at the top left corner of the table, then go to the Insert tab > Table > Quick Tables > Save selection to Quick Tables Gallery. You’ll get the Create New Building Block dialog box. Name it something you’ll remember. You can put it into a special category to organize it (I created an @DES category to store all my custom Building Blocks so they will always appear at the top of the list) and even store it within a specific template or just store it within the default Building Blocks template as appropriate.
Reset cell margins (6:03)
By default, tables offer a minimum of space between entries. But if you find that a little cramped, you can control it.
Put your cursor somewhere inside your table, and you’ll see the Table Design and Layout contextual tabs pop up. Choose the Layout tab on the right and click on Cell Margins. The Table Options dialog box that pops up allows you to reset top, bottom, left and right margins for every cell in the table simultaneously. Now your text has a little more breathing room!

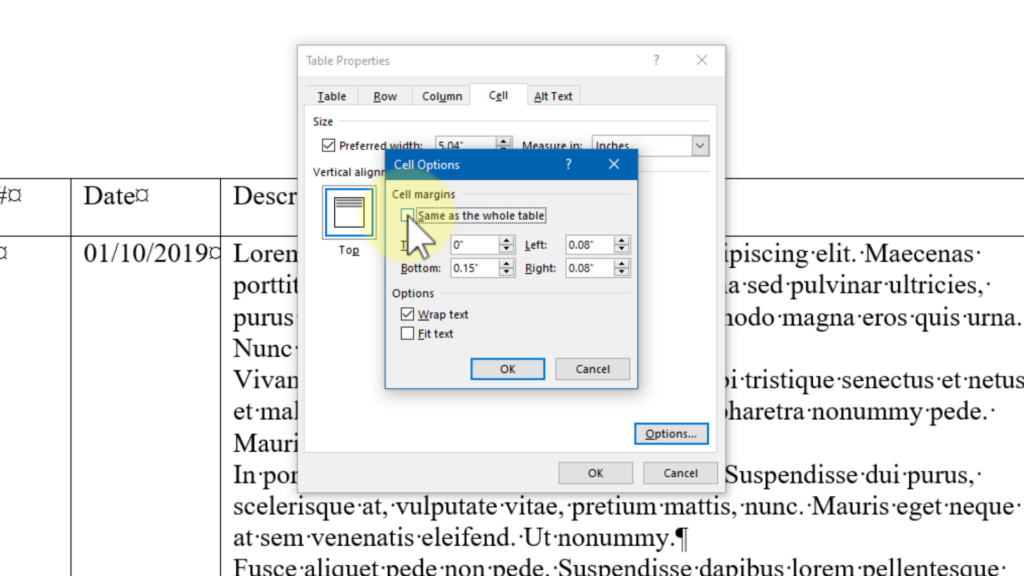
If you want to reset the margins for one particular cell or a range of cells you’ve selected, go to Table Properties and, on the Cell tab, click Options and uncheck the box next to Same as the whole table. Then, you can reset the margins for just the cell or cells you want.
(By the way, this trick also comes in handy when you’re working with labels in Word, particularly if you find your text is sitting uncomfortably close to the top margin. Just reset that top margin to move your text down a bit.)
Stop automatic cell resizing (7:30)
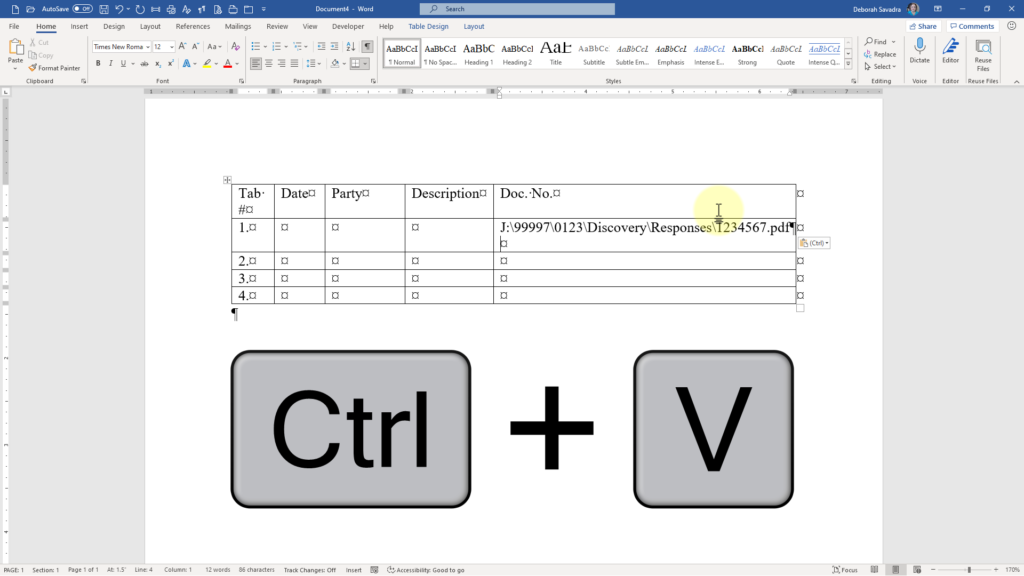
One default setting I personally find really annoying is a table column resizing itself if I happen to paste in text that’s too long to fit onto a single line in the cell. That’s why I routinely turn that setting off so I can manually control my column size.
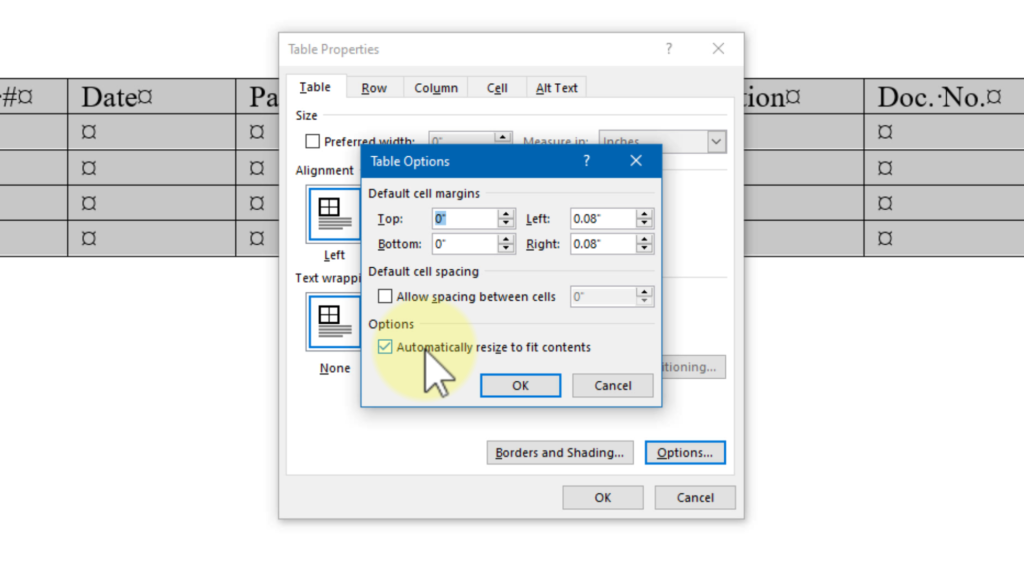
To do that, select the entire table by hovering over the top left-hand corner of the table and click the crosshair that appears, or using the Select Table button in the Table Layout tab. Then, go to Properties, and on the Table tab of the Table Properties dialog box, click Options and in the Table Options dialog box, uncheck the box next to Automatically resize to fit contents, then click OK and OK again.
Now you have total control over the sizing of your columns!
Add a new row/column with the plus sign (8:37)
If you’re in the last cell of your table and want to add a new row to the end of your table, all you have to do is press the Tab key. But what if you want to add a new row in the middle of your table, or you want to add a new column?
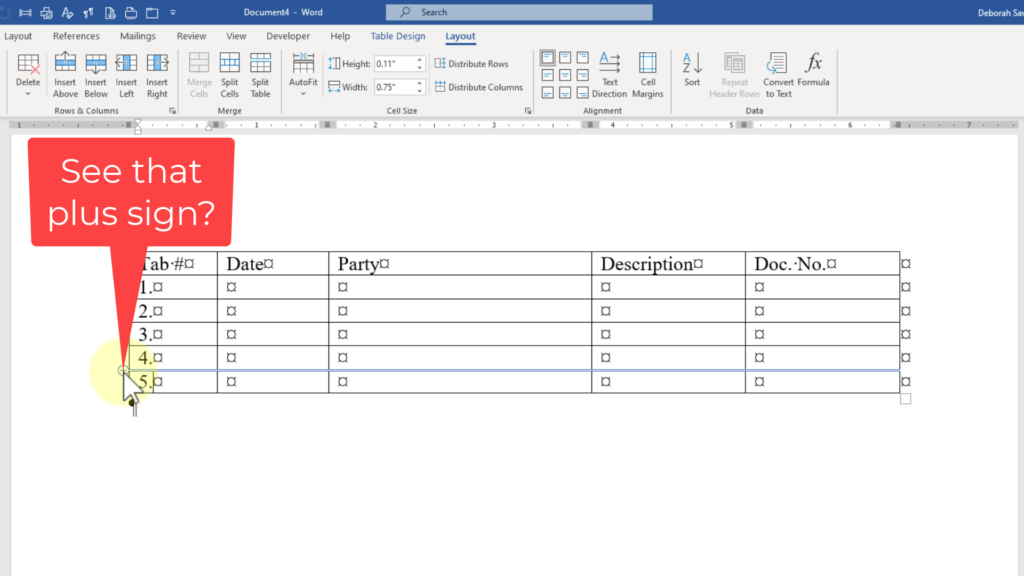
Just hover your mouse over the border between the cells where you’d like to place your new row or column and click the plus sign that appears. Voila! There’s your new row or column!
Learn more about tables with a sample course lesson
If you’d like to learn more about tables, I’ve got several lessons dedicated to tables within my Basic Word Skills for Legal Professionals course. In those lessons, I show you not only how to create tables, but how to make them a useful tool within your documents: sorting rows, controlling formatting, resizing table rows and columns, plus when you should use tables versus columns for displaying text side-by-side. Check out a sample lesson in the course now by clicking this link.
