
One of the most fun discoveries new Microsoft Word users make is the self-updating date. You may already know exactly what I’m talking about: you click a couple of times, and suddenly you’ve got today’s date embedded in your document, and it will update itself every time you open the document.
But what if what you want isn’t necessarily today’s date? What if you need the document to reflect the date it was saved, or printed, or created?
The good news is, you can get any of those with a couple more mouse clicks and a little know-how.
Remedial Work: How to Insert Today’s Date
For those of you who haven’t stumbled across this yet, here’s how you get today’s date into your document:
- On the Insert tab, click Date and Time.

- In the Date and Time dialog box, click the correct date format and, if you want the date to update to today’s date every time you open the document (which comes in handy for things like letterhead forms) be sure that the “Update Automatically” check box is checked.

Inserting Other Self-Updating Dates in Your Documents
Today’s date isn’t the only choice you have, however. Maybe you’re dealing with multiple drafts of a document in progress, so you need to be able to keep up with which draft you’re looking at. In that situation, you’ll want to know the date (and possibly the time, too) that draft was last saved.
For that and other dates, you’ll need to go back to the Insert tab and, instead of clicking on Date and Time, click on Quick Parts:

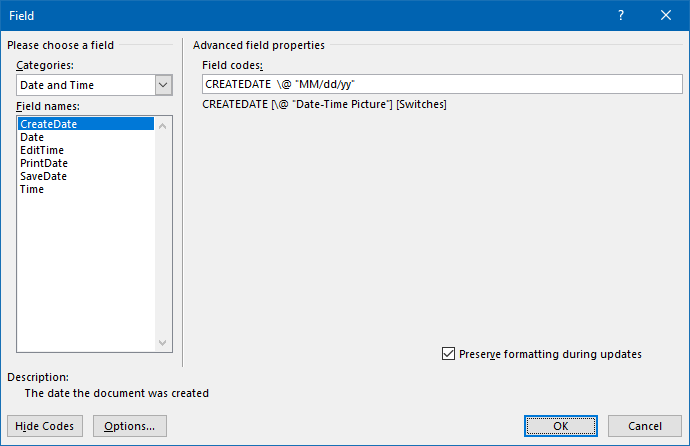
Once you click on Field, you’ll get the Field dialog box:

Notice that above, I’ve chosen the Date and Time category so that the field names list is a lot shorter. In addition to the Date field (which is essentially the same as Today’s Date seen above), you’ve got three other dates available to you:
- CreateDate — The date the document was created. (Personally, I don’t think I’ve ever used this date, but perhaps you can find an application for it.)
- PrintDate — The date the document was last printed. This could have some interesting applications in places like letterhead and certificates of service.
- SaveDate — The date the document was last saved. This is by far the one I use the most often.
Once you pick one of these dates, however, you’ve got at least one more choice to make. As you can see under Field properties, you got a variety of date formats to choose from (including some with time of day). If one of those formats works for you, simply select it and click OK.
But what if you want the date to say “10/02/22” rather than “10/2/22”? You can take a pre-configured date format and tweak it to your liking. Just click on the date format that’s closest to the one you want, then click the Field Codes button in the lower left-hand corner to see the Advanced Field Properties dialog box:
“M/d/yy” would show September 2, 2022 as “9/2/22”, whereas MM/dd/yy would show it as “09/02/22”.
If you know what “picture” you want for your date format, you can also type it directly into the Date formats field without going into Advanced field properties, using one of the pre-configured formats as a starting point as I did below:

Other formats can be adjusted in similar ways, but you may have to play with the formats a bit to get familiar with them. In any event, once you have the format to your liking, click OK to finish.
Where would this be most useful for you? Let me know in the comments below!
Very useful article. I got one of my big problem solved.
Thanks for the tip! We are always revising documents and creating “most recent” ones for further revisions. This will be a handy time saver once my boss learns it, too.
I didn’t know that you could tweak a pre-configured date format to suit your needs. Thanks for the tip!
I really appreciate your work. So valuable!
Thanks!
I write policies for my work- they are constantly being edited- the last saved will definitely be helpful to, me. I work in health care but have listened to your tutorials for several years and always find things that will pertain to my work as well. Thank you.
Glad that helped!