
In the previous post in this series, I outlined why many of the myths surrounding WordPerfect versus Word are not only just plain wrong but are also responsible for a lot of the head-banging, keyboard-smashing and not-so-nice-word-saying that goes on when legal office users work with Word.
“This whole ‘change your attitude’ thing is all well and good,” you might be thinking to yourself, “but I need actual, concrete help. Where is it?”
Hopefully, some of that help is below. Before you go diving deep into features like Styles (which I do recommend at some point), try getting a quick “bang for the buck” out of the tips below. You might be surprised how much more user-friendly you can make Word in just a few minutes’ time.
Getting Word to work with you, not against you
One of the myths I didn’t tackle last time was this: “You have to accept Word as it is.”
Baloney.
While you are a lot better off working with Word the way it’s designed, not everything is set in stone. You can customize a lot of your experience with Word and reshape it more to your liking. Let me show you a few examples.
Don’t hate on the Ribbon. Change it!
The Ribbon’s gotten a lot of hate over the years. There’s even been a plugin that, at least in the early days of Word 2007, reverted the interface back to the old menu bar style.
You don’t like the Ribbon either? You can change it. (Within reason.)
Modifying (or even hiding) the Ribbon
First of all, if you resent all the vertical space the Ribbon takes up on your screen and want a bigger editing window, just hide it.

Click that little upward-facing arrow on the far right-hand bottom corner, and your Ribbon is minimized.

Ah, that’s better!
Change your mind later? Just click any of the tab names (Insert, View, etc.) to drop the Ribbon back down again, and you’ll see a pin icon in the lower right-hand corner where the upward-facing arrow used to be:

Click that, and the Ribbon stays maximized.
That’s just the beginning of what you can do with the Ribbon. Did you know you can actually alter its contents? Just go to the File tab (or, if you’re still on Word 2007 [why?], click the Office button) and choose Options > Customize Ribbon:

You can enable and disable whole tabs by checking/unchecking them (for example, I always enable Developer, which is disabled by default) and add new groups to existing tabs and populate them with commands which are diffcult to find otherwise. You can even create your own tab with your favorite/most frequently-used commands all in one place.
Video: Create your own custom tab for your favorite commands
Getting commands where you can get at ’em
The Ribbon isn’t the only part of the interface you can customize. See right under Customize Ribbon where it says Quick Access Toolbar? That’s where you can populate the Quick Access Toolbar with all sorts of commands, since by default it’s a little … sparse.

This is an example of the Quick Access Toolbar

Here’s a quick tutorial on changing your Quick Access Toolbar:
Video: Modifying the Quick Access Toolbar
But maybe all that clicking around with your mouse exhausts you. You’re a speed typist, dang it, and you want to have your hands on the keyboard ALL. THE. TIME. What you want are some shortcut keys a.k.a. hotkeys.
Word has a couple of different ways to create shortcut keys for common tasks, depending on what you’re looking to do. If you’re tired of having to reach for the mouse and search the Insert > Symbols dialog box for a section or paragraph symbol, you can assign those to shortcut keys:
If it’s a command you want keyboard access to, that’s found on the bottom left of the Customize Ribbon dialog box:
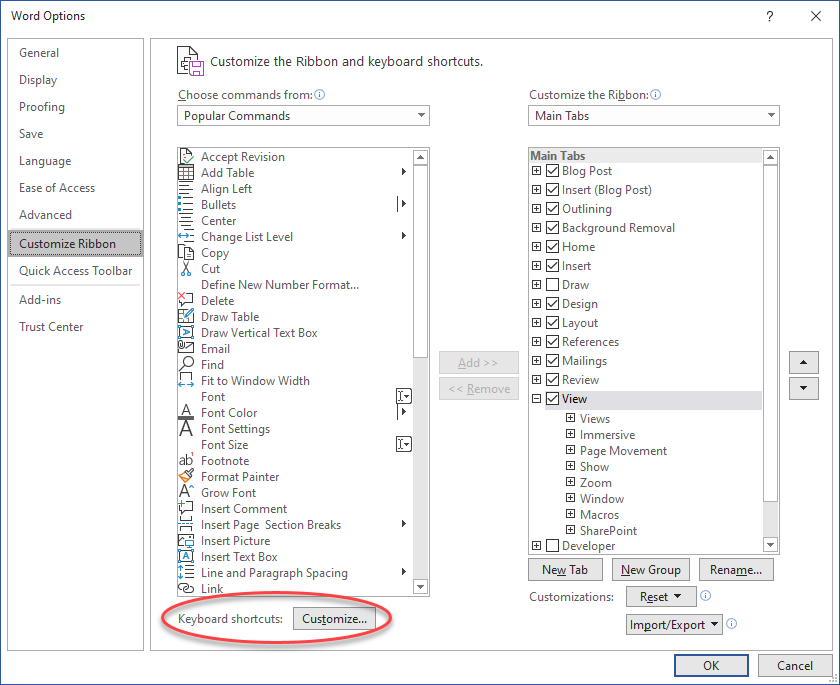
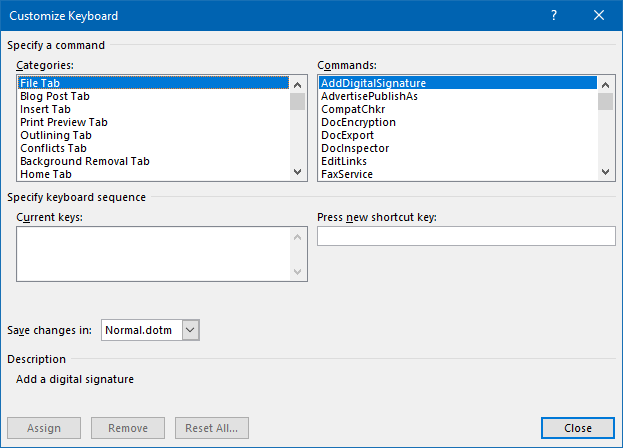
Find and select your favorite command above under Categories then Commands, click your cursor into the Press new shortcut key field, then press your desired shortcut key combination. If you’re in danger of overwriting a shortcut key assignment that’s already in use, Word will warn you (you’ll see a “currently assigned to” underneath Current keys), but if it’s for a command you’ll never use anyway, click Assign and re-assign that shortcut key to what you want it to be.
So that’s just a sample of how you can tweak Word’s interface to work with you a bit better. (Hey, it’s the computer’s job to adapt to you, not the other way around. After all, you are animate and the computer is inanimate. You’re higher on the food chain.)
So now let’s talk about changing the way things work rather than the way they look.
Settings and options
You got a look at what’s “under the hood” of Word within the Options dialog box when we explored how to change the Ribbon and make keyboard shortcuts. But there’s all sorts of useful stuff there, too, and once you know your way around it, you can get rid of minor annoyances (ever typed “(c)” and gotten ©?) and set up certain features the way you’d prefer them to work.
AutoFormat
You may have noticed, for instance, that you can be typing along, trying to get some work done, darn it, and you look up at the screen and something you didn’t ask for is there. You typed 1st and you got 1st. Or you typed a few dashes and hit Enter, and now there’s this long line across the page.
This is Word trying to do your thinking for you. You may or may not want it to.
This, too, is configurable. It’s a feature called AutoFormat As You Type, and it can either be a brilliant time-and-effort-saver, or it can be annoying as all get out. But you can keep the helpful ones and ditch the others.
Click on the File tab and choose Options and go to Proofing on the left. Click AutoCorrect Options and choose the AutoFormat As You Type tab in the dialog box:

By default, all (or nearly all) of those boxes are going to be checked. You may want to be a bit more judicious. Uncheck any boxes that look like they’d do things you don’t like. For instance, you can tell from my settings that I really don’t like Word to guess whether I want automatic numbered or bulleted lists. (If I want those, I’ll ask for them, thank you.)
Feel free to experiment. You can always come back and revise these settings later.
AutoCorrect
While we’re in this dialog box, let’s switch over to the AutoCorrect tab. Annoyed by the copyright symbol that pops up when you type “(c)”? Have a word you continually mistype (mine’s “regardign”) and want it auto-corrected? Here’s where you can make some adjustments.
As far as that annoying copyright symbol goes, you can either delete that entry altogether or change the prompt to “((c))” (I chose the latter) so it’s not popping up every time you type “(c)”.
You can also add custom entries for things you mistype a lot. Just type the wrong spelling in Replace and the correct spelling in With, then click Add.

You can delete that entry altogether …

… or add a new entry with a different prompt.
That’s not all you can do with AutoCorrect. You can also hack it to serve as a text expander (e.g., you type “BISAA” and Word expands it to “Brief in Support of American Amalgamated Consolidated Widget Corporation’s Second Amended Motion for Leave of Court to Conduct Onsite Inspection”). It’s essentially the same process as the illustration above right, but click here for a fuller how-to.
Hacks and other stuff nobody tells you
Speaking of hacks, let’s now turn our attention to a couple of other useful features you wouldn’t just stumble into while using Word.
Customizable building blocks
Word has this wonderful (at least I think it’s wonderful) feature called Building Blocks (Quick Parts is a type of Building Block). You wouldn’t know it unless you happened to notice certain things on the Insert tab:

These are built-in header Building Blocks, but you CAN add your own!
Used thoughtfully and in conjunction with templates, Building Blocks like Quick Parts can save you a ton of time putting together documents. Just as an example, I keep a pleading template (a .dotx file) in our document management system in each case that already has the case style, signature block, certificate of service, and a paragraph numbering style included.
If I need a notary acknowledgement for discovery responses, all I have to do is go to Insert > Quick Parts and click the one I already have saved in my Building Blocks. I don’t have to go searching around for the last discovery responses I created to grab a copy of that acknowledgement and make sure I change any client-specific information it has.
The same is true for letters. I already have templates built with the headers (both first page and second-and-subsequent-page) already built-in, but I also have both types of headers saved as Quick Parts in case I get a document that needs to be “converted” to a letter. A couple of clicks, and I’m done.
Access your Windows clipboard within Word
If you’ve ever had to copy-and-paste several pieces of text repeatedly, you’ve probably gotten frustrated at having to re-copy one snippet just because it wasn’t the last snippet you copied (so you couldn’t just CTRL-V it into your document).
You actually don’t have to do that. You can access your entire Windows clipboard from within Word.
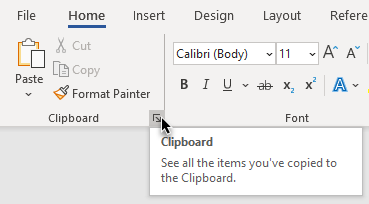
Oh, look – there’s where the Clipboard lives!
Click that, and the Clipboard pane opens on the left. Click here to learn how to leverage it.
Myth-busting time: You don’t learn Word by using it
I could go on for days about all the ways you can tweak your Word experience to your liking. This post isn’t an exhaustive list of things to tweak. Instead, I’m hoping to inspire you to look around under the hood to see what’s there. If you don’t like certain aspects of Word, you might be able to change it.
I get emails all the time from people who say they’ve been using Word for ‘X’ number of years, so they feel like they know it pretty well. But go through the list of tips above and tell me: how many of them would you have known about if someone (doesn’t have to be me) didn’t tell you about them?
… and you don’t learn Word by being “trained”, either
I could also go on a rant about how current law firm “training” practices don’t really equip law firm/department workers for real-world use of Microsoft Word. But I’ll save that rant for my next post.
Bluebook R5.3: Omission of words is generally indicated by the insertion of an ellipsis, three periods separated by spaced and set off by a space before the first and after the last period (" . . . "), to take the place of the word or words omitted.
Ever notice that manually typing . . . with the requisite spacing counts each period as a word in Word's word count? Not good when working for attorneys who like to push the word count limit of their briefs to the max. And Word's default AutoCorrectundefinedReplace text as you type for an ellipsis gets counted as one word, it doesn't contain the Bluebook's requisite spacing. The solution? Utilize thin spaces by typing 2009 alt+x wherever you want your thin space to appear — between periods, between internal and external quotation marks, etc. I have set up our firm's templates with auto-correctundefinedReplace text as you type shortcuts for these.
For some reason, in my original Comment above, the forward slash symbol is changed to the word "undefined." So anywhere you see the word "undefined," replace (in your mind) "undefined" with a forward slash. Sigh.
Yes, I’ve complained to WordPress about it. It’s just weird!
I have literally never hear of “thin spaces”. I will have to try that out. (My readers teach me so much.)
Hiding the ribbon
I double click on a tab to hide the ribbon. If you want it back you can click on any tab but this is temporary. If you want to return it permanently, double-click on any tab. I’m still using 2013; things may be different in newer versions. Hiding the ribbon removes one of my most used tools- the ruler which I always use to place and move tabs. I never use the tab menu except when using tab leaders. Double-clicking in the top half of the ruler gets me to page setup faster than any other method.
My favorite modifications
• Always have the showundefinedhide set at show- absolute necessity when formatting or troubleshooting
• Display almost all options on the status bar- you never know when this will be helpful when trouble shooting
• Have QAT shortcut for Reveal Formatting- the Shift-F1 shortcut is clumsy on a laptop
• Don’t show startup screen when opening Word
• Uncheck do grammar check with spell check- I hate the grammar checker- writing in the passive voice is not always wrong
• Uncheck option to create drawing canvass when inserting shapes
• Load Spanish and French dictionaries automatically so these words can be displayed correctly
• Unclick Ctrl-click to follow hyperlinks so just clicking works
I also use a 20 year old version of Clipmate by Thornsoft which remembers everything on the clipboard regardless of what app I am using.
I had never tried the “double-click a tab” trick before – thanks for passing that (and your other mods) on!